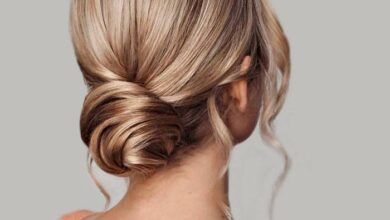
3 Ways to Perfect a Side Braid
3 Ways to Perfect a Side Braid takes center stage, and this opening passage beckons readers into a world crafted with good knowledge, ensuring a reading experience that is both absorbing and distinctly original. This guide is for everyone, whether you’re a braiding novice or a seasoned pro.
We’ll cover everything from prepping your hair to adding finishing touches, making sure you have the tools and knowledge to create a flawless side braid that turns heads. So, let’s dive in and explore the world of side braids, where beauty meets practicality.
Ready to upgrade your braiding skills? We’ll be exploring three different approaches to perfecting the side braid. We’ll break down the steps for both classic and Dutch braids, showing you how to achieve a sleek, secure braid that stays in place.
Plus, we’ll share some expert tips for adding a touch of personality with finishing touches like curling the ends, adding accessories, or creating a loose, romantic look.
Preparing Your Hair: 3 Ways To Perfect A Side Braid
The foundation of a flawless side braid lies in properly preparing your hair. The right texture and length, along with a thorough pre-braiding routine, will make all the difference in achieving a smooth, long-lasting braid.
Hair Texture and Length
While any hair type can be braided, certain textures and lengths lend themselves better to a side braid. Fine hair might require a bit more effort to achieve volume and hold, while thicker hair can be more challenging to manage.
Ideally, hair should be at least shoulder-length for a side braid to be truly visible and aesthetically pleasing. However, shorter hair can still be styled into a side braid, although it may be more of a delicate and intricate design.
So, you’ve mastered the art of the perfect side braid, right? But what about the backdrop? Maybe you’re looking for a way to elevate your look with some stunning wall decor. Check out these 21 stunning wall decor ideas to find the perfect complement to your braid and your style.
After all, the right decor can make even the simplest braid look like a masterpiece.
Prepping Your Hair
Prepping your hair before braiding is essential for achieving a smooth, polished look.
Mastering the art of the perfect side braid is all about finding the right balance of tension and technique. Whether you’re aiming for a sleek and polished look or a more relaxed, bohemian vibe, there’s a method to achieve your desired outcome.
And if you’re looking for a workout routine to complement your hairstyling skills, you might want to check out is obe fitness worth it ? They offer a wide variety of classes, including some that focus on flexibility and strength training, which can be incredibly beneficial for achieving a more sculpted and toned physique.
Once you’ve got your fitness routine sorted, you can experiment with different braiding techniques to find the perfect style to showcase your newfound confidence.
Washing and Conditioning
Start by washing your hair with a clarifying shampoo to remove any product buildup or impurities. Follow with a deep conditioner to add moisture and manageability, especially if your hair is prone to dryness.
Mastering the side braid is all about technique, practice, and the right tools. A good hairbrush is a must, and don’t forget to consider your nail game! If you’re looking for a polished look, check out this guide for perfectly manicured nails under 10 that won’t break the bank.
Once your nails are on point, you can focus on perfecting those braids. Remember, a little hairspray goes a long way to keep those strands in place.
Styling Products
After conditioning, apply a leave-in conditioner or detangler to further hydrate and detangle your hair. A styling cream or mousse can also be helpful for adding volume and hold.
Detangling and Brushing
Detangling your hair thoroughly is crucial before braiding. Use a wide-tooth comb or detangling brush to gently work through any knots or tangles. This step helps prevent breakage and ensures a smooth braid.
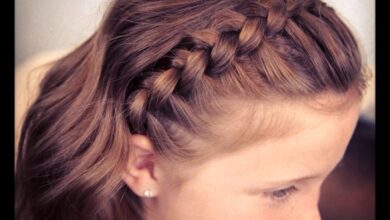
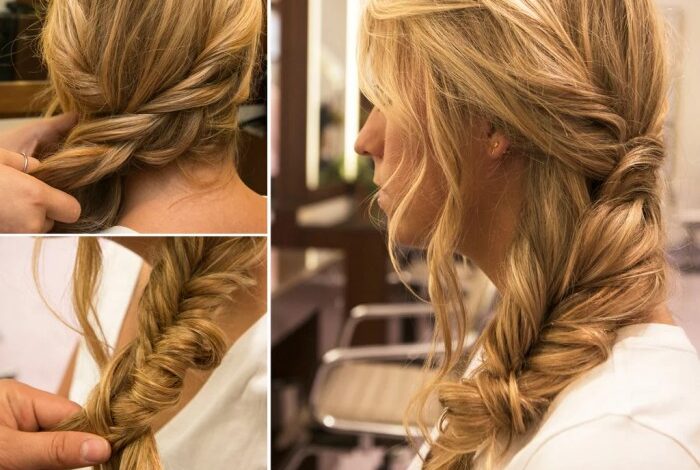
Creating the Braid
Now that your hair is prepped and ready, let’s get into the actual braiding process. There are two main types of side braids: the classic side braid and the Dutch braid. While they might look similar at first glance, there are subtle differences in their techniques that result in distinct visual outcomes.
Classic Side Braid
The classic side braid, also known as a French braid, is a versatile style that can be worn for both casual and formal occasions. It involves weaving strands of hair over each other to create a neat and secure braid.
Here’s a step-by-step guide to creating a classic side braid:
1. Divide your hair
Begin by dividing your hair into three equal sections, starting from the side where you want the braid to begin.
2. Start braiding
Take the right section of hair and cross it over the middle section. Then, take the left section and cross it over the middle section. This is the basic braiding pattern.
3. Add hair to the braid
As you continue braiding, pick up a small strand of hair from the outer edge of your head and add it to the section you’re about to cross over the middle. Repeat this on both sides of the braid, adding hair with each pass.
4. Continue braiding
Continue braiding down the side of your head, adding hair to each section as you go.
5. Secure the braid
Once you reach the bottom of your head, continue braiding the remaining hair until you reach the desired length. Secure the end of the braid with a hair elastic.
Dutch Braid
The Dutch braid, also known as an inverted French braid, is a more intricate style that creates a raised, three-dimensional braid. Unlike the classic side braid, where the strands are woven over each other, the Dutch braid involves weaving the strands under each other.To create a Dutch braid, follow these steps:
1. Divide your hair
Begin by dividing your hair into three equal sections, starting from the side where you want the braid to begin.
2. Start braiding
Take the right section of hair and cross it underthe middle section. Then, take the left section and cross it underthe middle section. This is the key difference between a Dutch braid and a classic side braid.
3. Add hair to the braid
As you continue braiding, pick up a small strand of hair from the outer edge of your head and add it to the section you’re about to cross underthe middle. Repeat this on both sides of the braid, adding hair with each pass.
4. Continue braiding
Continue braiding down the side of your head, adding hair to each section as you go.
5. Secure the braid
Once you reach the bottom of your head, continue braiding the remaining hair until you reach the desired length. Secure the end of the braid with a hair elastic.
Tips for a Perfect Braid, 3 ways to perfect a side braid
To ensure your side braid stays neat and secure throughout the day, consider these tips:
- Use hairspray:Before braiding, spray your hair with a light-hold hairspray to help tame flyaways and hold the braid in place.
- Secure with bobby pins:Once you’ve secured the braid with an elastic, use bobby pins to hold any loose strands in place, especially if you have fine or slippery hair.
- Choose the right elastic:For a sleek and secure braid, opt for a thin, clear elastic band. Avoid using thick or brightly colored elastics, as they can detract from the overall look of the braid.
Adding Finishing Touches

Once you’ve mastered the art of creating a side braid, it’s time to add some finishing touches to elevate your look. The end of your braid can be styled in various ways, and incorporating accessories can enhance its beauty. You can also create a softer, more relaxed appearance by pulling out strands of hair.
Styling the Braid Ends
The end of your side braid offers a great opportunity to express your personal style. Here are a few ways to style it:
- Leaving them loose:This is the simplest option, perfect for a casual, effortless look. It allows the braid to flow freely and adds a touch of whimsy.
- Curling them:For a more polished and elegant appearance, curl the ends of your braid using a curling iron or hot rollers. This adds volume and texture, creating a sophisticated look.
- Using a decorative hair tie:Choose a hair tie that complements your outfit and personality. You can opt for a simple elastic band, a satin ribbon, or even a beaded hair tie. This adds a touch of color and style to your braid.
Incorporating Accessories
Accessories can transform a simple side braid into a statement piece. Here are some ideas:
- Hair clips:Use bobby pins or decorative hair clips to secure stray strands and add a touch of sparkle or color. You can even create a unique design by arranging the clips in a pattern.
- Flowers:Real or artificial flowers can add a touch of romance and femininity to your side braid. You can tuck a single flower behind your ear or create a floral crown by weaving flowers throughout the braid.
- Ribbons:Ribbons can be incorporated into a side braid in many ways. You can tie a ribbon around the base of the braid, weave it through the braid, or even use it to create a bow at the end.
Creating a Loose, Romantic Feel
For a softer, more relaxed look, pull out a few strands of hair from your side braid. This will create a wispy, romantic effect, making your braid appear less structured and more natural.
“Pull out a few strands of hair from the braid, starting from the top and working your way down. This will create a more relaxed and romantic look.”