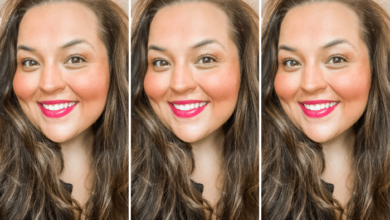
13 Tips for Flawless Face Makeup: Mistakes to Avoid
13 tips for a flawless face makeup mistakes to avoid – We’ve all been there – staring in the mirror, wondering why our makeup isn’t looking quite as flawless as we hoped. Maybe it’s a foundation that’s too light, or a concealer that’s caked on. Don’t worry, it happens to the best of us! The key to achieving a flawless face lies in understanding the fundamentals of makeup application and avoiding common pitfalls.
So, let’s dive into 13 tips that will help you master your makeup game and unlock the secret to a truly radiant complexion.
From choosing the right products to perfecting your application techniques, these tips will equip you with the knowledge you need to create a look that’s both beautiful and long-lasting. Get ready to embrace the art of makeup and transform your daily routine into a confidence-boosting experience.
Foundation Application Techniques
Applying foundation flawlessly is crucial for a polished makeup look. Achieving an even, seamless finish requires the right techniques and tools. The key is to blend the foundation seamlessly into your skin, ensuring a natural, undetectable application.
Choosing the Right Tools
The tool you choose for foundation application can significantly impact the final result. Different tools are suitable for different skin types and preferences.
- Brushes:Foundation brushes come in various shapes and sizes, each designed for specific application techniques. Flat foundation brushes are excellent for achieving a full-coverage look, while stippling brushes are ideal for a more natural, airbrushed finish. Dense brushes help to buff the foundation into the skin, creating a seamless blend.
- Sponges:Makeup sponges, like the Beauty Blender, are popular for their ability to blend foundation seamlessly and provide a dewy finish. Dampening the sponge before application helps to create a more natural, airbrushed effect. Sponges are particularly effective for blending foundation around the nose and eyes.
- Fingers:Applying foundation with your fingers can provide a warm, natural finish. The heat from your fingertips helps to melt the foundation into the skin, creating a seamless blend. However, this method may not be ideal for achieving full coverage.
Step-by-Step Guide
Follow these steps for a flawless foundation application:
- Prepare Your Skin:Before applying foundation, ensure your skin is clean and moisturized. A well-hydrated canvas helps the foundation to glide on smoothly and prevent any dry patches from appearing.
- Choose the Right Shade:Select a foundation shade that matches your skin tone perfectly. Test the foundation on your jawline in natural light to ensure a seamless blend. If you have uneven skin tone, consider using multiple shades to create a more natural look.
- Apply Foundation:Start by applying foundation to the center of your face, working outwards towards the hairline, jawline, and neck. Use small, circular motions to blend the foundation seamlessly into the skin.
- Blend Carefully:Pay particular attention to blending the foundation along the hairline, jawline, and neck to avoid any harsh lines or noticeable edges. Use a stippling motion to blend the foundation into the skin, creating a natural, airbrushed effect.
- Set with Powder:After applying foundation, set it with a translucent powder to prevent creasing and extend its wear time. Use a large, fluffy brush to dust the powder over your face, focusing on the T-zone and areas prone to oiliness.
Blending Tips
Blending is crucial for a flawless foundation application. Here are some additional tips:
- Use a Light Hand:Too much pressure can create streaks or uneven application. Use a light hand and blend gently.
- Work in Sections:Instead of applying foundation all over your face at once, work in sections to ensure a smooth, even application.
- Use a Setting Spray:A setting spray can help to lock in your makeup and prevent it from fading or creasing throughout the day.
Concealer Magic

Concealer is your secret weapon for achieving a flawless complexion. It’s the perfect tool for covering up imperfections, brightening dark circles, and creating a smooth, even canvas for your makeup. But with so many shades and textures available, it can be overwhelming to know where to start.
Let’s dive into the world of concealer and learn how to choose the right formula for your needs.
Choosing the Right Shade and Texture
The first step to mastering concealer is understanding the importance of selecting the right shade and texture. Choosing the wrong shade can lead to a cakey, unnatural look, while the wrong texture might not provide enough coverage or blend seamlessly into your foundation.
- Shade Selection:For concealing dark circles, opt for a shade that is one to two shades lighter than your skin tone. This will help brighten the under-eye area and create a more awake look. For blemishes and redness, choose a concealer that matches your skin tone exactly.
Using a concealer that is too light can make the blemish more prominent.
- Texture:Creamy concealers are ideal for covering dark circles and blemishes, as they provide excellent coverage and blend easily. Liquid concealers are great for everyday use, while stick concealers are perfect for on-the-go touch-ups.
Concealing Dark Circles
Dark circles can be a real challenge, but with the right concealer, you can make them disappear.
- Triangle Technique:Apply concealer in an inverted triangle shape under your eyes, extending from the inner corner to the outer corner, and then up towards the temple. This technique helps to brighten the entire under-eye area and minimize the appearance of dark circles.
- Blending:Use a small, fluffy brush or a beauty blender to blend the concealer outwards, ensuring it seamlessly blends into your foundation.
- Setting Powder:Set the concealer with a translucent powder to prevent creasing and keep it in place throughout the day.
Concealing Blemishes
Blemishes and redness can be easily concealed with the right concealer.
I’m all about perfecting my makeup routine, especially for festive occasions. From choosing the right foundation to mastering the perfect winged liner, I’ve learned a lot about avoiding common makeup mistakes. And let’s not forget about the outfit! I’m already planning what I’ll wear to the upcoming holiday party and browsing for inspiration on the holiday party dress – it’s all about finding the perfect balance between glam and comfortable.
Once I’ve nailed the outfit, I’ll be back to my 13 tips for flawless face makeup – after all, a perfect look is all about the details!
- Spot Treatment:Apply a small amount of concealer directly onto the blemish using a small brush or your finger.
- Dab and Blend:Dab the concealer gently onto the blemish, ensuring it is completely covered. Use a small brush or beauty blender to blend the edges seamlessly into the surrounding skin.
- Setting Powder:Set the concealer with a translucent powder to prevent it from smudging or fading.
Blending Concealer into Foundation
The key to a flawless finish is to blend your concealer seamlessly into your foundation.
- Use a Brush or Sponge:A small, fluffy brush or a beauty blender is ideal for blending concealer into foundation.
- Blend Outward:Start by blending the concealer outward, ensuring it blends seamlessly into the surrounding skin.
- Avoid Over-Blending:Over-blending can cause the concealer to disappear or become patchy.
Powder Power
Powder is the final touch in your makeup routine, helping to set your foundation and concealer, control shine, and create a smooth, flawless finish. It comes in various forms, each serving a specific purpose.
Types of Powder
Different types of powder cater to specific needs and preferences. Understanding their properties is crucial for choosing the right one for your skin type and desired effect.
- Loose Powder:This lightweight powder offers sheer coverage and a natural finish. It’s ideal for setting makeup, absorbing excess oil, and blurring imperfections without adding noticeable coverage.
- Pressed Powder:This compact powder provides more coverage than loose powder, making it suitable for touch-ups throughout the day. It’s often available in a variety of shades to match your skin tone and can be used to set foundation, conceal blemishes, or even contour.
- Translucent Powder:This colorless powder is designed to set makeup without altering the skin’s natural tone. It’s perfect for setting foundation, reducing shine, and creating a smooth, airbrushed finish.
- Finishing Powder:This powder is designed to add a final touch of refinement to your makeup look. It often has a subtle shimmer or pearlescent finish, enhancing the glow of your skin.
Setting Makeup with Powder
Setting your makeup with powder is essential for preventing shine and extending wear.
- Choose the right powder:Select a powder based on your skin type and desired effect. For oily skin, opt for a mattifying powder. For dry skin, choose a hydrating powder or a setting spray.
- Apply powder strategically:Focus on areas prone to shine, such as the T-zone (forehead, nose, and chin). Apply powder lightly to the rest of the face to set your foundation and concealer.
- Use a powder brush:A large, fluffy powder brush is ideal for applying powder evenly and softly.
- Apply powder in thin layers:Start with a light dusting of powder and build up coverage as needed. Too much powder can create a cakey look.
Applying Powder Without Caking
Applying powder without creating a cakey look requires a light touch and the right technique.
- Use a light hand:Don’t press the powder brush too hard into the skin. Instead, use a gentle, sweeping motion.
- Blend thoroughly:Make sure to blend the powder well into your skin, especially around the edges of your face.
- Dust away excess powder:Use a large, soft brush to sweep away any excess powder from your face.
- Use a damp beauty blender:For a more natural finish, apply powder using a damp beauty blender. This helps to press the powder into the skin and create a seamless look.
Eye Makeup Essentials
Eye makeup can be a powerful tool to enhance your natural beauty and express your personal style. From subtle daytime looks to dramatic evening transformations, mastering eye makeup techniques can make a significant difference in your overall appearance. To achieve flawless eye makeup that lasts, understanding the fundamentals is crucial.
Choosing the Right Eyeshadow Shades
Selecting eyeshadow shades that complement your eye color and skin tone is essential for creating harmonious and flattering eye makeup looks.
Let’s face it, flawless makeup takes practice. From blending techniques to product choices, there’s a lot to learn! But don’t worry, I’ve got your back with those 13 tips to avoid common makeup mistakes. Now, if you’re looking for a spooky touch to your Halloween decor, check out this guide on how to create a ghoulish garland.
Once you’ve mastered those makeup tips, you’ll be ready to rock your Halloween look!
- For blue eyes:Warm shades like copper, gold, and bronze can bring out the blue in your eyes.
- For green eyes:Purple, plum, and burgundy shades create a stunning contrast against green eyes.
- For brown eyes:Brown eyes are versatile and can be enhanced with a wide range of shades, including browns, greens, blues, and even pinks.
- For hazel eyes:Hazel eyes have a mix of brown, green, and gold tones, making them incredibly versatile. You can experiment with various shades, but warm tones like browns, golds, and greens are particularly flattering.
It’s also important to consider your skin tone. If you have fair skin, light shades like pinks and peaches will complement your complexion. If you have darker skin, richer shades like browns, plums, and greens will create a beautiful contrast.
Eyeliner and Mascara Mastery: 13 Tips For A Flawless Face Makeup Mistakes To Avoid
Eyeliner and mascara are essential tools for enhancing the eyes, adding definition, and creating a dramatic look. Applying them correctly can make a world of difference in your overall makeup look. Let’s explore the techniques for mastering eyeliner and mascara.
Types of Eyeliner and Application Techniques
Different types of eyeliner offer various levels of intensity and precision. Here’s a breakdown of popular eyeliner types and their application techniques:
- Liquid Eyeliner:Known for its intense color payoff and precise application, liquid eyeliner comes in a pen or bottle with a fine brush. It’s ideal for creating sharp lines and dramatic wings. To apply, start with a thin line at the lash line and gradually thicken it towards the outer corner.
For a winged effect, extend the line slightly beyond the outer corner of the eye, creating a diagonal flick.
- Gel Eyeliner:This creamy, highly pigmented formula offers a blend of precision and staying power. It comes in a pot with a small brush. Apply gel eyeliner with a small angled brush for a more controlled application. It’s suitable for creating both thin lines and bold looks.
- Pencil Eyeliner:Available in various shades and textures, pencil eyeliner is versatile and easy to use. It’s perfect for smudging and creating a soft, smoky eye look. Apply it directly to the lash line and smudge with a brush or cotton swab for a diffused effect.
For a more defined look, use a sharpener to keep the tip precise.
- Kajal Eyeliner:Traditionally used in India, kajal is a kohl-based eyeliner that is known for its intense black color and its ability to define the eyes. It comes in a stick form and can be applied directly to the waterline for a dramatic effect.
Achieving a Precise Eyeliner Wing
Creating a perfect eyeliner wing can be challenging, but with practice and the right technique, it’s achievable. Here are some tips for achieving a precise wing:
- Use a Guide:Use a piece of tape or a credit card as a guide to create a straight line. Place the guide at an angle from the outer corner of your eye towards the end of your eyebrow. This will help you create a consistent and symmetrical wing.
- Start Small:Begin with a thin line at the lash line and gradually thicken it towards the outer corner. This will help you control the shape of the wing and avoid any mistakes.
- Use Short Strokes:Instead of trying to draw the wing in one stroke, use short, precise strokes to build up the line gradually. This will give you more control and prevent any shaky lines.
- Practice Makes Perfect:Like any skill, mastering the eyeliner wing takes practice. Don’t be discouraged if your first few attempts aren’t perfect. Keep practicing, and you’ll eventually get the hang of it.
The Importance of Curling Lashes Before Applying Mascara
Curling lashes before applying mascara is crucial for enhancing the eyes and creating a more open and awake appearance. Curling lashes lift them, making them appear longer and fuller.
Applying Mascara Evenly and Without Clumping
Applying mascara evenly and without clumping is essential for a flawless look. Here are some techniques to achieve this:
- Wiggle the Wand:Instead of simply sweeping the mascara wand from root to tip, wiggle the wand at the base of your lashes to coat them evenly and prevent clumping.
- Use a Lash Comb:After applying mascara, use a lash comb to separate and define your lashes, removing any clumps and ensuring even distribution of mascara.
- Apply in Thin Coats:It’s better to apply mascara in thin coats than one thick coat. This will help to prevent clumping and allow for a more natural look.
- Avoid Pumping the Wand:Pumping the mascara wand in the tube can introduce air, which can cause the mascara to dry out and become clumpy. Instead, gently twist the wand to remove excess mascara.
Blush and Bronzer Bliss
Blush and bronzer are essential makeup tools that can enhance your natural features and create a radiant, sculpted look. Choosing the right shades and application techniques can make a world of difference in achieving a flawless finish.
Types of Blush and Bronzer
Blush and bronzer come in various forms, each with its unique characteristics and benefits.
- Powder Blush:This is the most common type of blush, available in a wide range of shades. Powder blush provides a buildable, natural-looking flush of color.
- Cream Blush:Cream blush offers a more pigmented and dewy finish. It blends easily and can be used for a natural or more intense look.
- Liquid Blush:Liquid blush provides a sheer, buildable color that melts into the skin for a natural, healthy glow.
- Powder Bronzer:Powder bronzer is a versatile product that can be used to warm up the complexion, contour the face, and add a sun-kissed glow.
- Cream Bronzer:Cream bronzer offers a more pigmented and dewy finish than powder bronzer, making it ideal for creating a natural, sculpted look.
- Liquid Bronzer:Liquid bronzer provides a sheer, buildable color that blends seamlessly into the skin for a natural, sun-kissed glow.
Choosing the Right Shades
Selecting the right blush and bronzer shades for your skin tone is crucial for achieving a flattering look.
- Fair Skin:Opt for soft pinks, peaches, and light corals for blush. For bronzer, choose light shades with a warm undertone.
- Medium Skin:You can experiment with a wider range of blush shades, from light pinks to deeper corals. For bronzer, go for medium shades with a warm or neutral undertone.
- Olive Skin:Look for blush shades in terracotta, coral, and rose tones. For bronzer, choose shades with a warm or neutral undertone.
- Dark Skin:Deep berry, plum, and brick shades are perfect for blush. For bronzer, opt for rich, warm shades with a deep undertone.
Application Techniques
Applying blush and bronzer correctly can enhance your features and create a natural, sculpted look.
- Blush:
- Apply blush to the apples of your cheeks, blending upwards towards your temples.
- For a natural look, use a light hand and blend well.
- For a more dramatic look, apply more blush and blend upwards towards your hairline.
- Bronzer:
- Use a large, fluffy brush to apply bronzer to the hollows of your cheeks, along your hairline, and under your jawline.
- Blend well to create a natural, sculpted look.
- Avoid applying bronzer too close to your eyes, as it can make you look tired.
Lipstick and Lip Liner Perfection
Achieving the perfect pout is an essential part of any flawless makeup look. Lipstick and lip liner play a crucial role in defining your lips, adding color, and enhancing your overall appearance. Choosing the right shades and mastering application techniques can make a world of difference.
Let’s delve into the art of lipstick and lip liner perfection.
Choosing the Right Shades
Selecting the perfect lipstick and lip liner shades is essential for creating a harmonious and flattering look. Here are some tips to help you choose shades that complement your skin tone and outfit:
- Skin Tone:
- Fair Skin:Opt for soft pinks, peaches, and light corals. Avoid dark, bold shades that can make your lips look washed out.
- Medium Skin:Experiment with a wider range of colors, including warm reds, berries, and plums. These shades will enhance your natural lip color.
- Olive Skin:Embrace rich reds, deep browns, and terracotta tones. These shades will create a striking contrast against your skin.
- Dark Skin:You can pull off any color, but consider bold reds, deep plums, and rich browns. These shades will make your lips pop.
- Outfit:
- Neutral Colors:Stick to nude or light pink shades to avoid clashing with your outfit.
- Bold Colors:If you’re wearing a vibrant outfit, consider a bold lipstick shade like red, berry, or plum to complement it.
- Evening Wear:Opt for a glamorous lipstick shade like red, burgundy, or deep purple for a sophisticated touch.
Applying Lipstick Evenly
Even application is key to achieving a flawless lipstick look. Here are some techniques to help you apply lipstick evenly and prevent feathering:
- Exfoliate:Gently exfoliate your lips with a lip scrub to remove dead skin cells and create a smooth surface for lipstick application.
- Moisturize:Apply a lip balm or moisturizer to hydrate your lips and prevent lipstick from drying them out.
- Lip Liner:Use a lip liner that matches your lipstick shade to define your lip shape and prevent feathering. Apply it along the natural lip line, staying within the boundaries of your lips.
- Start in the Center:Apply lipstick to the center of your lips first, then blend it outwards towards the corners.
- Use a Brush:Use a lip brush for more precise application and to ensure even coverage.
- Blotting:Blot your lips with a tissue after applying lipstick to remove excess product and set the color.
The Importance of Lip Liner
Lip liner plays a crucial role in achieving a polished lipstick look. Here’s why:
- Defining Lip Shape:Lip liner helps to define your lip shape, creating a more sculpted and defined look. This is especially helpful if your lips are thin or uneven.
- Preventing Feathering:Lip liner acts as a barrier to prevent lipstick from bleeding or feathering, ensuring a clean and crisp look. This is particularly important for bold and dark lipstick shades.
- Longer Wear:Lip liner helps to hold lipstick in place, extending its wear time and preventing it from fading quickly.
The Importance of Blending
Blending is the art of seamlessly merging your makeup products together to create a natural and flawless look. It’s a crucial step that can make or break your makeup application. Without proper blending, your makeup can look harsh, patchy, and unnatural.
Blending Tools
Blending tools play a vital role in achieving a smooth and seamless finish. Different tools are best suited for different areas of the face. For example, a fluffy brush is ideal for blending out eyeshadow, while a dense brush is better for blending foundation and concealer.
Sponges are also a popular choice for blending, as they can be used to create a more natural and airbrushed look.
- Blending Brushes:These brushes come in various shapes and sizes, allowing you to target specific areas and blend with precision. Fluffy brushes are ideal for blending eyeshadow and powder, while denser brushes are better for blending foundation and concealer.
- Blending Sponges:Sponges are versatile tools that can be used to blend a variety of makeup products, including foundation, concealer, and cream blush. They can create a more natural and airbrushed look than brushes, and they are also good for applying and blending cream products.
Tips for Achieving a Soft and Diffused Look
- Use Light, Circular Motions:When blending, use light, circular motions to seamlessly merge your makeup products. Avoid harsh strokes, as these can create streaks and lines.
- Start with a Small Amount of Product:It’s better to start with a small amount of product and gradually add more as needed. This will help you avoid over-applying and creating a cakey look.
- Blend in a Downward Motion:When blending foundation and concealer, blend in a downward motion to mimic the natural direction of hair growth. This will help create a more natural look.
- Don’t Forget Your Neck and Ears:Blend your foundation and concealer down to your neck and ears to avoid any harsh lines. This will help create a more seamless and natural look.
- Use a Setting Spray:Once you’re happy with your makeup, spritz your face with a setting spray to help lock in your look and prevent any smudging or fading.
Setting Your Look
The final step in creating a flawless face makeup look is setting it. Setting your makeup involves using a setting spray or powder to help your makeup last longer and prevent it from fading, creasing, or transferring. This step is essential for ensuring that your makeup stays put throughout the day, no matter what you’re doing.
The Importance of Setting Your Makeup
Setting your makeup is crucial for a variety of reasons. First, it helps to lock in your makeup, preventing it from smudging, fading, or transferring. This is particularly important for people with oily skin, as their skin tends to produce more oil throughout the day, which can cause makeup to break down.
Second, setting your makeup can help to create a more polished and professional look. It can also help to minimize the appearance of pores and fine lines.
Using Setting Spray
Setting sprays are a great way to lock in your makeup and keep it looking fresh all day long. They work by creating a thin film over your makeup that helps to prevent it from moving. Setting sprays come in a variety of formulas, including matte, dewy, and hydrating.
Choosing the right formula for your skin type is essential for achieving the desired finish.
Applying Setting Spray
Applying setting spray is simple and straightforward.
- Hold the bottle about 6-8 inches away from your face.
- Close your eyes and spray the mist evenly over your entire face.
- Avoid getting the spray in your eyes or mouth.
- Allow the spray to dry completely before applying any other products.
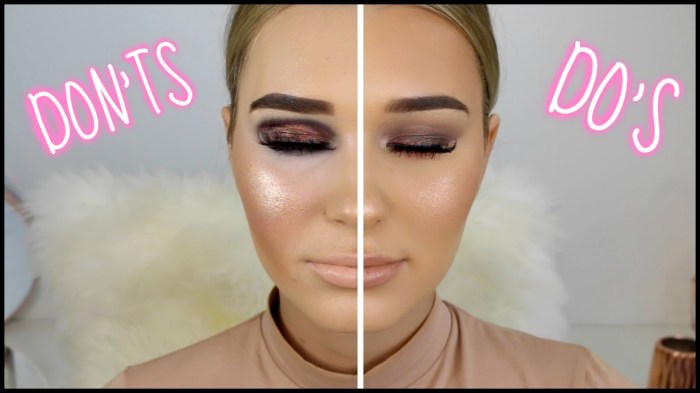
Common Makeup Mistakes to Avoid
Even with the best makeup products and techniques, common mistakes can sabotage your flawless face. These errors can range from using the wrong shade of foundation to applying too much product, ultimately resulting in a less-than-desirable look. Understanding these pitfalls and learning how to avoid them can significantly enhance your makeup game, helping you achieve a natural and polished appearance.
From blending techniques to choosing the right foundation, there’s a lot to consider when aiming for flawless face makeup. And let’s not forget about the finishing touches! A cute hair bow can elevate any look, but keeping them organized can be a challenge.
Luckily, there are some creative solutions out there, like those featured in this article on 7 ideas for hair bow holders. Once you’ve mastered the art of bow storage, you can truly focus on perfecting your makeup routine.
Using the Wrong Foundation Shade
Choosing the right foundation shade is crucial for a seamless and natural-looking base. Using a shade that is too light can make your face appear ashy or unnatural, while a shade that is too dark can create a mask-like effect.
- Test foundation on your jawline:This area provides a more accurate representation of your skin tone compared to the back of your hand, which can be lighter.
- Consider your undertone:Determine whether your skin has warm, cool, or neutral undertones. Warm undertones have yellow or golden hues, cool undertones have pink or red hues, and neutral undertones have a mix of both.
- Blend thoroughly:Ensure that the foundation is blended seamlessly into your skin, especially around the jawline and hairline, to avoid any visible lines or color discrepancies.
Applying Too Much Foundation
While foundation is essential for creating an even canvas, applying too much can lead to a heavy, cakey look. It can also clog pores and accentuate fine lines and wrinkles.
- Start with a small amount:Begin with a pea-sized amount of foundation and build up gradually if needed.
- Use a damp beauty blender or sponge:This will help to sheer out the foundation and create a more natural finish.
- Less is more:Remember that a thin layer of foundation is usually sufficient for a flawless look.
Skipping Primer
Primer acts as a barrier between your skin and makeup, creating a smooth and even surface for application. Skipping this step can result in makeup settling into fine lines, pores, or dry patches.
- Choose a primer suitable for your skin type:There are primers specifically designed for oily, dry, or combination skin.
- Apply a thin layer:A small amount of primer is all you need.
- Let it dry completely:Before applying foundation, allow the primer to dry thoroughly to ensure optimal results.
Ignoring Eyebrow Shaping
Well-defined eyebrows can frame your face and enhance your overall look. Neglecting eyebrow shaping can make your face appear unfinished or unbalanced.
- Define your brow shape:Use a brow pencil or powder to fill in sparse areas and define the shape of your brows.
- Brush your brows:Use a spoolie brush to brush your brows upwards and outwards, creating a natural and polished look.
- Consider professional shaping:If you’re unsure about shaping your brows yourself, consider visiting a professional for expert advice and guidance.
Overusing Setting Spray
Setting spray is designed to lock in your makeup and prevent it from smudging or fading. However, overusing it can leave your face feeling sticky or create a cakey finish.
- Hold the spray at a distance:Hold the setting spray about 8-10 inches away from your face when spraying.
- Mist in a “T” shape:Spray the setting spray in a “T” shape across your face, starting from the forehead, down the nose, and across the chin.
- Less is more:Apply a light mist rather than soaking your face in setting spray.
Accessorize with Confidence
The right makeup tools can elevate your application techniques and help you achieve a flawless look. Just like a skilled artist uses various brushes to create a masterpiece, you can use the right tools to enhance your makeup application and achieve professional-looking results.
Choosing the Right Tools
Selecting the appropriate tools for different makeup products and techniques is crucial for achieving a seamless and polished look. The type of brush or sponge you use can significantly impact the final outcome of your makeup application.
- Foundation Brushes:For a flawless foundation application, choose a foundation brush with dense, synthetic bristles. A flat foundation brush is ideal for achieving a full-coverage look, while a stippling brush allows for a more natural and buildable finish.
- Concealer Brushes:For precise concealer application, opt for a small, tapered brush with soft, synthetic bristles. This type of brush helps to blend concealer seamlessly into the skin, covering blemishes and dark circles effectively.
- Blush Brushes:A fluffy, angled blush brush is ideal for applying blush to the apples of your cheeks and blending it outwards for a natural-looking flush.
- Powder Brushes:A large, fluffy powder brush is perfect for setting your makeup with powder and creating a smooth, matte finish.
- Eye Shadow Brushes:Use a variety of eye shadow brushes for different purposes. A small, flat brush is excellent for packing color onto the lids, while a fluffy blending brush helps to soften and blend out harsh lines.
- Eyeliner Brushes:For precise eyeliner application, choose a fine, angled brush with synthetic bristles. This type of brush allows for control and precision, creating both thin and thick lines.
- Mascara Brushes:A mascara wand with a curved shape and bristles of varying lengths helps to lift, separate, and define lashes, creating a dramatic and voluminous look.
- Lip Brushes:A lip brush with a pointed tip allows for precise application of lipstick and lip liner, creating a clean and defined lip shape.
- Sponges:Beauty sponges are versatile tools that can be used for blending foundation, concealer, and cream products. A damp sponge helps to create a seamless and natural finish.
Practice Makes Perfect
Achieving a flawless face makeup look isn’t a one-time event; it’s a journey of practice and experimentation. Just like any skill, mastering makeup takes time, patience, and dedication. Remember, there’s no magic formula; it’s about finding the right products and techniques that work best for your unique features and skin type.
Learning from Makeup Tutorials
Makeup tutorials are a fantastic resource for learning new techniques and exploring different looks. They offer step-by-step instructions and visual demonstrations, making it easier to understand and replicate the techniques. When choosing tutorials, look for those created by reputable makeup artists or beauty influencers with a style that resonates with you.
- Choose tutorials relevant to your skill level.Start with beginner-friendly tutorials and gradually move on to more advanced techniques as you gain confidence.
- Pay attention to the products used.Note the brands and types of products the artist recommends, as they often provide insights into the best choices for achieving specific looks.
- Practice the techniques regularly.The more you practice, the more comfortable and confident you’ll become. Don’t be afraid to experiment and try different approaches to find what works best for you.
Practicing Regularly, 13 tips for a flawless face makeup mistakes to avoid
Consistency is key to improving your makeup skills. Set aside dedicated time for practicing, even if it’s just for 15-20 minutes a day. This allows you to experiment with different products, techniques, and looks without feeling rushed or pressured.
- Practice on your non-dominant hand.This can help you develop better control and precision, which translates to smoother application on your face.
- Start with a clean face.This ensures a smooth canvas for your makeup and allows you to practice applying products on a fresh surface.
- Don’t be afraid to make mistakes.Makeup is meant to be fun and expressive. Experimentation is part of the learning process. Embrace your mistakes as opportunities to learn and improve.