DIY Arm Knitting Infinity Scarf: A Cozy and Chic Project
DIY arm knitting infinity scarf is a wonderfully simple and rewarding craft that allows you to create a stylish and cozy accessory with just your arms and some yarn. This technique, where you use your arms as knitting needles, is surprisingly easy to learn and offers a unique way to express your creativity.
Whether you’re a seasoned knitter or a complete beginner, arm knitting is a fantastic way to create a beautiful and functional piece. The process is incredibly relaxing, and the results are truly impressive. Imagine draping a luxuriously soft and chunky infinity scarf around your neck, crafted entirely by your own hands.
The satisfaction of creating something so beautiful and practical is truly unbeatable.
Step-by-Step Guide to Arm Knitting an Infinity Scarf: Diy Arm Knitting Infinity Scarf
Arm knitting is a fun and easy way to create a chunky and cozy infinity scarf. You only need your arms and some yarn to get started. This guide will walk you through the process step by step.
Materials
You will need the following materials to arm knit an infinity scarf:* Yarn:Choose a bulky weight yarn for a thicker scarf. You will need about 150-200 yards of yarn, depending on the desired length and width of the scarf.
Scissors
To cut the yarn.
Step 1: Casting On
Casting on is the first step in arm knitting. This is where you create the initial loop on your arm that you will use to knit the rest of the scarf.* Wrap the yarn around your dominant hand.Wrap the yarn around your dominant hand twice, making sure the yarn crosses over itself.
- Hold the yarn tails.Hold the two yarn tails together with your dominant hand, keeping the yarn wrapped around your hand.
- Slide the loop onto your arm.Slide the loop over your arm, towards your elbow.
- Repeat steps 1-3.Repeat steps 1-3 to create a second loop on your arm.
You should now have two loops on your arm, ready for the next step.
I love the cozy feel of a chunky arm-knitted infinity scarf, but sometimes I crave just a little more – a pop of color, a unique texture, or even a bit of sparkle. That’s where the magic of just a little more comes in! Adding a few extra details to your arm-knitting project can transform it from simple to stunning, making it a truly personal and eye-catching accessory.
Step 2: Knitting
Knitting is the process of creating the actual fabric of the scarf. This is done by transferring loops from one arm to the other.* Transfer the loop from your dominant arm to your non-dominant arm.Use your dominant hand to pull the loop from your dominant arm over your non-dominant arm, creating a loop on your non-dominant arm.
DIY arm knitting an infinity scarf is a fun and relaxing way to unwind. The rhythmic motion of the yarn, the feeling of the wool in your hands, it all brings a sense of calm and focus. It’s a perfect activity to do while enjoying the peace of nature, which, as the article natural joy how connecting with nature can uplift your life explains, can have a profound impact on our well-being.
Once you’ve finished your cozy scarf, you can wear it proudly, knowing that you created something beautiful with your own hands and a little bit of nature’s magic.
- Transfer the loop from your non-dominant arm to your dominant arm.Use your non-dominant hand to pull the loop from your non-dominant arm over your dominant arm, creating a loop on your dominant arm.
- Repeat steps 1-2.Repeat steps 1-2 to continue knitting.
Keep knitting until you reach the desired length of your scarf.
Step 3: Binding Off
Binding off is the final step in arm knitting, where you close off the end of the scarf.* Transfer the loop from your dominant arm to your non-dominant arm.Transfer the loop from your dominant arm to your non-dominant arm.
- Slide the loop off your arm.Slide the loop off your arm, keeping it on the yarn.
- Cut the yarn.Cut the yarn, leaving a long tail.
- Thread the tail through the loop.Thread the tail through the loop on the yarn.
- Pull the tail tight.Pull the tail tight to secure the end of the scarf.
You have now completed your infinity scarf!
Step 4: Joining the Ends, Diy arm knitting infinity scarf
Once you have finished knitting and binding off your scarf, you will need to join the ends to create the infinity loop.* Overlap the ends of the scarf.Overlap the ends of the scarf, making sure the edges are aligned.
Sew the ends together.Sew the ends of the scarf together using a needle and thread.
Your infinity scarf is now ready to wear!
Arm knitting an infinity scarf is a fun and easy project, and it’s a great way to use up leftover yarn. It’s also a good reminder that even when things break, like an umbrella, you can still find a way to use them.
For example, did you know you can make a parachute out of a broken umbrella ? It’s a fun and creative way to repurpose something that might otherwise be thrown away. And just like that umbrella, a little bit of creativity can turn your leftover yarn into a stylish new accessory!
Variations and Customization Options

Arm knitting is a versatile craft that allows for endless possibilities in creating unique and personalized infinity scarves. You can experiment with different stitch patterns, embellishments, and yarn choices to create a scarf that reflects your style and preferences.
Stitch Patterns
The basic arm knit stitch is simple and easy to learn, but there are several other stitch patterns that can be used to add texture and visual interest to your scarf.
- Double Knit Stitch:This stitch creates a thicker and more substantial fabric, making it perfect for a cozy winter scarf. To create a double knit stitch, simply wrap the yarn around your arm twice before passing it over the other arm.
- Rib Stitch:The rib stitch is a classic knit pattern that creates a textured and stretchy fabric. To create a rib stitch, alternate between wrapping the yarn around your arm once and twice.
- Cable Stitch:This stitch creates a more intricate and sophisticated look. To create a cable stitch, you will need to use two arms and cross the yarn over and under each other.
Embellishments
Adding embellishments to your arm knit infinity scarf is a great way to personalize it and make it even more unique.
- Tassels:Tassels are a classic embellishment that adds a touch of bohemian flair to any scarf. You can make your own tassels from yarn or purchase pre-made tassels.
- Beads:Beads can be strung onto the yarn before or after arm knitting to add a touch of sparkle and color.
- Pom-poms:Pom-poms are a fun and playful embellishment that adds a touch of whimsy to any scarf. You can make your own pom-poms from yarn or purchase pre-made pom-poms.
Color Choices and Yarn Textures
The color and texture of the yarn you choose will have a significant impact on the overall look and feel of your infinity scarf.
- Color:Choose a color that complements your wardrobe or reflects your personal style. You can also use multiple colors to create a striped or ombre effect.
- Texture:The texture of the yarn will affect the drape and feel of your scarf. Choose a yarn with a texture that you find comfortable and appealing. For example, a chunky yarn will create a thicker and more substantial scarf, while a fine yarn will create a lighter and more delicate scarf.
Finishing Touches and Care s
You’ve successfully arm-knitted your infinity scarf, and now it’s time to give it that final touch of perfection and learn how to keep it looking its best for years to come. Here’s a guide on how to finish, block, and care for your handmade creation.
Finishing the Scarf
Once you’ve finished arm knitting your infinity scarf, you’ll need to secure the ends to prevent unraveling. Here’s how:
- Weave in the ends:This is the most common method. Take the loose ends and weave them through the last few stitches of the scarf, hiding them within the fabric.
- Tie a knot:Tie a secure knot at the end of the scarf, then weave the tail through the last few stitches to conceal it.
- Sew the ends:Use a tapestry needle and yarn to sew the ends together, creating a neat and secure finish.
Blocking and Shaping the Scarf
Blocking helps to even out the stitches and give your scarf a more polished look. It’s particularly important for arm-knitted scarves, as the stitches can be quite loose. Here’s how to block your scarf:
- Wet blocking:This method involves soaking the scarf in lukewarm water for a few minutes, then laying it flat on a towel to dry. You can use pins or weights to help shape the scarf.
- Dry blocking:For this method, you’ll need to pin the scarf to a blocking board or foam mat. You can use pins or weights to stretch out the stitches and shape the scarf.
It’s essential to use a yarn that is suitable for wet blocking. Check the yarn label for instructions.
Caring for Your Arm-Knitted Scarf
- Hand washing:Always hand wash your arm-knitted scarf in cool water with a mild detergent. Avoid using harsh chemicals or bleach, which can damage the yarn.
- Gently squeezing:After washing, gently squeeze out excess water, but avoid twisting or wringing the scarf.
- Laying flat to dry:Lay the scarf flat on a towel to dry, away from direct sunlight or heat. Avoid hanging the scarf, as this can stretch it out of shape.
Inspiration and Ideas for Arm Knitting Projects

Arm knitting is a fantastic craft that allows you to create unique and beautiful projects using only your arms and some yarn. While infinity scarves are a popular choice, there are many other exciting possibilities to explore. Let’s delve into some inspiring examples and ideas to spark your creativity.
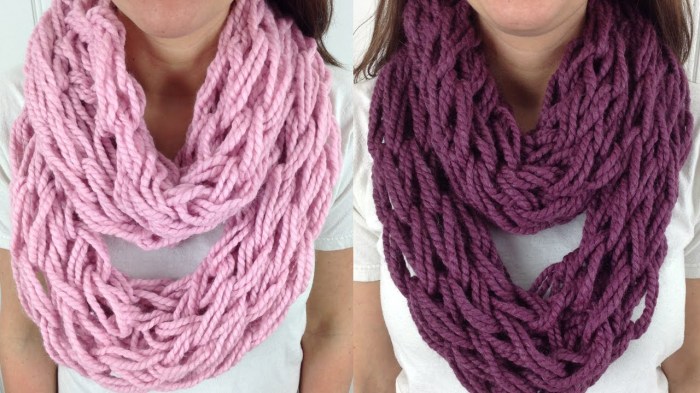
Examples of Arm-Knitted Infinity Scarves
Arm-knitted infinity scarves come in various styles and textures, adding a personal touch to your wardrobe. Here are some examples to inspire your next project:
- Chunky and Textured:A thick, chunky yarn creates a warm and cozy infinity scarf with a rustic appeal. Consider using a wool blend for extra warmth or a cotton blend for a lighter option.
- Color Block:Experiment with different colors of yarn to create striking color blocks within your scarf. You can use two or more colors to create stripes, ombre effects, or even geometric patterns.
- Cable Knit:Arm knitting allows you to create intricate cable patterns, adding a sophisticated touch to your scarf. Use a medium-weight yarn for a more defined cable design.
Other Arm Knitting Projects
Beyond infinity scarves, arm knitting opens up a world of possibilities for crafting unique and beautiful items.
- Blankets:Create cozy and oversized blankets for your living room or bedroom. Choose a bulky yarn for a luxurious feel or a lightweight yarn for a more airy blanket.
- Hats:Arm-knitted hats can be a fun and quick project. You can use different yarn weights and textures to create different styles, from slouchy beanies to warm winter hats.
- Poufs:Arm-knitted poufs add a touch of bohemian charm to your home decor. Use a thick yarn and fill the pouf with stuffing for a comfortable and stylish seat.
- Bags:Arm knitting can be used to create sturdy and stylish bags. Choose a durable yarn and add a lining for a functional and fashionable bag.
Experimenting with Designs and Techniques
The beauty of arm knitting lies in its versatility. Don’t be afraid to experiment with different yarns, colors, and techniques to create your unique projects.
- Yarn Weight:Experiment with different yarn weights to create different textures and thicknesses. Bulky yarns create thick and cozy pieces, while fine yarns create delicate and airy projects.
- Yarn Types:Explore different yarn types, such as wool, cotton, acrylic, or linen, to achieve different looks and textures. Wool is warm and soft, cotton is breathable, acrylic is durable, and linen is natural and strong.
- Color Combinations:Don’t be afraid to mix and match colors to create unique and eye-catching designs. You can use contrasting colors for a bold statement or complementary colors for a more subtle look.
- Techniques:Explore different arm knitting techniques, such as adding beads, fringes, or tassels, to personalize your projects.