Amazing Dresser Turned TV Stand Makeover: A DIY Project
Amazing dresser turned TV stand makeover: Have you ever looked at an old piece of furniture and seen its potential for a whole new life? I recently tackled this project and transformed a tired old dresser into a stylish and functional TV stand.
It was a rewarding experience, and I’m excited to share the process with you.
This project is all about embracing the art of repurposing. Not only is it a great way to give new life to an old piece of furniture, but it’s also a sustainable way to create something unique and personal.
You’ll be amazed at how much character and charm a simple dresser can bring to your living room when transformed into a TV stand.
Dresser Preparation
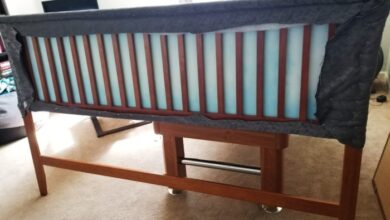
The first step in transforming your dresser into a stunning TV stand is preparing it for the makeover. This involves cleaning, sanding, and filling any imperfections to create a smooth and even surface for painting.
Cleaning the Dresser
Thoroughly clean the dresser to remove any dust, dirt, grease, or grime. This will ensure that the paint adheres properly and creates a lasting finish. Use a damp cloth with mild soap and water to wipe down the entire surface of the dresser.
I’m so thrilled with how my old dresser transformed into a stylish TV stand! It’s amazing what a little paint and some new hardware can do. Speaking of transformations, I recently threw a carnival-themed birthday bash for my niece, complete with cotton candy, a ring toss game, and even a clown! It was a blast ! Now, back to my dresser-turned-TV-stand, I’m planning to add some fun carnival-inspired decorations to really tie the room together.
Be sure to dry it completely before proceeding to the next step.
My amazing dresser turned TV stand makeover was a total game-changer for my living room! I love how it adds a touch of vintage charm and provides ample storage space. To add a personal touch, I decided to create a shutter message board above the TV to display family photos and inspiring quotes.
Now, my living room is a cozy and inviting space that truly reflects my style.
Sanding the Dresser, Amazing dresser turned tv stand makeover
Sanding the dresser is crucial for achieving a smooth and even surface for painting. Use a medium-grit sandpaper to smooth out any rough spots, scratches, or imperfections. Sand in the direction of the wood grain to avoid creating any visible scratches.
My amazing dresser turned TV stand makeover was a total success! I added a few finishing touches to really tie it all together, and that’s where this fun DIY project comes in. I used some ric rac, burlap, and felt to make adorable little accessories in just 15 minutes – check out the tutorial ric rac burlap and felt accessories in 15 minutes for the full instructions! They add a touch of whimsy and personality to the whole setup.
Now my TV stand is a stylish focal point in the living room, and I’m loving the results!
For a more polished finish, you can follow up with a fine-grit sandpaper.
Removing Hardware and Filling Holes
Remove all existing hardware from the dresser, including drawers, knobs, and handles. This will allow you to paint the entire surface evenly. Use a screwdriver or wrench to remove the hardware. Once removed, fill any holes left by the hardware with wood filler.
Allow the wood filler to dry completely before sanding it smooth.
Priming the Dresser
Priming the dresser is essential for creating a durable and long-lasting paint finish. Primer helps the paint adhere to the surface and prevents it from chipping or peeling. Apply a coat of primer to the entire dresser, ensuring even coverage.
Let the primer dry completely before proceeding to paint.
Design and Customization: Amazing Dresser Turned Tv Stand Makeover
Now that your dresser is prepped, it’s time to unleash your creativity! Transforming a dresser into a TV stand is all about blending style, functionality, and personal touches. We’ll explore some design ideas, dive into creating a custom shelf, and discover ways to add those finishing touches that make your TV stand truly unique.
Choosing a Style
The style of your TV stand should complement your existing decor. Consider these popular options:
- Modern:Clean lines, minimalist details, and a focus on functionality. Think sleek, geometric shapes and a neutral color palette.
- Rustic:Embrace the warmth of natural wood and distressed finishes. Look for reclaimed wood, exposed grain, and iron accents.
- Industrial:This style combines raw materials like metal and wood, with exposed hardware and a rugged aesthetic. Think pipes, gears, and distressed finishes.
- Traditional:Elegant details, ornate carvings, and a timeless appeal. Choose rich colors and intricate designs.
- Mid-Century Modern:A fusion of modern and traditional elements, with clean lines, geometric shapes, and a focus on functionality. Think tapered legs, rounded edges, and bold colors.
Adding a Custom Shelf
A custom shelf can be a fantastic way to create extra storage for your electronics, media, or decorative items. Here’s how to create one:
- Measure the space:Determine the width, depth, and height of the shelf you need.
- Choose your material:Wood, metal, or even glass can be used for your shelf. Select a material that complements your chosen style.
- Cut the shelf:Use a saw to cut your chosen material to the desired dimensions.
- Attach the shelf:Use brackets or shelf supports to securely attach the shelf to the dresser. Ensure it is strong enough to support the weight of your electronics.
Decorative Touches
Small details can make a big difference. Consider these decorative touches:
- Molding:Add decorative trim around the edges of the dresser to create a more polished look.
- Hardware:Replace the existing knobs and pulls with new ones that complement your style.
- Paint:Choose a color that complements your decor or creates a bold statement.
- Distressing:Create a vintage look by distressing the paint or wood finish.
Painting and Finishing

The final step in your dresser-turned-TV-stand makeover is painting and finishing. This is where you bring your vision to life and give your piece a truly unique look. The process involves applying paint or stain, ensuring a smooth and even finish, and then sealing and protecting the surface.
Choosing the Right Paint
Choosing the right paint type and color is essential for achieving the desired look. Consider the following factors:
- Type of Paint:Chalk paint, latex paint, and oil-based paint are popular choices for furniture. Chalk paint offers a matte finish and is easy to apply, while latex paint is water-based, dries quickly, and offers a wide range of colors. Oil-based paint provides a durable, high-gloss finish but requires more preparation and ventilation.
- Color:The color you choose should complement your room’s decor and the overall style of your makeover. Consider using a color wheel to choose complementary or contrasting colors. A bold color can make a statement, while a neutral color can create a more subtle look.
- Finish:The finish of the paint can also impact the overall look. Matte finishes are popular for a rustic or vintage look, while gloss finishes provide a more modern and polished look.
Applying Paint
Applying paint evenly and smoothly is crucial for a professional-looking finish.
- Preparation:Before applying paint, ensure the surface is clean, dry, and free of dust or debris. Sanding the surface lightly can help create a smoother finish.
- Priming:Priming is an important step, especially when painting over dark or stained wood. A primer helps the paint adhere better and provides a more even finish.
- Painting:Use a high-quality paintbrush or roller for even application. Apply thin coats, allowing each coat to dry completely before applying the next. For a smooth finish, consider using a paint sprayer.
Sealing and Protecting the Finish
Sealing and protecting the finished surface is essential for longevity and durability.
- Sealing:A sealant helps protect the paint from scratches, stains, and moisture. Choose a sealant based on the type of paint used and the desired level of protection. Polyurethane sealant is a popular choice for furniture, offering a durable and water-resistant finish.
- Waxing:Waxing adds a protective layer and enhances the sheen of the paint. Apply a thin layer of wax with a clean cloth, allowing it to dry completely before buffing to a shine.
Functionality and Placement
Now that your dresser-turned-TV stand is looking fabulous, let’s make it functional and find the perfect spot for it! This is where the real magic happens, transforming your beautiful piece into a practical and stylish centerpiece.
Cable Management
Managing cords and wires is essential for a clutter-free and visually appealing TV stand.
- Cable Ties:Use cable ties to neatly bundle together similar cords, like HDMI cables, power cords, and speaker wires.
- Cable Management Boxes:These boxes offer a discreet way to hide cords and wires, keeping them organized and out of sight. They can be placed on the floor or mounted to the back of the TV stand.
- Cord Covers:For a seamless look, consider using cord covers that run along the floor or wall, hiding cords and wires while maintaining a clean aesthetic.
Storage Solutions
Your TV stand can double as a storage unit, providing ample space for your electronics, media, and other items.
- Drawers:Drawers are perfect for storing remotes, DVDs, gaming consoles, and other small items.
- Shelves:Open shelves can be used to display books, decorative items, or electronics.
- Storage Baskets:Baskets placed on shelves or in drawers offer a convenient way to organize and store items.
Positioning the TV Stand
The placement of your TV stand is crucial for both functionality and aesthetics.
- Eye Level:Position the TV stand so that the center of the screen is at eye level when seated on the couch or in your favorite viewing spot.
- Distance:Ensure enough distance between the TV and your seating area for optimal viewing experience. A general rule of thumb is to sit about 3-4 feet away from a 40-inch TV.
- Lighting:Avoid placing the TV stand in direct sunlight or near bright light sources, as it can cause glare and make the screen difficult to view.
Ensuring Stability
It’s essential to ensure that your TV stand is sturdy enough to safely support the weight of your TV and other items.
- Weight Capacity:Check the weight capacity of the TV stand and ensure it can handle the weight of your TV, along with any other items you plan to place on it.
- Leveling:Make sure the TV stand is level to prevent the TV from tilting or falling.
- Wall Mounting:If your TV is heavy or you have concerns about stability, consider wall mounting it for added security.