5 Incredibly Cute Nail Polish Tutorials
5 Incredibly Cute Nail Polish Tutorials – Want to take your nail game to the next level? Who doesn’t love a little bit of cute nail art? From simple polka dots to trendy animal prints, there’s a design out there for everyone.
Whether you’re a seasoned nail art pro or just starting out, these tutorials will help you create adorable looks that will turn heads.
We’ll explore a variety of techniques, from using stencils and freehand drawing to incorporating popular trends like glitter and rhinestones. We’ll also cover essential tips for preparing your nails, achieving a smooth application, and maintaining your cute nail designs for longer.
Cute Nail Polish Designs: Unleash Your Inner Artist: 5 Incredibly Cute Nail Polish Tutorials
Cute nail polish designs are a fun and expressive way to showcase your personality and style. They’re like miniature canvases on your fingertips, allowing you to experiment with colors, patterns, and textures. Whether you prefer a simple, minimalist look or something more elaborate and eye-catching, there’s a cute nail art design out there for everyone.
I’m feeling so inspired by these 5 incredibly cute nail polish tutorials I found online! I’m definitely going to try the rainbow gradient look, and maybe even the floral design. I’m thinking of bringing over a little something to my new neighbors – maybe some homemade cookies and a bag of neighbor gift 17 pistachios.
I’m sure they’ll appreciate the gesture. After all, who doesn’t love a little bit of sweetness and a touch of color? I’m going to try to recreate those adorable nail designs and maybe even add some sparkly accents! I’m excited to see how they turn out.
Choosing the right colors and techniques is key to achieving a cute nail look. Pastel shades, bright colors, and playful accents like glitter and rhinestones are popular choices. You can create simple polka dots, geometric patterns, or even tiny animal faces.
I’m so excited to share these 5 incredibly cute nail polish tutorials with you! From whimsical polka dots to shimmering gradients, there’s a style for everyone. And speaking of vibrant colors, if you’re looking for a refreshing summer treat, check out this guide on how to make a watermelon.
After all, what’s better than a perfect manicure paired with a juicy slice of watermelon? Back to those nail tutorials – I can’t wait to see what you create!
The possibilities are endless!
I’ve been wanting to try out some new nail designs, and I found 5 incredibly cute nail polish tutorials that I can’t wait to try! I think I’ll start with the one that uses glitter and tiny hearts. I’m also thinking about getting a new sweater to wear with my new nail designs – who doesn’t just love a sweater when it’s cold outside?
who doesnt just love a sweater when its cold outside Speaking of sweaters, I’m going to go find a cozy one to wear while I practice my new nail art skills!
Expressing Individuality Through Nail Art
Nail art is a fantastic way to express your individuality and creativity. It’s a personal form of self-expression that allows you to showcase your unique style and interests. From subtle accents to bold statement pieces, nail art can reflect your mood, personality, and even your favorite hobbies.
Simple and Easy Designs

Sometimes, the simplest nail designs are the most effective. With just a few basic tools and a bit of creativity, you can create adorable and eye-catching looks. Let’s explore some simple designs that are perfect for beginners.
Polka Dot Design
Polka dots are a classic and versatile nail design. They can be playful, sophisticated, or anything in between depending on the colors you choose. Here’s how to create a simple polka dot design using two contrasting colors:
1. Start with a base coat
Apply a base coat to protect your nails and help the polish adhere better.
2. Choose your colors
Select two contrasting colors for your polka dots. For example, you could use black and white, pink and blue, or gold and silver.
3. Apply the base color
Apply a coat of your chosen base color to all your nails.
4. Use a dotting tool or a bobby pin
Dip the dotting tool or bobby pin into the contrasting color and create small dots on your nails.
5. Experiment with size and spacing
You can create dots of different sizes and space them close together or farther apart.
6. Add a top coat
Once your dots are dry, apply a top coat to seal the design and add shine.
Heart Design
Heart designs are perfect for adding a touch of sweetness and romance to your nails. With a thin brush, you can create simple and delicate hearts. Here’s how:
1. Apply a base coat
Apply a base coat to your nails.
2. Choose your color
Select a color you like for your hearts.
3. Use a thin brush
Dip the thin brush into the color and create a small heart shape on your nail.
4. Practice your strokes
You can practice on a piece of paper before applying the hearts to your nails.
5. Add a top coat
Once the hearts are dry, apply a top coat to seal the design and add shine.
Geometric Design
Geometric designs are a great way to add a modern and edgy touch to your nails. Using tape, you can create clean lines and sharp angles. Here’s how to create a simple geometric design using two colors:
1. Apply a base coat
Apply a base coat to your nails.
2. Choose your colors
Select two contrasting colors for your design.
3. Apply the base color
Apply a coat of your chosen base color to all your nails.
4. Use tape
Cut strips of tape and place them on your nails to create the desired geometric shape. For example, you could create triangles, squares, or stripes.
5. Apply the second color
Apply a coat of the second color over the exposed area of your nail.
6. Remove the tape
Carefully remove the tape while the second color is still wet.
7. Add a top coat
Once the design is dry, apply a top coat to seal the design and add shine.
Trendy and Fun Nail Art
Nail art is a fantastic way to express your creativity and personality. Whether you’re looking for a subtle touch or a bold statement, there are countless designs to explore. Let’s dive into some trendy and fun nail art techniques that are easy to recreate at home.
Creating a Gradient Nail Design, 5 incredibly cute nail polish tutorials
A gradient nail design, also known as an ombre effect, creates a seamless transition between two or more colors. This technique can be achieved using a sponge and multiple colors of nail polish.
- Start by applying a base coat to all your nails. This helps protect your nails and creates a smooth surface for the polish.
- Choose two or three colors that you want to blend together. For a soft and subtle look, select colors that are similar in shade. For a more dramatic effect, opt for contrasting colors.
- Apply the lightest color to the base of your nail, followed by the next darkest color, and so on. You can use a small brush or a dotting tool to apply the colors in thin stripes.
- Take a makeup sponge and dab it onto the polish, blending the colors together. You can use a clean sponge for each color or use the same sponge to create a more mixed effect.
- Repeat the blending process until you achieve a smooth and even gradient.
- Once the gradient is complete, seal the design with a top coat to protect the polish and give it a glossy finish.
Creating a Cute Animal Print Design
Animal print designs are always a popular choice for nail art. From leopard print to zebra stripes, there are endless possibilities. You can create animal print designs using stencils or by freehand drawing.
- For a stencil design, you can purchase pre-made stencils or create your own using tape or paper.
- Apply a base coat to your nails, and then apply a base color for your animal print. For example, for leopard print, you could use a light brown or beige color.
- Place the stencil on your nail and apply the contrasting color for the spots or stripes.
- Carefully remove the stencil, and then apply a top coat to seal the design.
For a freehand animal print design, you can use a fine-tipped brush or a dotting tool to create the spots or stripes.
- Practice on a piece of paper first to get a feel for the shapes and sizes.
- Apply a base coat to your nails and then a base color for your animal print.
- Using a light hand, draw the spots or stripes onto your nails.
- Once the design is complete, apply a top coat to seal it.
Incorporating Popular Trends
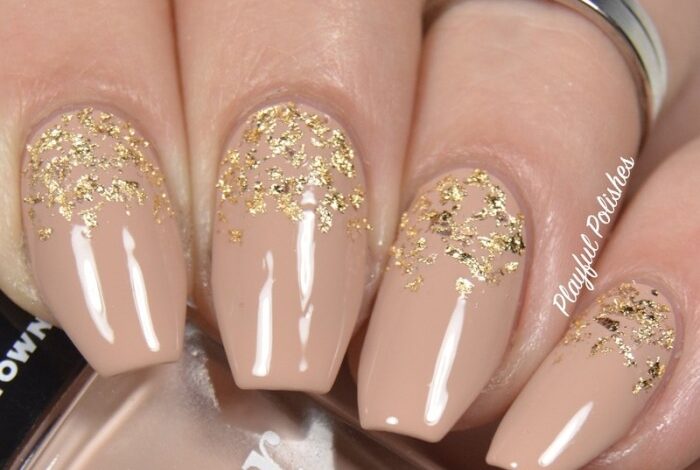
Glitter, rhinestones, and negative space are all popular trends in nail art. You can incorporate these elements into your cute nail designs to add a touch of glamor or a modern twist.
- Glitter can be used to create a sparkly accent on your nails. You can apply it to the entire nail, create a glitter gradient, or add a simple glitter accent.
- Rhinestones can be used to add a touch of bling to your nails. You can create simple designs using rhinestones, or you can use them to create more intricate patterns.
- Negative space is a technique where you leave a portion of your nail bare, creating a unique and modern design. You can create negative space designs using tape or by freehand drawing.