DIY Padded Headboard: A Cozy & Stylish Upgrade
D i y padded headboard – DIY padded headboards set the stage for a cozy and stylish bedroom makeover. Forget about expensive store-bought options – crafting your own headboard lets you personalize your space with unique fabrics, textures, and designs. From classic to modern, you can create a headboard that reflects your individual style and adds a touch of luxury to your haven.
This DIY project isn’t just about saving money, it’s about unleashing your creativity. You’ll be surprised at how easy it is to transform simple materials into a statement piece that elevates your bedroom’s aesthetic. Whether you’re a seasoned DIYer or a curious beginner, this guide will walk you through the steps, from choosing the right fabric to installing your finished masterpiece.
Introduction to DIY Padded Headboards
Transforming your bedroom into a sanctuary of comfort and style doesn’t have to break the bank. A DIY padded headboard offers a unique opportunity to personalize your space while saving money. This project allows you to unleash your creativity and design a headboard that perfectly complements your bedroom’s decor.
Not only will you save money, but you’ll also gain a sense of accomplishment knowing you created a beautiful and functional piece yourself.
The Appeal of DIY Padded Headboards
The allure of DIY padded headboards lies in their versatility and affordability. They provide a cost-effective way to enhance your bedroom’s aesthetic appeal while adding a touch of luxury.You can choose from a wide range of fabrics, colors, and designs to create a headboard that reflects your personal style.
This freedom of customization allows you to create a truly unique piece that perfectly complements your existing furniture and decor.
Advantages of Creating a Padded Headboard
There are numerous advantages to creating a padded headboard compared to purchasing one.
- Cost Savings:DIY padded headboards are significantly cheaper than store-bought ones. You can save hundreds of dollars by using affordable materials and doing the work yourself.
- Customization:You have complete control over the design, size, shape, and fabric of your headboard. This allows you to create a piece that perfectly fits your needs and style.
- Unique Style:DIY projects offer a unique opportunity to create a one-of-a-kind piece that reflects your personal taste. You can incorporate your favorite colors, patterns, and textures to create a truly personalized headboard.
- Sense of Accomplishment:Completing a DIY project provides a sense of satisfaction and accomplishment. You’ll be proud to display your creation in your bedroom.
History of Padded Headboards
Padded headboards have a rich history, dating back to the Victorian era. During this period, elaborate and ornate headboards were a symbol of wealth and status. They were often made from luxurious materials such as velvet, silk, and brocade, and were intricately carved and embellished with decorative elements.Over time, padded headboards evolved and became more accessible to the general public.
Today, they are a popular and versatile addition to bedrooms of all styles.
Design Considerations for a DIY Padded Headboard
When designing a DIY padded headboard, you have the freedom to personalize it to your taste and style. The design choices you make will determine the overall look and feel of your headboard and how it complements your bedroom decor.
Headboard Styles
The style of your padded headboard can range from modern and minimalist to traditional and ornate.
- Modern: Modern headboards are typically characterized by clean lines, simple shapes, and neutral colors. They often feature geometric patterns or subtle textures. A modern headboard can be made from a variety of materials, such as wood, metal, or upholstered fabric.
- Traditional: Traditional headboards often have more intricate designs, including carvings, moldings, and tufted upholstery. They are typically made from wood and upholstered in rich fabrics like velvet or linen.
- Bohemian: Bohemian headboards embrace a more eclectic style, incorporating bold colors, patterns, and textures. They may feature macrame, tassels, or other decorative elements.
Headboard Shapes and Sizes
The shape and size of your headboard will also influence its overall look and feel.
- Rectangular: Rectangular headboards are the most common shape, offering a classic and versatile option. They can be made in various sizes, from small and compact to large and grand.
- Curved: Curved headboards add a touch of elegance and sophistication to a bedroom. They can be shaped in a variety of ways, such as a rounded top, a flowing curve, or a scalloped edge.
- Arched: Arched headboards create a sense of grandeur and drama. They are often found in traditional and formal bedrooms.
Upholstery Fabrics
The upholstery fabric you choose for your headboard will significantly impact its look and feel.
- Velvet: Velvet is a luxurious and elegant fabric that adds a touch of sophistication to any headboard. It is soft to the touch and has a rich, velvety texture.
- Linen: Linen is a natural and breathable fabric that is known for its durability and crisp texture. It is a good choice for a headboard that will receive a lot of use.
- Cotton: Cotton is a soft and comfortable fabric that is easy to care for. It is a versatile option for a headboard, as it can be used in a variety of styles.
- Leather: Leather is a durable and stylish fabric that adds a touch of masculinity to a headboard. It is also easy to clean and maintain.
Materials and Tools Needed: D I Y Padded Headboard
To embark on your DIY padded headboard journey, you’ll need to gather the necessary materials and tools. This section will provide a comprehensive list, categorized for your convenience, to ensure a smooth and successful project.
Materials
The materials required for your DIY padded headboard project can be categorized into wood, fabric, padding, and hardware.
| Material | Quantity | Description |
|---|---|---|
| Wood | 1 piece | Headboard frame (size will depend on your bed size and desired headboard height) |
| Plywood | 1 piece | Back panel (size should match the dimensions of the headboard frame) |
| Fabric | 1 yard | Upholstery fabric (consider the desired look and feel of your headboard) |
| Batting | 1 roll | Padding for the headboard (choose a thickness that provides the desired level of comfort) |
| Foam | 1 piece | Additional padding for the headboard (optional, for extra cushioning) |
| Staple gun | 1 | For attaching fabric and padding to the headboard frame |
| Staples | 1 box | For use with the staple gun |
| Screws | As needed | For assembling the headboard frame |
| Wood glue | 1 bottle | For securing the plywood back panel to the frame |
| Measuring tape | 1 | For accurate measurements |
| Scissors | 1 pair | For cutting fabric and padding |
| Sewing machine | 1 | For sewing fabric edges if needed |
| Safety glasses | 1 pair | For eye protection during construction |
Step-by-Step Construction Guide
Now that you have your materials and tools ready, it’s time to dive into the actual construction of your padded headboard. This step-by-step guide will walk you through the process, ensuring you create a beautiful and comfortable headboard that complements your bedroom decor.
Cutting the Wood
Before you begin assembling your headboard, you need to cut the wood to the desired size. This step involves using a saw, which can be a circular saw, a jigsaw, or a miter saw. The choice of saw depends on the size of the headboard and the type of wood you are using.
The first step is to measure the width of your bed and add about 6-8 inches to each side for a comfortable overhang. The height of the headboard is entirely up to your preference.
It’s important to measure carefully and make accurate cuts. A slight error in measurement can result in an uneven or lopsided headboard.
Building a DIY padded headboard is a fun weekend project, especially if you’re looking for a way to add a touch of luxury to your bedroom. It can be a bit of a messy endeavor though, so you might need a good reason to reward yourself afterwards.
Maybe you’ll need to find a reason to enjoy a scoop of your favorite ice cream, perhaps with a need an excuse for ice cream ? Once you’ve satisfied your sweet tooth, you can get back to the task at hand and enjoy the satisfaction of creating a beautiful, custom headboard for your bed.
For example, if your bed is 60 inches wide, you would add 6 inches to each side, resulting in a headboard width of 72 inches. The height can be anything from 36 inches to 48 inches or even taller, depending on your preference.
Once you have determined the desired dimensions, use a pencil to mark the cut lines on the wood.
Make sure to wear safety goggles and hearing protection when using a saw.
Assembling the Frame
The next step is to assemble the frame of the headboard. You can create a simple frame using 2x4s or opt for a more intricate design using different wood sizes and shapes. This step involves joining the wood pieces together using screws or wood glue.
For a sturdy headboard, it is recommended to use wood glue in conjunction with screws.
If you are using a simple frame design, you will need to cut two vertical pieces and two horizontal pieces of wood to the desired dimensions. You can then join the pieces together using wood glue and screws.
Make sure to predrill the holes before screwing the wood pieces together to prevent splitting.
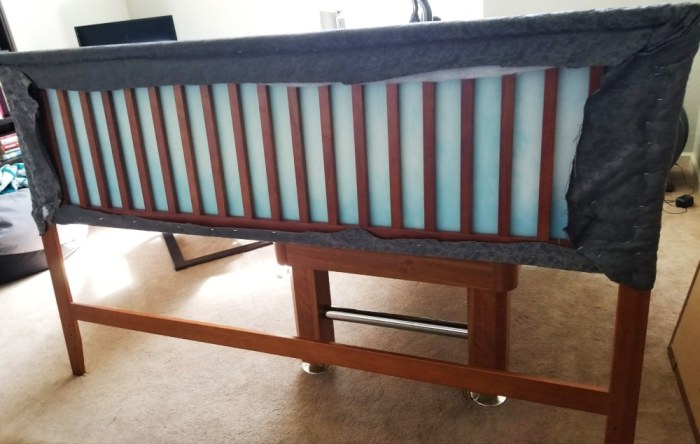
Adding Upholstery Padding
Now it’s time to add the upholstery padding to your headboard frame. This step involves attaching batting, foam, and fabric to the frame to create a comfortable and aesthetically pleasing headboard.
Choose a high-density foam for a firm and supportive headboard.
First, cut a piece of batting slightly larger than the frame. Use a staple gun to attach the batting to the back of the frame, ensuring it is smooth and taut.
Be careful when using a staple gun, as the staples can be sharp.
Next, cut a piece of foam slightly smaller than the batting. Use a spray adhesive to attach the foam to the batting, ensuring it is centered and evenly distributed.
Use a high-quality spray adhesive that will bond well to both the foam and the batting.
Covering the Headboard
The final step is to cover the headboard with fabric. This step involves stretching and securing the fabric to the frame, creating a finished and polished look.
Choose a fabric that complements your bedroom decor and is durable enough to withstand wear and tear.
First, cut a piece of fabric slightly larger than the headboard. You can use a staple gun to attach the fabric to the back of the frame, ensuring it is smooth and taut.
Start by attaching the fabric at the center of the headboard and work your way outwards.
You can then fold the excess fabric around the edges of the headboard and staple it to the back.
Use a fabric measuring tape to measure the fabric before cutting.
Adding Finishing Touches
Once the headboard is covered, you can add finishing touches such as buttons, trim, or decorative elements.
Use a button gun to attach buttons to the headboard.
You can also add a decorative trim to the edges of the headboard.
Building a DIY padded headboard can be a fun and rewarding project, but it can also be a bit time-consuming. If you need a break from the project, take a look at these 5 ideas to keep kids entertained at a restaurant for some inspiration.
Once you’re back to your headboard, you’ll have a fresh perspective and be ready to tackle the next step!
Use a sewing machine to sew the trim to the fabric.
You can also add decorative elements such as tassels or beads to the headboard.
Upholstery Techniques

Upholstering your DIY padded headboard is the final touch that brings your project to life. This stage allows you to add style, texture, and comfort to your headboard. Choosing the right upholstery technique depends on your skill level, the desired look, and the type of fabric you’re using.
Let’s delve into the most common methods.
Stapling
Stapling is the most popular and straightforward upholstery technique. It involves attaching the fabric to the headboard’s frame using a staple gun. Stapling is suitable for most fabrics, including cotton, linen, and velvet. The technique is relatively simple and requires minimal tools.
However, it’s important to use the right staples for the fabric thickness and to avoid over-stapling, which can distort the fabric.
To ensure a smooth and even finish, pull the fabric taut before stapling.
Sewing, D i y padded headboard
Sewing is a more intricate upholstery technique that provides a cleaner and more durable finish. It involves stitching the fabric to the headboard frame using a sewing machine or by hand.Sewing is ideal for fabrics that are difficult to staple, such as leather or thick upholstery fabrics.
It also allows for more intricate designs and patterns. Sewing requires a bit more time and effort, but it offers a professional look.
Use a heavy-duty needle and thread for sewing upholstery fabrics.
Gluing
Gluing is a quick and easy upholstery technique that involves attaching the fabric to the headboard frame using an adhesive.Gluing is suitable for lightweight fabrics and for areas that are difficult to staple or sew. It is particularly useful for attaching foam padding to the headboard frame.
However, it’s important to use a strong adhesive that is suitable for both the fabric and the headboard material.
Use a fabric adhesive that is specifically designed for upholstery.
Installation and Finishing Touches
Now that your padded headboard is complete, it’s time to install it and add those finishing touches that will make it truly unique. The installation process is relatively straightforward and depends on your bed frame. You’ll need to attach the headboard to the bed frame securely, ensuring it stands upright and is properly aligned.
Attaching the Headboard to the Bed Frame
You have several options for attaching the headboard to your bed frame. * Bed Frame with Headboard Slats:Most modern bed frames have built-in slats designed for attaching a headboard. Simply position the headboard against the slats and use screws or bolts to secure it in place.
Bed Frame with Headboard Brackets
Building a DIY padded headboard is a fun weekend project that can add a touch of cozy luxury to your bedroom. It’s a great way to create a focal point and personalize your space, and it’s a lot cheaper than buying a new headboard.
Plus, it’s a project the whole family can enjoy! If you’re looking for more ways to create lasting memories and make the most of your time together, check out this article on frugal fun family tradition 7 magical moments under the christmas tree.
Then, once you’ve got your Christmas spirit flowing, you can get back to crafting that DIY headboard, and create a cozy, personalized haven for your family to enjoy.
Some bed frames come with brackets specifically designed for attaching a headboard. Follow the manufacturer’s instructions for attaching the brackets to the bed frame and then secure the headboard to the brackets.
DIY Brackets
If your bed frame doesn’t have a headboard attachment system, you can create your own brackets using wood or metal. You can find numerous tutorials online for making DIY headboard brackets.
Adding Finishing Touches
Once your headboard is securely attached, you can start adding those finishing touches that will personalize it.
Adding Trim
Adding trim around the edges of the headboard can enhance its visual appeal and give it a more polished look. You can choose from various trim options, such as:* Wood Trim:Wood trim is a classic choice that can be painted or stained to match your headboard’s style.
Fabric Trim
Fabric trim can add a soft and luxurious touch. You can use the same fabric as your headboard or choose a contrasting color or pattern.
Metal Trim
Metal trim, such as brass or silver, can add a touch of elegance and sophistication.
Adding Buttons
Adding buttons to your headboard is a popular way to add texture and visual interest. You can use fabric-covered buttons, wooden buttons, or even decorative metal buttons. * Button Placement:Buttons can be arranged in a variety of patterns, such as a simple grid, a diagonal pattern, or a more elaborate design.
Button Attachment
You can use upholstery tacks or a specialized button-covering tool to attach the buttons to the fabric.
Adding Studs
Studs can add a touch of rustic charm or a more modern, industrial look to your headboard. You can use metal studs, wooden studs, or even decorative plastic studs.* Stud Placement:Studs can be arranged in a variety of patterns, such as a simple grid, a diagonal pattern, or a more elaborate design.
Stud Attachment
Studs are typically attached using a hammer and nails or a nail gun.
Incorporating Additional Elements
You can further enhance your headboard by incorporating additional elements like lighting or shelves.
Adding Lighting
Adding lighting to your headboard can create a warm and inviting atmosphere. * Sconces:Sconces are wall-mounted light fixtures that can be attached to the headboard.
Strip Lights
LED strip lights can be attached to the back of the headboard and used to create a soft and ambient glow.
Reading Lamps
Reading lamps can be attached to the headboard for providing focused light for reading.
Adding Shelves
Adding shelves to your headboard can provide a convenient place to store books, magazines, or other items.* Floating Shelves:Floating shelves can be attached to the wall behind the headboard.
Integrated Shelves
You can design and build shelves directly into the headboard.
Inspiration and Design Ideas
The beauty of a DIY padded headboard lies in its versatility. You can craft a headboard that perfectly complements your bedroom’s style, from minimalist to luxurious. Let’s delve into some inspiring design ideas that can spark your creativity.
Headboard Styles
Various headboard styles can be achieved with a DIY approach. Here are a few examples:
- Channel Tufted:This classic style features a series of vertical or horizontal rows of buttons or studs, creating a luxurious and elegant look. It’s a timeless choice that complements traditional and modern bedroom styles.
- Diamond Tufted:A modern twist on the traditional tufted design, featuring diamond-shaped tufts that create a geometric pattern.
This style adds a touch of sophistication to contemporary and minimalist bedrooms.
- Button Tufted:This design involves using buttons to create a unique and intricate pattern on the headboard. The buttons can be covered in fabric or leather for a customized look.
- Wingback:This style features tall, curved wings that frame the headboard, creating a sense of privacy and grandeur. It’s a statement piece that adds drama and elegance to any bedroom.
- Upholstered Panels:This design involves creating a series of rectangular panels that are upholstered in fabric or leather.
The panels can be arranged in a variety of configurations to create a unique and customized headboard.
Materials and Finishes
The materials and finishes you choose can significantly impact the look and feel of your DIY padded headboard.
- Fabric:From velvet to linen, the fabric choice sets the tone for your headboard. Consider the texture, color, and pattern of the fabric when selecting it.
- Wood:The base of your headboard can be made from various wood types like pine, oak, or plywood.
Consider the wood’s grain, color, and durability.
- Padding:Foam or batting provides the cushioning and comfort for your headboard. Choose the appropriate thickness and density based on your desired level of softness.
- Buttons and Studs:These elements add visual interest and detail to your headboard.
Choose buttons or studs that complement the fabric and style of your headboard.
Gallery of DIY Padded Headboard Designs
Here’s a glimpse into the diverse possibilities of DIY padded headboards:
- A simple, elegant headboard with a clean, modern design: A headboard crafted from a piece of plywood, upholstered in a neutral fabric like linen, with a single row of buttons down the center.
- A statement headboard with a bold, geometric pattern: A headboard made from a combination of different wood types, upholstered in a vibrant fabric with a geometric pattern, featuring a diamond tufted design.
- A whimsical headboard with a unique, playful design: A headboard crafted from reclaimed wood, upholstered in a patterned fabric with a touch of whimsy, incorporating a combination of different button sizes and shapes.
- A luxurious headboard with a rich, textured fabric: A headboard made from solid oak, upholstered in a luxurious velvet fabric, featuring a channel tufted design with large, ornate buttons.
Safety and Precautions
Building a padded headboard is a fun and rewarding DIY project, but it’s important to prioritize safety throughout the process. Working with power tools and upholstery materials requires careful attention and adherence to safety guidelines to prevent accidents and injuries.
Power Tool Safety
Power tools can be dangerous if not used correctly. Here are some essential safety precautions to follow:
- Always wear safety glasses to protect your eyes from flying debris.
- Use ear protection to minimize noise exposure and protect your hearing.
- Ensure the work area is well-lit and free of clutter to prevent tripping hazards.
- Keep your fingers away from the blade or cutting surface of any power tool.
- Use the correct tools for the job and always follow the manufacturer’s instructions.
- Never operate power tools while tired or under the influence of drugs or alcohol.
- Disconnect power tools from the power source before making adjustments or changing blades.
- Store power tools in a safe and secure location when not in use.
Upholstery Material Safety
Upholstery materials like foam and fabric can pose certain hazards if not handled properly:
- Avoid inhaling dust or fibers from upholstery materials, as they can irritate the respiratory system. Wear a dust mask or respirator if necessary.
- Use caution when handling sharp upholstery needles and pins. Keep them in a designated container when not in use.
- Avoid using flammable upholstery materials near heat sources or open flames.
- Properly dispose of upholstery scraps and materials according to local regulations.
Common DIY Mistakes and Prevention
Here are some common DIY mistakes to avoid and tips for ensuring a safe project:
- Not measuring accurately:Accurate measurements are crucial for a well-fitting headboard. Use a measuring tape and level to ensure precise dimensions. Double-check your measurements before cutting materials.
- Not securing the headboard frame:A sturdy headboard frame is essential for stability and safety. Use strong screws or bolts to securely attach the frame to the wall or bed frame.
- Using the wrong type of screws or fasteners:Select screws or fasteners appropriate for the materials you are working with. Using the wrong fasteners can lead to instability and potential damage.
- Not using a safety harness when working at heights:If you need to work at heights, always use a safety harness to prevent falls.
General Safety Tips
- Always read and follow the instructions provided with your power tools and materials.
- Take breaks when needed to avoid fatigue, which can increase the risk of accidents.
- Keep a first-aid kit readily available in case of minor injuries.
- If you are unsure about any aspect of the project, consult a professional or seek guidance from an experienced DIYer.
Customization and Personalization
The beauty of a DIY padded headboard lies in its adaptability. You can easily tailor it to match your unique style and preferences, transforming it into a statement piece that reflects your personality.
Fabric Choices
Fabric is the star of the show when it comes to customizing a padded headboard. You can choose from a vast array of textures, patterns, and colors to create the desired look.
- Velvet:For a luxurious and sophisticated feel, velvet is an excellent choice. Its soft texture and rich color variations add a touch of elegance to any bedroom.
- Linen:Linen offers a natural and relaxed vibe. Its breathable and durable qualities make it a popular choice for bedrooms. Linen comes in various colors and textures, allowing you to create a rustic or contemporary look.
- Cotton:Cotton is a versatile and affordable option. It is available in a wide range of colors, patterns, and weaves, making it easy to find the perfect match for your decor.
- Leather:For a bold and modern statement, leather is an excellent choice. Its durability and timeless appeal make it a perfect choice for a statement headboard.
- Faux Leather:A more budget-friendly alternative to genuine leather, faux leather offers a similar look and feel. It is available in a variety of colors and textures, allowing you to create a contemporary or vintage aesthetic.
Embroidery
Embroidery adds a personal touch to your headboard. You can choose from a variety of designs, from simple initials to intricate patterns. Embroidery can be done by hand or using a sewing machine, depending on your skill level and the complexity of the design.
Paint Finishes
If you prefer a more minimalist look, you can paint your headboard in a solid color. You can choose from a variety of paint finishes, such as matte, satin, or gloss, to create the desired effect.
- Metallic Paint:For a touch of glamour, consider using metallic paint. Gold, silver, and copper are popular choices for adding a touch of elegance to your headboard.
- Chalkboard Paint:Chalkboard paint allows you to personalize your headboard with messages, drawings, or even a calendar. It’s a fun and interactive way to add personality to your bedroom.
- Distressed Paint:For a vintage look, try distressing your headboard with paint. This technique involves applying multiple layers of paint and then sanding back some areas to reveal the layers underneath.
Budget-Friendly Alternatives
Creating a padded headboard doesn’t have to break the bank. With a little creativity and resourcefulness, you can achieve a stunning look without sacrificing your budget. This section explores budget-friendly alternatives for materials and techniques, providing tips for finding affordable options and sharing ideas for a stylish and functional headboard.
Affordable Fabric Options
Finding the perfect fabric for your headboard can be a challenge, especially on a budget. However, there are many affordable options available that can still deliver a luxurious look and feel.
- Thrifted Fabrics:Thrift stores and consignment shops are treasure troves of unique and affordable fabrics. You can find everything from vintage textiles to modern prints at a fraction of the cost of new fabrics. Be sure to inspect the fabric carefully for any damage or stains before purchasing.
- Drop-Cloth Fabrics:Drop cloths are inexpensive and readily available at most hardware stores. They offer a textured and rustic look, making them perfect for a farmhouse or industrial-style headboard.
- Fabric Remnants:Many fabric stores sell remnants at discounted prices. These are small pieces of fabric that are perfect for smaller projects like headboards. You can often find unique and high-quality fabrics for a fraction of the cost.
- Upcycled Materials:Get creative with upcycled materials like old curtains, blankets, or even clothing. These materials can be repurposed into beautiful and unique headboards.