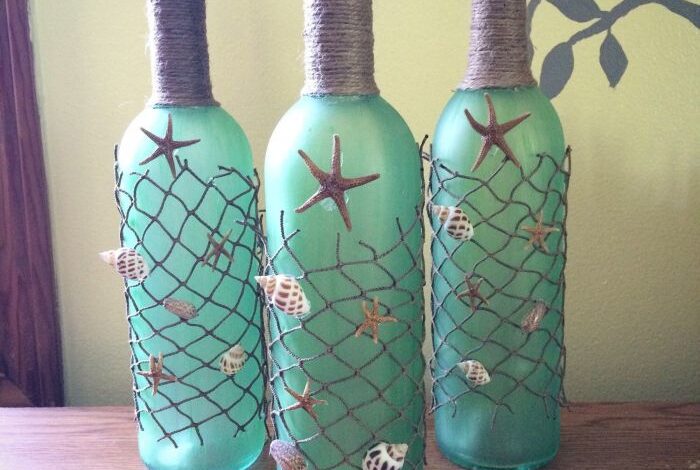
DIY Shell Bottles: A Creative Ocean-Inspired Craft
DIY shell bottles are a delightful way to bring the beauty of the ocean into your home. These unique creations are not just decorative, they’re also a fun and rewarding craft project that allows you to express your creativity while preserving memories of your beach adventures.
The process of creating a shell bottle involves collecting shells, cleaning them, preparing a bottle, designing a visually appealing arrangement, and carefully filling and sealing the bottle. It’s a journey that combines elements of nature, artistry, and patience.
DIY Shell Bottles
Transforming ordinary glass bottles into stunning decorative pieces is an art form that has been practiced for centuries. This craft, known as DIY Shell Bottles, involves adorning bottles with seashells, creating unique and eye-catching displays that evoke the beauty of the ocean.
The process is both creative and relaxing, allowing individuals to express their artistic flair while crafting beautiful pieces for their homes or as gifts.
Materials Used in DIY Shell Bottles
The materials used in DIY Shell Bottles are readily available and often collected during beach trips or purchased from craft stores. These materials include:
- Glass Bottles:The foundation of this craft, glass bottles come in various shapes and sizes, providing a blank canvas for creativity. Bottles with unique shapes or interesting textures can add visual interest to the final piece.
- Seashells:The heart of DIY Shell Bottles, seashells come in a wide variety of shapes, sizes, and colors. Their natural beauty adds a touch of the ocean to the finished product.
- Adhesive:A strong adhesive is essential for securely attaching the seashells to the bottle. Epoxy resin, hot glue, or even strong craft glue can be used, depending on the desired strength and application.
- Decorative Elements:To enhance the visual appeal, additional decorative elements such as sand, small pebbles, beads, or even dried starfish can be incorporated into the design.
History and Origin of DIY Shell Bottles
The origins of DIY Shell Bottles can be traced back to ancient civilizations who used seashells as adornments and tools. The art form likely evolved alongside maritime cultures, with seashells serving as a reminder of journeys at sea and the beauty of the ocean.
In modern times, DIY Shell Bottles have gained popularity as a relaxing and creative hobby, allowing individuals to express their artistic flair and create unique and personalized decorative pieces.
Shell Collection and Preparation: Diy Shell Bottle
Before you start crafting with shells, you’ll need to gather a collection. This step is as much about responsible sourcing as it is about finding beautiful shells. Once you have your shells, cleaning and preparing them is crucial for a successful project.
Ethical and Sustainable Shell Collection
Collecting shells ethically and sustainably is essential to protect marine ecosystems. Here are some key tips:
- Respect Wildlife:Always be mindful of living creatures. Avoid disturbing or harming any animals, especially nesting seabirds or crabs that might be using shells for shelter.
- Leave Some Behind:Take only what you need and leave some shells for other creatures and the natural environment.
- Choose Live Shells Carefully:If you find a shell with a live creature inside, consider leaving it alone. If you must collect it, ensure the creature is unharmed and returned to its environment.
- Check Local Regulations:Some areas have regulations on shell collecting, so always check with local authorities before collecting shells.
- Support Sustainable Sources:Consider purchasing shells from reputable sources that promote ethical and sustainable practices.
Cleaning and Preparing Shells
Once you have your shells, it’s time to clean and prepare them for crafting. Here are some methods:
- Soaking:Soak shells in a solution of warm water and mild dish soap for several hours. This helps loosen dirt and debris.
- Scrubbing:After soaking, use a soft-bristled brush to gently scrub away any remaining dirt or residue. Avoid using harsh chemicals or abrasive materials that can damage the shell.
- Deodorizing:If shells have a strong odor, you can soak them in a solution of baking soda and water. This helps neutralize odors and remove any remaining impurities.
- Drying:After cleaning, allow shells to air dry completely. Avoid placing them in direct sunlight, as this can cause fading or discoloration.
Sterilizing Shells
Sterilizing shells is important, especially if you’re using them for crafts that will be handled by children or individuals with weakened immune systems.
- Boiling:Boil shells in water for 10-15 minutes to kill any bacteria or germs. This method is effective for most shells.
- Baking:Place shells in a preheated oven at 200°F (93°C) for 30 minutes. This method is suitable for shells that can withstand heat.
Bottle Selection and Preparation
Choosing the right bottle is crucial for your shell project, and preparing it properly will ensure a beautiful and long-lasting display. The bottle’s shape, size, and material will influence the overall aesthetic and practicality of your creation.
Bottle Types
The type of bottle you choose will depend on the size and style of your shell collection and the overall look you want to achieve.
DIY shell bottles are a fun and unique way to add a touch of the ocean to your home decor. If you’re looking for a thoughtful gift idea for your neighbors this Christmas, consider baking them some homemade bread, as featured in this list of 10 neighbor Christmas gift ideas.
Once your shells are cleaned and arranged in your bottle, you can add a personal touch by tying a festive ribbon around the neck for a special holiday display.
- Glass bottlesare a popular choice due to their transparency, allowing the shells to be showcased beautifully. They come in various shapes and sizes, from small vials to large jars. Consider using clear glass for a classic look or opt for colored glass for a more unique aesthetic.
Creating a DIY shell bottle is a fun and relaxing way to bring a bit of the beach indoors. It’s a great project to do while you’re enjoying a quiet moment in your morning routine, which is super important for setting yourself up for a productive day, right?
Check out these tips for morning routine organization ! Once your shell bottle is complete, it’s a beautiful and unique piece of decor that can add a touch of nature to any room.
- Plastic bottlesare a more budget-friendly option and can be found in various sizes and shapes. However, they may not be as aesthetically pleasing as glass bottles and might not be as durable. If using plastic bottles, ensure they are food-grade and BPA-free for safety.
- Metal bottles, like vintage tin cans or repurposed metal containers, can add a rustic or industrial touch to your project. However, they may require additional cleaning and preparation to ensure they are free of rust or other imperfections.
Cleaning and Sanitizing
Before filling your chosen bottle, it’s essential to thoroughly clean and sanitize it.
- Wash the bottle with warm, soapy waterto remove any dirt, dust, or debris. Use a bottle brush to reach hard-to-clean areas.
- Rinse the bottle thoroughlywith clean water to remove any soap residue.
- Sanitize the bottleby filling it with a solution of equal parts water and white vinegar. Let it sit for at least 30 minutes, then rinse again with clean water. Alternatively, you can use a bleach solution (1 tablespoon of bleach per gallon of water), but ensure it is diluted properly and rinsed thoroughly.
Sealing the Bottle Opening
Depending on the bottle type and your desired aesthetic, you may need to seal the opening.
- Cork stoppersare a classic and practical option for glass bottles. They are readily available in various sizes and can be easily inserted and removed.
- Screw-top lidsare another convenient option, particularly for plastic bottles. They offer a secure seal and are easy to use.
- Fabric or ribboncan be used to create a more decorative seal, especially for glass bottles with a wide opening. You can tie a ribbon around the neck of the bottle or use fabric scraps to create a unique cover.
Designing and Arranging the Shells
The heart of your shell bottle lies in the arrangement of the shells. This is where your creativity comes into play. You can choose to follow a specific theme, play with colors and textures, or let your intuition guide you.
The possibilities are as vast as the ocean itself.
Consider the shape and size of the bottle, the type of shells you have, and the overall aesthetic you want to achieve. Think about how you want to create depth and dimension within the bottle. You can create layers of shells, mix different sizes and shapes, or even use wire to create unique formations.
Creating a Visually Appealing Composition
A well-designed composition is crucial for a captivating shell bottle. Here are some tips to consider:
- Balance and Harmony:Aim for a balanced arrangement where no single element overpowers the others. Consider the visual weight of each shell and how it interacts with the others.
- Focal Point:Create a focal point using a larger or more unique shell. This will draw the viewer’s eye and add visual interest.
- Color and Texture:Play with contrasting colors and textures to create depth and dimension. For instance, you can pair smooth, white shells with rough, textured ones.
- Negative Space:Don’t overcrowd the bottle. Allow some negative space to give the shells room to breathe and enhance their visual impact.
Using Additional Embellishments
To enhance your shell bottle, you can incorporate additional embellishments. These elements can add texture, color, and depth to your creation.
I love making DIY shell bottles – they’re a great way to bring a little bit of the beach home. I usually find my shells at yard sales, and I’ve learned a few tricks over the years to get the best deals.
Check out these yard sale tips from the pros to help you snag some beautiful shells for your next DIY project! Once I have a good collection, I wash and sort them before arranging them in a clear glass bottle, creating a unique and eye-catching centerpiece.
- Sand:Different types of sand can add texture and color to your bottle. For example, fine white sand can create a beachy feel, while coarse black sand adds a dramatic touch.
- Beads:Beads can add sparkle and color to your bottle. You can use glass beads, wooden beads, or even shells that have been drilled and strung together.
- Pebbles:Pebbles can add weight and texture to your bottle. You can use smooth, polished pebbles or rough, natural ones.
Filling and Sealing the Bottle
Now that your shell arrangement is perfect, it’s time to fill the bottle and seal it to create a lasting and visually appealing piece. This step involves carefully adding materials to enhance the shell display and then securely sealing the bottle to prevent leaks and maintain its aesthetic appeal.
Methods for Securely Placing Shells Inside the Bottle
Placing shells inside a bottle can be a delicate task, especially with smaller and more fragile shells. To ensure the shells are secure and do not shift during filling, consider the following methods:
- Use a long, thin tool, like tweezers or a pair of chopsticks, to gently place each shell inside the bottle. This allows for precise placement and minimizes the risk of damaging the shells.
- If you are working with a larger bottle, you can use a funnel to guide the shells into the bottle. This is particularly helpful for filling the bottle with sand or other materials.
- For a more secure placement, you can use a glue gun to adhere the shells to the inside of the bottle. This is especially useful for delicate shells or if you want to create a specific design. Apply a small amount of glue to the base of the shell and carefully place it inside the bottle.
Filling the Bottle with Water, Sand, or Other Materials
Once the shells are in place, you can fill the bottle with water, sand, or other materials to create the desired look and enhance the display.
- For a simple and elegant look, fill the bottle with clear water. This allows the shells to be seen in their natural beauty. Add a few drops of food coloring to the water to create a subtle hue.
- To create a more textured and visually interesting display, use sand or small pebbles. You can use different colors of sand to create layers or patterns. Use a funnel to gently pour the sand into the bottle.
- Other materials, like glitter, beads, or small seashells, can be added to the bottle to enhance the overall aesthetic. Experiment with different materials and combinations to create a unique look.
Sealing the Bottle
The final step is to seal the bottle to prevent leaks and preserve the display.
- For glass bottles, a cork stopper is a classic and effective sealing method. Choose a cork that fits snugly into the opening of the bottle. If necessary, you can trim the cork to achieve a perfect fit.
- For plastic bottles, a screw-on lid is the most common sealing method. Ensure the lid is securely tightened to prevent leaks.
- To add a decorative touch, you can use a sealant, such as epoxy resin, to create a waterproof and durable seal. Apply a thin layer of resin around the opening of the bottle and allow it to cure completely.
Displaying and Caring for Shell Bottles

Your shell bottle is complete, and now it’s time to show it off! Displaying your creation is an important part of the process, as it allows you to enjoy your work and share it with others. However, it’s equally crucial to care for your shell bottle to ensure its longevity and beauty.
Displaying Your Shell Bottle
A well-crafted shell bottle can be a stunning decorative element in any home. There are many ways to display your creation, each with its own unique charm.
- On a Shelf or Mantel:A shelf or mantel provides a classic and simple display option. Choose a spot that receives natural light, allowing the shells to shimmer and sparkle.
- In a Glass Cabinet:A glass cabinet can showcase your shell bottle while protecting it from dust and potential damage. It also allows for a more curated and formal display.
- On a Tabletop:A tabletop display can be casual or formal, depending on the surrounding decor. Consider using a decorative tray or stand to elevate the bottle and add visual interest.
- In a Window:If your shell bottle is filled with clear sand or crystals, placing it in a window can create a beautiful suncatcher effect.
Protecting Your Shell Bottle from Dust and Damage
Dust can accumulate on your shell bottle over time, dulling its shine and making it appear less attractive. Protecting it from dust and damage is crucial for maintaining its beauty.
- Regular Dusting:Use a soft cloth or a feather duster to gently remove dust from the bottle’s exterior. Avoid using harsh chemicals or abrasive cleaners that could damage the shells.
- Glass Display Case:As mentioned earlier, a glass display case can provide excellent protection from dust and accidental bumps.
- Avoid Direct Sunlight:While natural light can enhance the beauty of your shell bottle, prolonged exposure to direct sunlight can fade the colors of the shells over time.
Caring for Your Shell Bottle
Proper care can ensure your shell bottle remains a treasured decorative piece for years to come.
- Avoid Excessive Moisture:Excessive moisture can cause mold or mildew to grow within the bottle. If you live in a humid climate, consider using a silica gel packet to absorb moisture.
- Handle with Care:When handling your shell bottle, use a gentle touch to avoid knocking the shells together or causing any damage.
- Avoid Extreme Temperatures:Shell bottles are sensitive to extreme temperatures. Avoid placing them near heat sources or in direct sunlight for extended periods.