DIY Tutorial: Decorate Candles with Paper Napkins
Diy tutorial decorate candles with paper napkins – DIY Tutorial: Decorate Candles with Paper Napkins – Transform ordinary candles into stunning works of art with this simple and versatile craft. Candle decorating with paper napkins is a delightful way to add a personal touch to your home decor, and it’s a fun and easy project for crafters of all skill levels.
This technique has been around for years, evolving from simple decoupage to intricate designs that mimic paintings and even photography.
From classic pillar candles to sleek taper candles, you can use this technique to personalize any type of candle. Whether you’re looking to create a rustic farmhouse feel, a whimsical fairy tale scene, or a sophisticated modern look, the possibilities are endless.
This guide will walk you through the process step-by-step, from selecting the right materials to adding finishing touches that will make your candles truly unique.
Candle Decorating with Paper Napkins
Candle decorating with paper napkins is a fun and easy craft that allows you to transform plain candles into beautiful and personalized pieces. The technique involves using decoupage medium to adhere patterned paper napkins to the surface of a candle, creating a unique and eye-catching design.
This technique is versatile and can be used to decorate various types of candles, from simple pillar candles to votive candles, tealights, and even jar candles. The possibilities are endless, and the results are truly stunning.
Types of Candles Suitable for Decorating
Paper napkin decoupage is a versatile technique that can be applied to a wide range of candle types. Here are some examples:
- Pillar Candles: These candles are a popular choice for decorating with paper napkins, as their large surface area provides ample space for intricate designs.
- Votive Candles: These small, cylindrical candles are ideal for creating delicate and charming designs.
- Tealights: Tealights are a fun and easy option for beginners, as their small size makes them quick and simple to decorate.
- Jar Candles: These candles are perfect for creating a unique and personalized look. You can decorate the glass jar itself, or the wax inside the jar.
Materials and Tools
Before embarking on your candle decorating journey, gather the necessary materials and tools to ensure a smooth and successful experience. These items will play a crucial role in achieving your desired look and ensuring a safe and enjoyable crafting process.
Essential Materials
The following list Artikels the essential materials required for candle decorating with paper napkins:
- Candles:The foundation of your project, candles provide the canvas for your decorative designs. Consider the size, shape, and color of the candles you choose, as these will influence the overall aesthetic of your finished product. For beginners, it’s recommended to start with plain white or ivory candles to allow the napkin design to stand out.
- Paper Napkins:The star of the show, paper napkins offer a wide range of designs and patterns to suit various styles and preferences. Choose napkins with motifs that resonate with your personal taste and complement the candle’s color and shape. Look for napkins with vibrant colors and intricate patterns for a bolder look, or opt for subtle designs for a more understated aesthetic.
- Mod Podge:This versatile adhesive acts as both a glue and a sealant, securing the napkin to the candle and protecting the finished design. It’s available in both matte and gloss finishes, allowing you to customize the final appearance of your candle.
Choose a matte finish for a more subtle look, or a gloss finish for a vibrant, polished appearance.
- Brushes:Brushes are essential for applying Mod Podge evenly and smoothly to the candle surface. Choose a brush with soft bristles to prevent damage to the napkin. A small, flat brush is ideal for detailed work, while a wider brush is useful for covering larger areas.
Looking for a unique and easy way to personalize your Valentine’s Day gifts? Try decorating candles with paper napkins! It’s a fun and simple craft that adds a touch of charm. For more gift ideas, check out this amazing 14 days of gifts countdown to Valentine’s Day guide.
You’ll find a treasure trove of inspiration to make this Valentine’s Day truly special. And after you’ve crafted your beautiful candles, don’t forget to share them with your loved ones – they’re sure to appreciate the thoughtfulness and creativity!
- Scissors:Scissors are used to trim the excess napkin around the candle, creating a clean and polished look. A pair of sharp, pointed scissors is recommended for precise cutting.
Optional Embellishments
While not strictly necessary, optional embellishments can enhance the visual appeal of your decorated candles:
- Glitter:Adding a touch of sparkle to your candles can create a glamorous effect. Choose glitter in colors that complement the napkin design and apply it sparingly for a subtle shimmer. Avoid using excessive amounts of glitter, as this can make the candle look messy.
- Beads:Beads can add texture and dimension to your candle designs. Choose beads in sizes and colors that complement the napkin and candle. Secure the beads with Mod Podge or a strong adhesive.
- Ribbons:Ribbons can add a touch of elegance and sophistication to your candle decorations. Choose ribbons in colors and patterns that complement the napkin and candle. Secure the ribbon with Mod Podge or a strong adhesive.
- Other embellishments:Your creativity is the limit when it comes to embellishing your candles. Consider using other materials such as lace, dried flowers, or even small pieces of fabric to create unique and personalized designs.
Safety Precautions
Safety is paramount when working with candles and Mod Podge:
- Work in a well-ventilated area:Mod Podge emits fumes, so it’s important to work in a well-ventilated area to avoid inhaling them. Open windows and doors to allow fresh air to circulate. Consider wearing a respirator mask if you are sensitive to fumes.
- Avoid contact with skin and eyes:Mod Podge can irritate skin and eyes. Wear gloves and eye protection when handling it. If Mod Podge comes into contact with your skin, wash it off immediately with soap and water. If it gets into your eyes, flush them with water for 15 minutes and seek medical attention.
- Keep Mod Podge away from heat and flame:Mod Podge is flammable, so keep it away from heat and open flames. Store it in a cool, dry place.
- Handle candles with care:Candles are fragile and can easily break. Handle them carefully to avoid accidents. Never leave a burning candle unattended.
Best Practices
Following best practices ensures a smooth and successful candle decorating experience:
- Prepare the candles:Before applying Mod Podge and the napkin, clean the candles with a damp cloth to remove any dust or debris. Allow the candles to dry completely before proceeding.
- Work in thin layers:Apply Mod Podge in thin, even layers to avoid wrinkles or bubbles. Allow each layer to dry completely before applying the next. This will prevent the napkin from becoming soggy and ensure a smooth, even finish.
- Smooth out wrinkles:If wrinkles appear in the napkin, use a soft brush or your fingers to gently smooth them out. Be careful not to tear the napkin.
- Let the Mod Podge dry completely:Allow the Mod Podge to dry completely before handling the candles. This will prevent the napkin from smudging or getting damaged.
Preparation and Design: Diy Tutorial Decorate Candles With Paper Napkins
Getting ready to decorate your candles with paper napkins is an exciting step! Choosing the right napkins and understanding how to manipulate them for the best results is key to achieving a beautiful and unique finish.
Let’s dive into the exciting world of paper napkin design and preparation.
Selecting Paper Napkins
The first step is choosing the perfect paper napkins. You want napkins that have a design or texture that will translate well onto the surface of your candle. Consider these tips:
- Choose napkins with bold designs and vibrant colors. The colors and patterns will stand out more prominently on the candle’s surface.
- Consider napkins with interesting textures. Embossed or textured napkins can add a unique dimension to your design.
- Look for napkins with multiple layers. These are easier to work with and will provide a more substantial design.
- Experiment with different types of napkins. You can find napkins made from various materials, including paper, cloth, and even rice paper. Each type offers a unique look and feel.
Cutting and Layering Napkin Motifs
Once you’ve chosen your napkins, it’s time to prepare them for application. This involves cutting and layering the napkin motifs to ensure optimal adhesion and visual impact.
- Cut out the desired motifs from the napkin. You can use scissors or a craft knife for this step. Remember to cut out the motif with a small margin around it to ensure that the design is fully covered when applied to the candle.
- Separate the layers of the napkin. Most paper napkins have multiple layers. Separate these layers carefully, keeping the top layer (the one with the design) intact.
- Layer the motifs for a more substantial design. If you want a more textured or intricate design, you can layer multiple motifs on top of each other. This will also help to ensure that the design adheres well to the candle’s surface.
Creating Custom Designs
You can create unique designs by combining different napkin patterns. Here are a few ideas:
- Combine patterns with complementary colors. For example, you could use a floral napkin with a geometric pattern in a coordinating color.
- Layer different motifs on top of each other. This will create a more complex and interesting design.
- Use a stencil to create a custom design. You can use a stencil to create a specific pattern on the candle, and then apply the napkin motif over the top.
Application Techniques
Applying Mod Podge to your candle and napkin layers is the heart of the decoupage process. It’s the glue that binds the paper to the candle and creates a beautiful, finished look. Here’s how to apply Mod Podge for the best results:
Applying Mod Podge
Mod Podge is a water-based sealant that comes in a variety of finishes, including matte, gloss, and satin. It’s important to choose the finish that best suits your project. For candle decorating, a matte or satin finish is usually preferred, as it helps to minimize glare and highlights the details of the napkin design.
Always work in a well-ventilated area and use gloves to protect your hands.
Preparing the Candle
Before you begin applying Mod Podge, make sure your candle is clean and dry. Any dust or debris on the candle surface will show up in the final finish.
Decorating candles with paper napkins is a fun and easy craft project, but it can get a little messy! Just like those sticky fingers that always seem to find their way onto everything, you might need to employ some “germ warfare” tactics to keep your workspace clean.
Luckily, there are some quick fixes for those messy moments, like germ warfare quick fixes for your child’s dirty habits. Once you’ve tackled the mess, you can get back to creating those beautiful, personalized candles!
Applying the First Layer
Using a brush, apply a thin, even layer of Mod Podge to the area of the candle where you will be applying your napkin. Avoid getting Mod Podge on the wick or any other areas that you don’t want to decorate.
Applying the Napkin
Carefully place your napkin over the Mod Podge layer, making sure it is smooth and wrinkle-free.
Applying the Second Layer
Once the napkin is in place, gently brush another thin layer of Mod Podge over the top of the napkin. This will help to seal the napkin and prevent it from peeling or wrinkling.
Smoothing the Napkin
To smooth out any wrinkles or bubbles, use a soft cloth or a sponge to gently press the napkin into the Mod Podge.
I love how easy it is to decorate candles with paper napkins – just a little glue and some creativity, and you have a whole new look! It’s actually a great way to get crafty and make a fun party centerpiece.
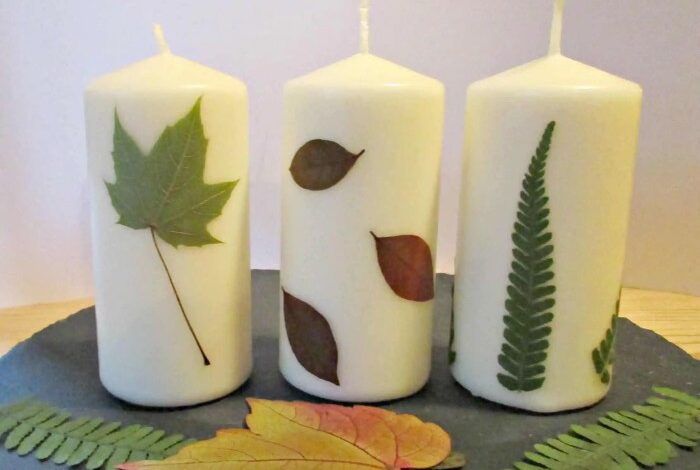
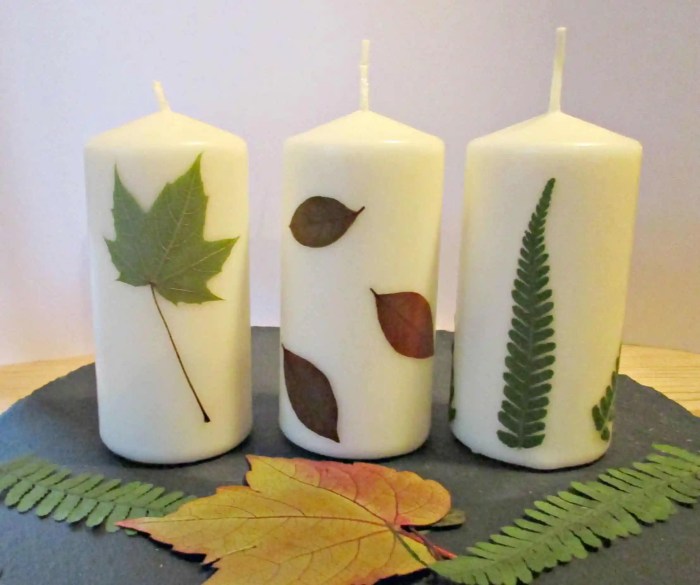
And if you’re looking for last-minute costume ideas for the grownups, check out this great resource: last minute costume ideas for the grownups. Anyway, back to the candles – I’m planning to make some with fall leaves next.
It’s going to be amazing!
Adding Additional Layers
For a more durable finish, you can add additional layers of Mod Podge. After each layer, allow the Mod Podge to dry completely before applying the next layer.
Application Methods
There are different application methods for Mod Podge, each with its own benefits:
Brushing
Brushing is the most common method for applying Mod Podge. It allows you to control the amount of Mod Podge that you are using and helps to ensure that the Mod Podge is evenly distributed.
Dabbing
Dabbing is a good method for applying Mod Podge to small areas or for creating a textured finish.
Smoothing
Smoothing is a good method for blending the Mod Podge and the napkin together. It helps to create a smooth, even finish and prevent wrinkles or bubbles.
Tips for a Smooth Finish
Here are some tips for achieving a smooth, even finish and avoiding wrinkles or bubbles:
- Use a high-quality brush. A good brush will help you to apply the Mod Podge evenly and prevent streaks or bubbles.
- Work in thin layers. Thin layers of Mod Podge will dry faster and are less likely to crack or peel.
- Allow the Mod Podge to dry completely between layers. This will help to prevent the Mod Podge from becoming too thick and causing wrinkles or bubbles.
- Use a soft cloth or sponge to smooth out any wrinkles or bubbles.
- Don’t overwork the Mod Podge. Once the Mod Podge is dry, it’s best to leave it alone. Overworking the Mod Podge can cause it to become cloudy or sticky.
Finishing Touches
The final step in decorating your candles with paper napkins is to seal and embellish them, adding a touch of elegance and durability to your creations. Applying a protective layer of Mod Podge is essential for preserving your artwork and ensuring its longevity.
Additionally, embellishing your candles with glitter, ribbons, or dried flowers can create a personalized and unique look.
Adding a Protective Layer
Sealing your decorated candles with a layer of Mod Podge is crucial for protecting the paper napkin design from smudging, fading, and damage. This protective layer also helps to create a smooth and even finish, enhancing the overall look of your candle.
- Apply a thin coat of Mod Podge over the entire decorated surface, ensuring that all edges are sealed.
- Let the Mod Podge dry completely before applying a second coat, if desired.
- Once the Mod Podge is completely dry, you can handle your candle without fear of damaging the design.
Embellishing with Glitter, Ribbons, or Dried Flowers
Adding embellishments to your decorated candles is a great way to personalize your creations and add a touch of sparkle or elegance.
- Glitter: Sprinkle glitter over the wet Mod Podge, allowing it to adhere to the surface. Once the Mod Podge is dry, brush off any excess glitter.
- Ribbons: Tie ribbons around the base or top of the candle, adding a touch of color and texture. Use a hot glue gun to secure the ribbon in place.
- Dried Flowers: Attach dried flowers to the candle using a hot glue gun. Choose flowers that complement the design of your paper napkin.
Creating Unique Finishing Touches
To elevate your candle decorating skills, consider incorporating unique finishing touches.
- Textured Accents: Create textured accents using materials like burlap, lace, or textured paper. Attach these accents to the candle using Mod Podge or hot glue.
- Personalized Messages: Add a personalized touch by writing messages or initials on the candle using a paint pen or permanent marker.
Variations and Inspiration

The beauty of decorating candles with paper napkins lies in its versatility. You can achieve a wide range of styles and themes by simply altering the napkins, candles, and techniques you use. Let’s explore some variations and find inspiration for your next candle decorating project.
Candle Variations
The size, shape, and color of the candle significantly influence the final look of your decorated piece. Here’s a table showcasing different candle variations and their potential decorative outcomes:
| Candle Type | Decorative Outcome | Example |
|---|---|---|
| Small Tea Lights | Intricate designs, delicate patterns | A tea light with a floral napkin design, perfect for a romantic dinner setting. |
| Tall Pillar Candles | Bold statements, large-scale patterns | A pillar candle with a geometric napkin design, adding a modern touch to a living room. |
| Round Candles | Classic and elegant designs | A round candle with a vintage-inspired napkin design, ideal for a farmhouse-style decor. |
| Square Candles | Contemporary and minimalist designs | A square candle with a minimalist napkin design, perfect for a modern and clean aesthetic. |
Napkin Variations
The type of paper napkin you choose plays a crucial role in the final design. You can explore different textures, patterns, and themes to create unique looks.
- Floral Napkins:These offer a classic and elegant look, perfect for creating romantic or vintage-inspired designs.
- Geometric Napkins:Ideal for modern and minimalist designs, these napkins can add a touch of sophistication to your candle.
- Seasonal Napkins:Choose napkins with holiday themes or seasonal motifs to create festive candles.
- Specialty Napkins:Explore napkins with unique designs, such as those featuring animals, landscapes, or abstract patterns.
Inspiration Resources
Finding inspiration for your candle decorating projects is easy. Here are some resources to spark your creativity:
- Pinterest:A treasure trove of ideas, Pinterest is a great place to find inspiration for various candle decorating techniques and designs.
- Instagram:Explore hashtags like #candledecorating, #papernapkinart, and #diycandles to discover unique designs and creative techniques.
- Craft Blogs:Many craft blogs feature tutorials and inspiration for candle decorating projects, often showcasing creative uses of paper napkins.
- Craft Magazines:Browse through craft magazines for ideas and inspiration on candle decorating, with many featuring step-by-step instructions and creative projects.
Conclusion
Decorating candles with paper napkins is a fun and easy way to personalize your home décor. This technique allows you to create unique and beautiful candles that reflect your style and personality. With a few simple materials and a little creativity, you can transform ordinary candles into stunning works of art.
Key Takeaways
This guide has covered all the essential steps involved in candle decorating with paper napkins, from selecting the right materials and tools to applying the designs and adding finishing touches. You’ve learned how to:
- Prepare your candles and paper napkins for the decoupage process.
- Apply the napkin designs using Mod Podge or a similar adhesive.
- Seal the designs with a protective layer of varnish or sealant.
- Explore various design ideas and techniques to create unique and personalized candles.
Share Your Creations, Diy tutorial decorate candles with paper napkins
Now that you’ve mastered the art of candle decorating with paper napkins, it’s time to unleash your creativity! Experiment with different napkin designs, colors, and techniques to create your own unique candle masterpieces. Don’t forget to share your creations with the world and inspire others to embark on their own candle decorating journey.
Let’s see those beautiful candles!