How to Make a Plexi Frame: A Step-by-Step Guide
How to make a plexi frame? It’s a question that pops up when you’re looking to add a modern touch to your home decor, display your favorite artwork, or create a unique and eye-catching project. Plexiglass, with its versatility and sleek appearance, offers a fantastic material for crafting frames that are both functional and stylish.
In this guide, we’ll delve into the process of building your own plexi frame, from selecting the right materials and tools to mastering the art of cutting and joining plexiglass. Get ready to embark on a journey of creativity and discover the rewarding experience of crafting your own unique plexi frame.
From choosing the right tools and materials to ensuring safety precautions, this guide will equip you with the knowledge and confidence to tackle this DIY project. We’ll explore different techniques for cutting plexiglass, including scoring and breaking, as well as various methods for joining the pieces together using adhesives and mechanical fasteners.
Once your frame is assembled, we’ll cover finishing touches like smoothing edges and applying protective coatings to enhance its appearance and durability. Finally, we’ll explore a range of creative applications for your plexi frame, inspiring you to unleash your imagination and create stunning displays.
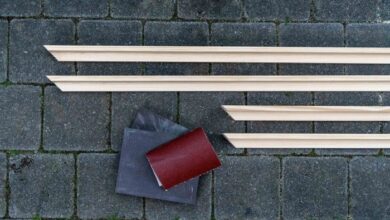
Measuring and Cutting Plexiglass
Now that you have your design in place, it’s time to get your hands dirty and start cutting! This is where precision comes in. You’ll need to measure your plexiglass carefully and cut it to the exact dimensions of your frame.
Making a plexi frame is a great DIY project, especially if you’re looking for a personalized gift. You could even incorporate a favorite family photo or a piece of artwork for a truly unique touch. If you’re looking for more ideas, check out this website for christmas gift idea grandparents , which might inspire you to create a special plexi frame that they’ll cherish for years to come.
Once you’ve got your design, you can easily find plexi sheets and framing materials at most craft stores.
Cutting Plexiglass
Plexiglass is a versatile material that can be cut using various techniques. The most common method involves scoring and breaking the material. This technique is relatively simple and can be done with basic tools.
Making a plexi frame is a great way to add a personalized touch to your toddler’s room. You can use it to display artwork, photos, or even a special piece of fabric. If you’re looking for budget-friendly ideas for your little one’s space, check out this article on toddler boy room on a budget 2 for more inspiration.
Once you’ve got the room looking great, you can easily add a plexi frame to showcase your child’s personality and create a truly unique space.
Here’s a step-by-step guide on how to cut plexiglass using the scoring and breaking method:
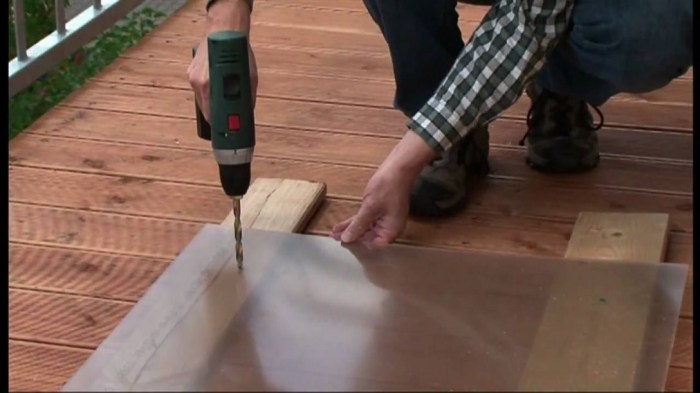
- Measure and Mark:Use a ruler and a permanent marker to mark the desired cut lines on the plexiglass sheet. Ensure your measurements are accurate, as any errors will be reflected in the final product.
- Score the Plexiglass:Using a utility knife or a specialized plexiglass scoring tool, score along the marked line. Apply firm and even pressure while scoring, creating a deep groove that will serve as a breaking point.
- Break the Plexiglass:Once the score is complete, you can break the plexiglass along the line. To do this, place the plexiglass on a flat surface with the scored line facing up. Then, gently apply pressure on both sides of the score line, gradually increasing the pressure until the plexiglass breaks cleanly.
For a clean break, it’s crucial to score the plexiglass deeply enough. A shallow score will result in a jagged break, making it difficult to assemble the frame.
For more intricate designs or complex shapes, consider using a jigsaw or a laser cutter. A jigsaw allows you to cut curves and intricate patterns, while a laser cutter offers precision and speed for complex designs.
Joining the Plexi Frame: How To Make A Plexi Frame

Now that you’ve measured and cut your plexiglass pieces, it’s time to join them together to form your frame. There are a few different methods you can use, each with its own advantages and disadvantages.
Adhesives for Plexiglass
Adhesives offer a clean and relatively easy way to join plexiglass pieces. However, it’s important to choose the right adhesive for the job. Not all adhesives are compatible with plexiglass, and some can cause the material to become cloudy or discolored.
- Acrylic-based adhesivesare a good choice for joining plexiglass. They bond strongly to the material and are available in both solvent-based and water-based formulas. Solvent-based adhesives tend to be stronger but can also be more difficult to work with. Water-based adhesives are easier to clean up but may not be as strong.
- Epoxy adhesivesare another good option for joining plexiglass. They are very strong and durable, and they can withstand a wide range of temperatures. However, epoxy adhesives can be difficult to apply and may require a longer curing time.
- Silicone adhesivesare not generally recommended for joining plexiglass. They can cause the material to become cloudy or discolored, and they may not bond as strongly as other types of adhesives.
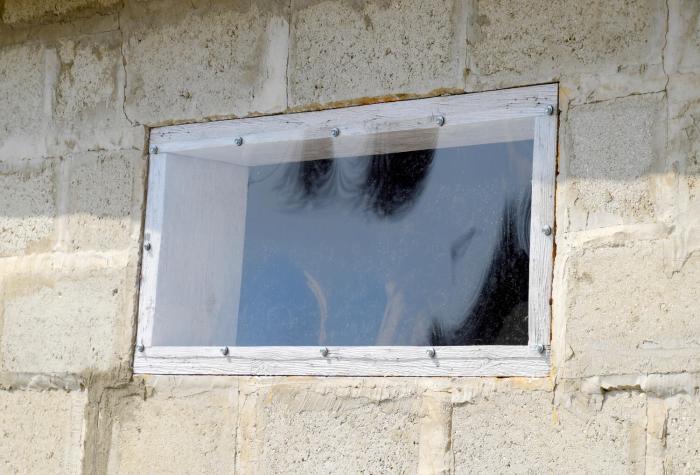
Mechanical Fasteners
Mechanical fasteners, such as screws or clips, can also be used to join plexiglass pieces. This method is often preferred for applications where strength and durability are important.
- Screwsare a common choice for joining plexiglass pieces. To avoid cracking the plexiglass, it’s important to use screws that are designed for use with plastic. These screws have a wider head and a shallower thread than standard wood screws.
You can also use a countersinking bit to create a recessed hole for the screw head. This will help to prevent the screw head from protruding from the surface of the plexiglass.
- Clipscan also be used to join plexiglass pieces. Clips are a good option for applications where you need to be able to easily disassemble the frame. There are many different types of clips available, so it’s important to choose the right type for your project.
Finishing Touches

Now that your plexi frame is assembled, it’s time to give it that polished look and protect it for years to come. This final step involves smoothing out any imperfections and adding a protective coating to enhance its durability and appearance.
Smoothing Edges
Smoothing the edges of your plexi frame is crucial for both aesthetics and safety. Rough edges can be sharp and prone to chipping, potentially causing injury. Here’s how to achieve a smooth, professional finish:
- Sanding:Start with coarse-grit sandpaper (around 120 grit) to remove any sharp edges or irregularities. Gradually transition to finer grits (240, 400, and 600) for a progressively smoother finish. Always sand in one direction to avoid scratches.
- Flame Polishing:This technique involves using a small flame to melt the edges of the plexi, creating a smooth and rounded finish. It’s best suited for thicker plexi sheets and requires practice to avoid scorching or warping the material.
- Edge Trimming:For more precise edge finishing, you can use a router with a specialized plexiglass bit. This method is ideal for creating clean, consistent edges, especially when working with intricate designs.
Applying Protective Coatings
Protective coatings not only enhance the appearance of your plexi frame but also make it more resistant to scratches, UV damage, and fading. Here are some popular options:
- Acrylic Lacquer:A clear, durable coating that provides a glossy finish and protects against scratches and UV rays. It’s readily available and easy to apply.
- Polyurethane Varnish:A high-performance coating that offers excellent durability and UV resistance. It’s ideal for outdoor applications and can withstand harsh weather conditions.
- UV-Resistant Film:This film is applied to the surface of the plexi and acts as a barrier against UV rays, preventing yellowing and fading. It’s easy to install and can be removed without damaging the plexi.
Cleaning and Maintenance, How to make a plexi frame
To keep your plexi frame looking its best, follow these simple cleaning and maintenance tips:
- Regular Dusting:Use a soft, microfiber cloth to gently remove dust and debris. Avoid using abrasive materials that can scratch the surface.
- Mild Soap and Water:For deeper cleaning, mix a few drops of mild dish soap with warm water. Gently wipe the surface with a soft cloth, rinsing thoroughly with clean water.
- Avoid Harsh Chemicals:Avoid using harsh chemicals, solvents, or abrasive cleaners as they can damage the plexi.
- Proper Storage:When not in use, store your plexi frame in a clean, dry environment to prevent dust accumulation and potential damage.
Making a plexi frame is a great way to showcase your favorite artwork or photos. You’ll need to cut the plexi to size, then carefully assemble it with the frame. But be careful, sometimes it can be hard to tell the difference between the plexi and the glass! To test your eye, try can you spot the difference and see if you can pick out the plexi from the glass.
Once you’re confident you can tell the difference, you’ll be ready to create a beautiful and durable frame for your treasured pieces.