The Secrets to Making a Perfect Big Bow
The secrets to making a perfect big bow lie in understanding the nuances of ribbon selection, mastering fundamental folding techniques, and building a sturdy structure that will hold its shape. It’s an art form that combines precision with creativity, allowing you to craft bows that are both visually stunning and structurally sound.
From choosing the right ribbon to adding finishing touches, this guide will walk you through each step, empowering you to create bows that will impress and delight. Whether you’re wrapping gifts, adding a touch of elegance to your hair, or decorating your home, the ability to create a perfect big bow is a skill that will enhance your creative endeavors.
The Art of Ribbon Selection
Choosing the right ribbon is crucial for crafting a stunning big bow. It’s the foundation of your masterpiece, impacting both the bow’s size and visual appeal. Consider the ribbon’s material, width, and texture, as they all contribute to the final look.
Ribbon Types and Their Characteristics
The type of ribbon you select plays a significant role in the final look of your bow. Each ribbon type has its own unique characteristics, making them suitable for different projects.
One of the secrets to making a perfect big bow is choosing the right fabric. You want something that will hold its shape and create a nice, full bow. A fabulous fabric scarf can be a great choice, as it often has a nice drape and a little bit of weight to it.
Of course, the color and pattern of the fabric are also important, as they will determine the overall look of your bow.
- Satin ribbon: Known for its smooth, glossy finish, satin ribbon adds a touch of elegance to any bow. Its delicate texture makes it ideal for creating bows that drape beautifully.
- Grosgrain ribbon: This ribbon features a textured, woven surface, offering a more substantial feel than satin. Its texture provides a firm structure, making it perfect for crafting voluminous bows.
- Organza ribbon: Organza ribbon is characterized by its sheer, lightweight texture. It adds a delicate and airy feel to bows, making it suitable for creating romantic and whimsical designs.
- Wire-edged ribbon: This ribbon features a wire running along its edges, providing added support and structure. It holds its shape well, making it ideal for creating bows that maintain their form even when handled.
- Velvet ribbon: Velvet ribbon exudes a luxurious feel, with its soft, plush texture. Its rich color and velvety softness create a sophisticated and elegant look, perfect for special occasions.
Ribbon Width and Texture: Shaping the Bow
The width of the ribbon directly influences the size and fullness of the bow. Wider ribbons create larger, more substantial bows, while narrower ribbons produce smaller, more delicate bows.
- Wide ribbons (2-4 inches):Ideal for creating dramatic, statement bows. They provide a generous amount of fabric, resulting in a voluminous and eye-catching look.
- Medium ribbons (1-2 inches):Offer a balance between size and detail. They create bows that are substantial without being overwhelming, suitable for a variety of projects.
- Narrow ribbons (less than 1 inch):Perfect for crafting delicate and intricate bows. They allow for intricate details and fine craftsmanship, creating a refined and elegant look.
The texture of the ribbon also plays a role in the final appearance of the bow.
- Smooth ribbons:Create a sleek and polished look. Satin ribbons, for example, provide a smooth, glossy finish that adds a touch of elegance to any bow.
- Textured ribbons:Offer a more tactile and visually interesting appearance. Grosgrain ribbons, with their textured surface, create a more substantial and dimensional bow.
Color and Pattern: Adding Visual Appeal
The color and pattern of the ribbon are essential elements in creating a visually appealing bow.
- Solid colors:Provide a classic and timeless look. They allow the bow’s shape and size to take center stage, making them versatile for various occasions.
- Printed patterns:Add a touch of personality and flair to your bows. Choose patterns that complement the occasion or theme, creating a unique and eye-catching design.
- Metallic ribbons:Offer a touch of glamour and sophistication. They add a shimmer and shine to any bow, making them perfect for special events and festive occasions.
Remember, the key to creating a perfect big bow lies in choosing the right ribbon that complements your project and your personal style. Experiment with different types, widths, and textures to discover the combination that best suits your vision.
Mastering the Fold

The foundation of any stunning bow lies in the mastery of its folds. These techniques, while seemingly simple, are the key to achieving symmetry, volume, and a polished finish. Let’s delve into the two fundamental folds: the butterfly fold and the loop fold.
Butterfly Fold
The butterfly fold is the simplest and most versatile technique. It forms the basic shape of the bow, creating two symmetrical loops.
To create a butterfly fold, start with a ribbon laid flat. Fold the ribbon in half, aligning the ends. Then, fold the ribbon again, bringing the bottom edge up to meet the top edge. This creates a single, folded section. Now, carefully pull the ends of the ribbon outwards to form two loops. The result is a symmetrical butterfly shape.
Loop Fold
The loop fold is a more advanced technique used to create intricate bows with multiple loops. It involves creating individual loops and then securing them together.
To create a loop fold, start with a ribbon laid flat. Fold the ribbon in half, aligning the ends. Then, fold the ribbon again, bringing the bottom edge up to meet the top edge. This creates a single, folded section. Now, pinch the center of the folded section and carefully pull the ribbon outwards to form a loop. Repeat this process to create multiple loops, securing each loop with a pin or clip.
Securing the Folds
Once you have created your desired folds, it’s essential to secure them to maintain the shape of the bow. There are several methods for securing the folds:
- Pins:Use straight pins to secure the folds at the center of the bow and at the base of each loop. Ensure the pins are inserted perpendicular to the ribbon to avoid snagging or damaging the fabric.
- Clips:Small, decorative clips can be used to secure the folds and add a touch of embellishment. Clip the folds at the center of the bow and at the base of each loop.
- Glue:For a more permanent solution, use a strong fabric glue to secure the folds. Apply glue sparingly to avoid creating a bulky or messy bow.
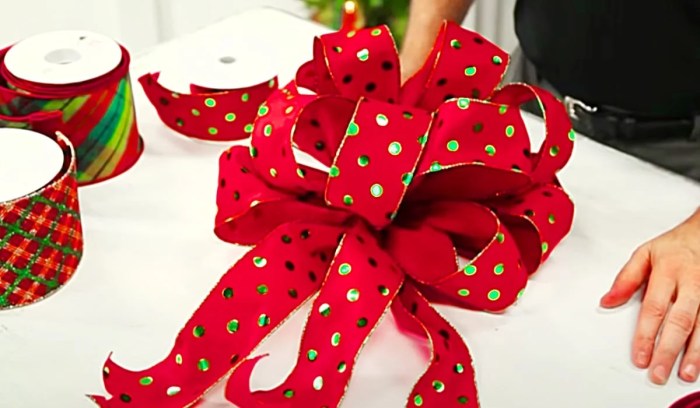
Building the Big Bow Structure: The Secrets To Making A Perfect Big Bow
The foundation of a stunning big bow lies in its structure. Just like a well-built house, a strong framework ensures the bow maintains its shape and grandeur. This section explores various techniques for constructing a big bow with multiple folds and layers, providing the stability and visual impact you desire.
Creating Layers for Volume and Dimension
To achieve a voluminous and multi-dimensional big bow, layering is key. This technique involves stacking multiple folds of ribbon on top of each other, creating a three-dimensional effect. Here are some popular methods for layering:
- The Classic Method:This involves folding the ribbon in half lengthwise and then creating loops on either side. These loops are then layered on top of each other, creating a symmetrical bow with multiple layers. This technique is ideal for achieving a classic, elegant look.
- The Overlapping Method:This method involves overlapping the folds of the ribbon, creating a more relaxed and casual look. Each fold is placed slightly off-center from the previous one, adding a sense of movement and asymmetry to the bow. This is particularly effective for creating large, cascading bows.
The secret to a perfect big bow isn’t just about the ribbon, it’s about the heart you put into it. Just like a warm, homemade lasagna, a beautiful bow takes time, care, and a dash of creativity. For some inspiration, check out this list of 25 neighbor Christmas gift ideas , including lasagna, which is sure to warm your heart (and stomach!).
But back to the bow, a little bit of patience and a few practice runs will get you a bow that’s as impressive as a perfectly layered lasagna.
- The Twisted Method:This technique involves twisting the ribbon before folding it, creating a more intricate and textured look. The twisting adds a unique dimension to the bow, making it appear more dynamic and eye-catching. This method is perfect for adding a touch of whimsy and sophistication to your bow.
Adding Structure and Stability with Wire or Floral Tape
To ensure your big bow retains its shape and structure, especially when used in decorative arrangements or gift wrapping, consider using wire or floral tape.
The secret to a perfect big bow? It’s all about the fabric and the technique. You want a material that drapes beautifully, like a luxurious silk or a soft velvet. And don’t forget to practice! Once you’ve mastered the art of the bow, you can even elevate your presentation by serving it alongside a stunning dish like prosciutto with cardamom scented peas and purple carrots.
The vibrant colors and delicate flavors of this dish will perfectly complement the elegance of your bow.
- Wire:Wire can be used to create a framework for the bow, keeping the folds in place and preventing them from drooping. Thin florist’s wire is ideal for this purpose. Simply wrap the wire around the base of each fold, securing it in place.
You can also use wire to create loops or accents within the bow itself, adding further structure and visual interest.
- Floral Tape:Floral tape is a self-adhesive tape that provides a secure and flexible hold. It’s commonly used to secure stems and create arrangements, and it can also be used to reinforce the folds of a big bow. Simply wrap the tape around the base of each fold, ensuring it adheres firmly.
Floral tape comes in a variety of colors, allowing you to match it to your ribbon or create a contrasting effect.
Creating a Center Loop or “Knot”
A center loop or “knot” adds a finishing touch to a big bow, creating a more defined and polished look. This element can be achieved using various methods:
- Simple Loop:This involves creating a small loop of ribbon in the center of the bow and securing it with a piece of wire or floral tape. This is a classic and simple technique that adds a touch of elegance to the bow.
- Knotted Center:This involves tying a knot in the center of the bow, using a piece of ribbon or twine. This method creates a more intricate and textured center, adding visual interest to the bow. You can experiment with different knotting techniques to create a variety of looks.
- Embellished Center:You can embellish the center of the bow with a variety of elements, such as a button, a brooch, or a decorative flower. This adds a personalized touch to the bow and makes it even more eye-catching.
Adding Finishing Touches
Now that you have mastered the art of building a big bow, it’s time to add those final touches that will elevate your creation from good to truly spectacular. Think of these embellishments as the jewelry for your bow, adding a touch of sparkle, personality, and visual interest.
Embellishing the Bow
Adding embellishments can transform a simple bow into a statement piece. Here are some popular options and tips for incorporating them:
- Beads:Beads come in a vast array of sizes, colors, and materials, offering endless possibilities. Consider using pearl beads for a classic look, wooden beads for a rustic feel, or colorful glass beads for a vibrant touch. You can strategically place beads around the center of the bow, along the edges, or even create patterns with different bead sizes and colors.
- Sequins:Sequins are a popular choice for adding sparkle and glamor. You can sew, glue, or hot glue sequins onto the bow, creating a shimmering effect. Consider using a variety of sequin sizes and colors for a more dynamic look.
- Decorative Accents:Think outside the box! You can incorporate other decorative elements like feathers, ribbons, lace, or even small charms to add a unique touch to your bow. The possibilities are endless, so let your creativity guide you.
Attaching Embellishments
Here are some methods for securely attaching embellishments to your bow:
- Sewing:This is a classic method that provides a strong and durable attachment. Use a needle and thread that matches the color of your bow and embellishments.
- Hot Glue:Hot glue is a quick and easy option for attaching embellishments, but it’s important to use a high-quality glue that will hold up over time. Be sure to apply the glue sparingly and let it dry completely before handling the bow.
- Fabric Glue:Fabric glue is a good alternative to hot glue, as it is less likely to damage delicate fabrics. It also dries clear, so it won’t be visible on your bow.
Ribbon Tails, The secrets to making a perfect big bow
Ribbon tails are an essential element of a big bow, adding visual interest and completing the overall look. Here are some tips for creating a visually appealing arrangement:
- Length:The length of the ribbon tails should be proportionate to the size of the bow. For a large bow, use longer tails, and for a smaller bow, use shorter tails.
- Styling:Ribbon tails can be styled in various ways. You can leave them straight, curl them, or even braid them. Experiment with different styles to find what suits your bow best.
- Placement:The ribbon tails should be placed evenly on either side of the bow. You can also twist or tie them together at the bottom for a more polished look.
Big Bow Applications

Now that you’ve mastered the art of crafting a perfect big bow, it’s time to explore the exciting ways you can use it! Big bows are incredibly versatile, adding a touch of whimsy and elegance to a variety of projects.
From enhancing gifts to adorning your home, the possibilities are endless.
Gift Wrapping
Big bows are the quintessential finishing touch for gift wrapping. They instantly elevate the presentation, adding a touch of festive flair. The key to choosing the right bow for your gift is to consider the size and shape of the box.
For smaller gifts, a smaller bow will suffice, while larger gifts demand a grander bow. Here are some tips for choosing the right size and style of bow for your gift wrapping:
- Size:Match the size of the bow to the size of the gift. A small bow on a large gift will look disproportionate, while a large bow on a small gift will overwhelm it.
- Style:Consider the occasion and the recipient’s taste when choosing a bow style. For example, a classic satin bow is perfect for formal occasions, while a whimsical ribbon bow is ideal for children’s gifts.
- Color:Choose a color that complements the wrapping paper and the occasion. For example, a red bow is perfect for Christmas, while a pastel bow is ideal for a baby shower.
Hair Accessories
Big bows can be a stunning addition to your hair, adding a touch of femininity and flair to any hairstyle. They can be worn on top of the head, tied around a ponytail, or even used to create a headband.Here are some tips for using big bows as hair accessories:
- Size:Choose a bow that is proportionate to the size of your head. A small bow will look lost on a thick head of hair, while a large bow can be overwhelming.
- Style:Consider the occasion and your personal style when choosing a bow style. For example, a classic satin bow is perfect for formal occasions, while a whimsical ribbon bow is ideal for casual outings.
- Color:Choose a color that complements your hair color and outfit. For example, a black bow is perfect for a black dress, while a brown bow is ideal for a brown outfit.
Home Decor
Big bows can add a touch of personality and charm to your home decor. They can be used to decorate wreaths, lampshades, and even furniture. Here are some tips for using big bows in your home decor:
- Size:Choose a bow that is proportionate to the size of the object you are decorating. A small bow on a large wreath will look lost, while a large bow on a small lampshade will overwhelm it.
- Style:Consider the style of your home decor when choosing a bow style. For example, a classic satin bow is perfect for a traditional home, while a whimsical ribbon bow is ideal for a modern home.
- Color:Choose a color that complements the colors in your home decor. For example, a red bow is perfect for a Christmas-themed room, while a pastel bow is ideal for a nursery.