DIY Upcycled Frame and Chalkboard: A Creative Home Decor Project
DIY Upcycled Frame and Chalkboard takes center stage, inviting you to transform old, forgotten frames into stylish and functional pieces. This project blends creativity with sustainability, breathing new life into discarded materials while adding a touch of personality to your home.
Upcycling offers a unique opportunity to create one-of-a-kind pieces that reflect your personal style. By repurposing old frames, you’re not only reducing waste but also creating a piece that speaks to your individuality. Whether you’re looking to add a vintage touch to your kitchen or a quirky statement to your living room, this project offers endless possibilities for personalization.
Introduction to Upcycled Frame and Chalkboard

Upcycling, the art of transforming discarded materials into something new and useful, is a popular DIY trend. This creative approach not only breathes new life into old objects but also promotes sustainability and reduces waste. Upcycling a frame and chalkboard is a fantastic way to showcase your creativity and add a unique touch to your home décor.
Benefits of Upcycling for a Frame and Chalkboard
Upcycling old frames and chalkboards offers numerous advantages, both environmentally and aesthetically.
- Environmental Responsibility:Upcycling reduces the demand for new materials and minimizes waste going to landfills. By giving old items a new purpose, you contribute to a more sustainable lifestyle.
- Cost-Effective:Repurposing materials can significantly reduce project costs. Finding old frames and chalkboards at thrift stores or garage sales can be a budget-friendly option.
- Unique and Personalized:Upcycled projects often possess a unique charm and personality. You can customize the frame and chalkboard to match your style and preferences, creating a truly one-of-a-kind piece.
- Creative Expression:Upcycling allows you to express your creativity and transform ordinary objects into something extraordinary. You can experiment with different paint colors, finishes, and embellishments to create a truly personalized piece.
Environmental and Aesthetic Advantages of Upcycling
Upcycling is a powerful tool for reducing our environmental footprint while enhancing our living spaces.
- Reduced Waste:Upcycling diverts materials from landfills, reducing the environmental impact of waste disposal.
- Resource Conservation:By reusing existing materials, we conserve natural resources that are used in the production of new items.
- Unique and Stylish Décor:Upcycled pieces often have a distinctive character and can add a touch of vintage charm to your home.
- Personal Expression:Upcycling allows you to create personalized items that reflect your individual style and taste.
Choosing the Right Frame
Finding the perfect frame for your upcycled chalkboard is an exciting part of the project! The frame will set the tone for your creation, so take your time to choose wisely. You can find unique frames in unexpected places, giving your chalkboard a truly personalized touch.
Frame Material Options
There are numerous materials you can use for your upcycled frame, each offering its own aesthetic and character.
- Old Picture Frames:These are a classic choice for upcycling. Look for frames with interesting details, like ornate moldings or unique finishes. You can easily remove the glass and backing to create your chalkboard.
- Window Frames:Window frames can add a rustic charm to your chalkboard. They often have a larger size, perfect for creating a statement piece. You’ll need to remove the glass and glazing, leaving the frame ready for your chalkboard.
- Pallet Wood:Pallet wood is a popular choice for upcycling projects due to its affordability and rustic appeal. You can easily create a frame by joining together pallet boards, creating a unique and eco-friendly design.
- Other Wood:Consider using salvaged wood from old furniture, doors, or even pieces you find at a lumberyard. Be sure to choose wood that is in good condition and free of knots or imperfections that could affect the frame’s stability.
Frame Size and Style Considerations
When choosing a frame, the size and style are important considerations.
- Size:Decide on the size of your chalkboard. This will determine the size of the frame you need. If you want a smaller chalkboard for a desk or shelf, a picture frame will work well. For a larger chalkboard, a window frame or a frame made from pallet wood might be a better choice.
- Style:Consider the style of your chalkboard. Do you want a rustic, modern, or vintage look? The frame should complement the overall style. A simple frame will enhance a modern chalkboard, while an ornate frame will work well with a vintage style.
- Chalkboard Dimensions:Once you have chosen a frame, measure the inside dimensions. This will determine the size of your chalkboard. Make sure to leave enough space around the edges for the frame to hold the chalkboard securely.
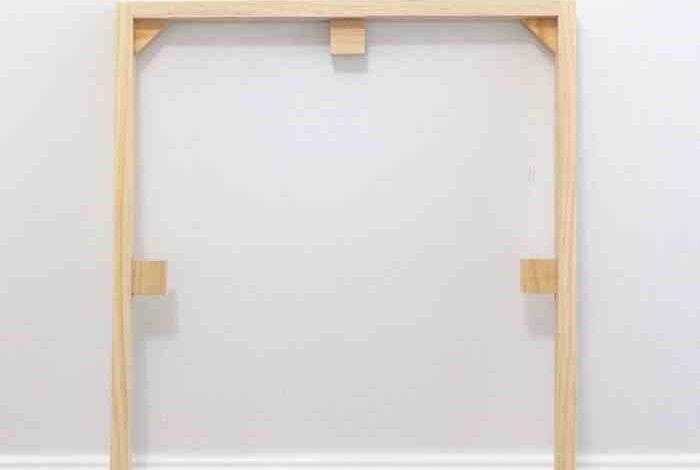
Preparing the Frame
Before you begin creating your chalkboard, prepare the frame by cleaning and sanding it.
- Cleaning:Use a damp cloth to remove any dirt, dust, or grime. For older frames, you may need to use a mild soap and water solution to remove stubborn stains.
- Sanding:Sand the frame with fine-grit sandpaper to create a smooth surface. This will help the paint adhere better and give your chalkboard a professional look.
- Painting:If you want to change the color of the frame, paint it with a primer and then your desired color. Allow the paint to dry completely before moving on to the next step.
Creating the Chalkboard Surface
Now that you’ve chosen your frame, it’s time to give it a chalkboard makeover! There are several ways to achieve this, each with its own advantages and disadvantages. Let’s explore the most popular methods:
Chalkboard Paint
Chalkboard paint is a specialized paint that creates a smooth, matte surface ideal for writing and drawing with chalk. Applying it is relatively straightforward and allows you to transform any surface into a chalkboard.
Applying Chalkboard Paint
1. Prepare the Surface
Before applying chalkboard paint, ensure the surface is clean, dry, and free of dust or debris. Sanding the surface with fine-grit sandpaper can improve adhesion.
I love the idea of making a DIY upcycled frame and chalkboard for Mother’s Day! It’s a thoughtful and practical gift that she can use to display family photos, notes, or even her favorite recipes. If you’re looking for more inspiration for homemade Mother’s Day gifts, check out this awesome website for mothers day ideas.
Once you’ve got your DIY project planned, you can personalize the chalkboard with a special message or drawing for an extra special touch.
2. Prime the Surface
If your frame is made of wood or metal, it’s recommended to prime it with a primer compatible with chalkboard paint. This helps the paint adhere better and provides a smooth base.
3. Apply the Chalkboard Paint
Using a brush or roller, apply a thin, even coat of chalkboard paint to the frame. Follow the manufacturer’s instructions regarding drying time and application.
4. Cure the Paint
Allow the paint to cure completely, typically 24-48 hours. This ensures the surface is ready for use.
5. Season the Chalkboard
After curing, season the chalkboard by rubbing a piece of chalk over the entire surface. This helps create a smooth, even surface for writing.
Pros and Cons of Chalkboard Paint
- Pros:
- Provides a durable and long-lasting chalkboard surface.
- Offers a wide range of colors to match your frame’s style.
- Relatively easy to apply and maintain.
- Cons:
- Requires careful preparation and curing time.
- May not be suitable for delicate frames.
- Can be messy to apply.
Chalkboard Contact Paper
Chalkboard contact paper is a self-adhesive paper with a chalkboard finish. It’s a convenient and mess-free option for creating a chalkboard surface, particularly for frames with intricate details or delicate materials.
Applying Chalkboard Contact Paper
1. Prepare the Surface
Clean and dry the frame’s surface thoroughly to ensure proper adhesion.
2. Measure and Cut
Measure the frame’s area and cut the contact paper to size. Allow for a small overlap for a seamless finish.
3. Apply the Contact Paper
Peel back a small portion of the backing paper and carefully align the contact paper with the frame. Smooth it down, working from the center outwards to avoid air bubbles.
4. Trim Excess
Once the contact paper is applied, use a sharp utility knife to trim any excess around the edges.
Pros and Cons of Chalkboard Contact Paper
- Pros:
- Easy to apply and remove without damaging the frame.
- Provides a quick and mess-free solution for creating a chalkboard surface.
- Suitable for delicate frames that can’t withstand paint.
- Cons:
- Not as durable as chalkboard paint.
- Limited color options.
- May not adhere well to uneven surfaces.
Using an Existing Chalkboard
If you have an old chalkboard lying around, you can repurpose it to create a unique frame. This is a great way to give a new life to an old item and add a vintage touch to your project.
Repurposing an Existing Chalkboard
1. Measure and Cut
Measure the frame’s dimensions and cut the chalkboard to fit.
2. Attach the Chalkboard
Use strong adhesive or mounting tape to secure the chalkboard to the frame. Ensure the chalkboard is securely attached to prevent it from falling off.
3. Clean and Season
Clean the chalkboard surface with a damp cloth and season it with chalk before use.
Pros and Cons of Using an Existing Chalkboard
- Pros:
- Offers a unique and vintage aesthetic.
- Provides a durable and long-lasting chalkboard surface.
- Can be a budget-friendly option.
- Cons:
- May be difficult to find a chalkboard that fits the frame perfectly.
- Requires careful handling to avoid damage.
Designing and Decorating the Frame
Now that you’ve created your chalkboard surface, it’s time to unleash your creativity and design a frame that complements your upcycled masterpiece. The frame is more than just a border; it’s an opportunity to add personality and style to your project.
A DIY upcycled frame and chalkboard is a fun and practical project for a baby or toddler’s room. You can personalize it with their name or favorite characters, and it’s a great way to display artwork or messages. If you’re looking for more gift ideas for little ones, check out this gift guide for babies and toddlers for inspiration.
Once you’ve got your gift ideas, you can get started on your upcycled frame and chalkboard, and personalize it to make it truly special.
Decorative Styles for Upcycled Frames
A wide range of decorative styles can transform your upcycled frame into a unique statement piece. Let’s explore some ideas:
| Style | Description | Example |
|---|---|---|
| Distressed | Achieve a vintage, rustic look by sanding or applying paint techniques to create a weathered effect. | Sanding the edges of the frame and applying a layer of white paint to create a chipped and faded look. |
| Embellished | Add decorative elements like beads, buttons, fabric scraps, or even small trinkets to create a personalized and eclectic frame. | Attaching a row of vintage buttons around the frame’s edge or adding a ribbon tied in a bow at the top. |
| Painted Patterns | Paint geometric patterns, floral designs, or abstract art directly onto the frame using stencils, brushes, or sponges. | Using a stencil to paint a repeating pattern of polka dots or stripes on the frame. |
| Metallic Accents | Apply gold, silver, or copper leaf to create a glamorous and sophisticated look. | Using gold leaf to accentuate the edges of the frame or applying a thin layer of copper paint for a warm, antique feel. |
Color Palettes and Finishes
When choosing colors and finishes, consider the overall aesthetic you want to achieve. For example, a rustic chalkboard might look best with a distressed wood frame, while a modern chalkboard might benefit from a sleek, black frame.
“The key is to create a cohesive design that complements the chalkboard surface and your personal style.”
Remember, you can also use multiple colors and finishes to add dimension and visual interest. For instance, you could paint the frame in a base color and then use a contrasting color for accents or embellishments.
Functional Uses for Upcycled Frame and Chalkboard

The versatility of an upcycled frame and chalkboard makes it a fantastic addition to any home. It can be used for various practical purposes, offering a unique and personalized touch to your décor. Let’s explore some functional uses for this DIY project.
Practical Uses for Upcycled Frame and Chalkboard
The upcycled frame and chalkboard are perfect for various practical uses around your home. You can use it as a message board, recipe board, calendar, artwork display, or even a memo board for important reminders.
- Message Board: A chalkboard can be used as a message board to leave notes for family members, share inspirational quotes, or even display a daily to-do list. You can personalize it with decorative elements like drawings, stickers, or colorful chalk.
- Recipe Board: Transform your chalkboard into a recipe board to display your favorite recipes or jot down new culinary discoveries. It’s a great way to keep your recipes organized and easily accessible in the kitchen.
- Calendar: Create a personalized calendar by drawing a grid on your chalkboard and filling in the dates. Use different colors to highlight important events, appointments, or birthdays. It’s a stylish and functional way to keep track of your schedule.
- Artwork Display: Use the chalkboard to showcase your children’s artwork, display inspirational quotes, or even create a gallery wall with your favorite pictures.
- Memo Board: Need a reminder for a task or an important appointment? Write it down on your chalkboard and keep it in a visible location. It’s a simple yet effective way to keep your life organized.
Incorporating the Frame and Chalkboard into Home Décor
The upcycled frame and chalkboard can be incorporated into various home décor styles. Here are some examples:
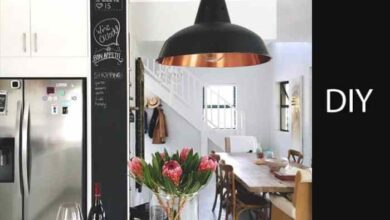
- Farmhouse Style: A rustic frame with a distressed finish paired with a chalkboard can add a touch of charm to a farmhouse-style kitchen or living room. Use chalk to write out a welcome message or display a collection of vintage recipes.
I recently upcycled an old picture frame into a chalkboard, and it turned out so cute! I’m planning to use it for leaving notes for my family, but I also thought it would be a great gift for my neighbors.
Speaking of gifts, I found a great idea for neighbor Christmas gifts on this website – a “bucket o’ chalk” filled with goodies! I think I’ll make a few of those and pair them with my chalkboard frames.
It’s going to be a fun and thoughtful way to show my neighbors I appreciate them.
- Modern Minimalist Style: For a modern minimalist look, opt for a sleek frame with a clean finish. Use a white or black chalkboard to create a minimalist aesthetic and display simple text or artwork.
- Bohemian Style: Embrace a bohemian vibe by using a colorful frame and incorporating elements like macrame or beaded decorations around the chalkboard. Use vibrant chalk colors to write out inspirational quotes or display colorful patterns.
- Industrial Style: A metal frame with a distressed finish can create an industrial-inspired look. Use the chalkboard to write out a motivational quote or display a vintage map.
Upcycling Techniques and Tips
Giving your old frame a new life is a fantastic way to add a personal touch to your decor. Upcycling is about transforming unwanted items into something useful and beautiful, and frames are perfect candidates for this. This section delves into some common upcycling techniques and provides tips to ensure a durable and eye-catching finish.
Sanding Techniques
Sanding is crucial for preparing the frame for painting or staining. It helps remove imperfections, smooth out rough surfaces, and create a uniform base for the new finish.
- Start with coarse-grit sandpaper (80-120 grit)to remove any stubborn layers of paint or varnish.
- Gradually progress to finer grits (150-220 grit)to achieve a smoother surface.
- Use a sanding blockto ensure even pressure and prevent uneven sanding.
- Sand in the direction of the wood grainto avoid scratches and maintain the natural texture of the wood.
- Always wear a dust mask and eye protectionwhen sanding, as dust can be harmful to your health.
Painting Techniques
Painting is a versatile technique for transforming the look of your frame. You can choose from a wide range of colors and finishes to create a unique and stylish piece.
- Prepare the frame by cleaning it thoroughlyto remove any dust or debris.
- Apply a primerto create a smooth and even surface for the paint to adhere to.
- Use a high-quality paintbrush or rollerfor an even and professional finish.
- Apply thin coats of paint, allowing each coat to dry completely before applying the next.
- Consider using multiple colors or techniques, such as distressing or layering, to add depth and texture.
Distressing Techniques
Distressing is a technique that adds a vintage or rustic look to your frame. It involves creating subtle wear and tear to give the frame a lived-in feel.
- Use sandpaperto create scratches and abrasions on the frame’s surface.
- Apply a layer of paint or stainto the frame before distressing.
- Use a sanding block or wire brushto create a distressed look.
- Consider using a paint scraperto create more dramatic effects.
Tips for Working with Different Materials
Upcycling involves working with various materials, each with its own characteristics and challenges. Here are some tips to ensure a successful and durable finish:
- Wood:Sanding, painting, and distressing are common techniques for wood frames.
- Metal:Clean the metal frame thoroughly using a metal cleaner and sandpaper. You can paint or distress metal frames.
- Plastic:Plastic frames can be painted using special plastic-friendly paints.
Safety Precautions and Best Practices, Diy upcycled frame and chalkboard
Upcycling projects often involve tools and materials that require safety precautions.
- Always wear eye protectionwhen using power tools or working with sanding materials.
- Use a dust maskto prevent inhaling dust particles, especially when sanding.
- Work in a well-ventilated areawhen using paints, stains, or varnishes.
- Keep tools and materials organizedto prevent accidents and ensure a clean workspace.
Inspirational Ideas and Examples: Diy Upcycled Frame And Chalkboard
Now that you’ve mastered the basics of creating an upcycled frame and chalkboard, let’s explore some inspirational ideas and examples to spark your creativity! These examples showcase the versatility and unique character that upcycled frame and chalkboards can bring to any space.
The examples below are categorized by style, function, or materials used, providing a diverse range of inspiration for your own upcycling projects.
Rustic Farmhouse Style
This style emphasizes natural materials, warm tones, and a touch of vintage charm. Here are some examples:* Image 1: Upcycled Window Frame ChalkboardThis example features a repurposed window frame painted in a warm white, with a chalkboard surface inserted in the center. The frame is adorned with rustic wood accents, such as a small wooden shelf or a weathered sign.
This design creates a cozy and welcoming atmosphere, perfect for displaying messages, recipes, or inspirational quotes.* Image 2: Reclaimed Wood Frame ChalkboardThis design utilizes reclaimed wood planks for the frame, creating a rustic and textured look. The chalkboard surface is painted in a dark grey or black, providing a stark contrast to the wood’s natural grain.
This design is ideal for a farmhouse kitchen or dining room, adding a touch of industrial chic to the space.
Modern Minimalist Style
This style focuses on clean lines, neutral colors, and a minimalist aesthetic. Here are some examples:* Image 3: Sleek Black Frame ChalkboardThis example features a simple black frame with a smooth, matte finish. The chalkboard surface is painted in a deep black, creating a sleek and modern look.
This design is perfect for a minimalist living room or office, where it can be used to display artwork, quotes, or reminders.* Image 4: Geometric Frame ChalkboardThis design incorporates geometric shapes into the frame, adding a touch of contemporary flair. The chalkboard surface is painted in a neutral color, such as white or grey, to complement the geometric design.
This design is ideal for a modern bedroom or home office, where it can be used to display inspirational messages, quotes, or artwork.
Functional and Practical Examples
These examples showcase the versatility of upcycled frame and chalkboards for practical uses.* Image 5: Kitchen Menu BoardThis design features a chalkboard surface within a frame, mounted on a wall in the kitchen. It can be used to list the day’s menu, grocery lists, or reminders.
The chalkboard surface allows for easy updating and erasing, making it a practical and functional addition to any kitchen.* Image 6: Kids’ Playroom Message BoardThis example utilizes a brightly colored frame and chalkboard surface, designed for children’s use. It can be used for displaying artwork, messages, or reminders.
The chalkboard surface encourages creativity and provides a fun way for children to express themselves.
Unique and Innovative Upcycling Ideas
“Don’t throw away that old picture frame, give it a new life as a unique and functional chalkboard!”
“Transform a vintage mirror frame into a stylish chalkboard for displaying messages, quotes, or even artwork!”
“Repurpose an old windowpane into a rustic chalkboard, adding a touch of vintage charm to your home décor.”