How to Make a 3D Paper Snowflake: A Step-by-Step Guide
How to make a 3 d paper snowflake – How to make a 3D paper snowflake? It’s a question that has captivated crafters for generations. This delicate art form, with its intricate designs and surprising depth, is more than just a wintertime decoration. It’s a journey into the world of paper folding and cutting, a testament to the beauty of simple materials transformed into something truly magical.
The history of paper snowflakes stretches back centuries, with origins in both the East and the West. The basic principles of paper folding and cutting are surprisingly simple, yet they allow for endless creative possibilities. From basic six-pointed stars to complex, multi-layered creations, the world of paper snowflakes offers something for everyone, regardless of skill level.
Introduction to Paper Snowflake Creation

Paper snowflakes, delicate and intricate, have been a cherished wintertime craft for generations. These ephemeral creations, with their symmetrical patterns and ethereal beauty, are a testament to the power of simple materials and a bit of imagination.The history of paper snowflakes can be traced back to ancient China, where paper was invented in the 2nd century AD.
Folding paper into intricate shapes is a timeless craft, and creating a 3D paper snowflake is a fun way to add a touch of winter magic to your home. If you’re looking for some creative inspiration, check out the hilarious mr beans nativity , where his unique interpretation of the Christmas story might give you some fresh ideas for your own paper snowflake designs.
Once you’ve mastered the basic folds, you can experiment with different cuts and patterns to create your own unique snowflake masterpieces.
However, the practice of folding and cutting paper into intricate designs, specifically snowflakes, became popular in Europe during the 19th century.
Making a 3D paper snowflake is a fun and easy way to add some festive cheer to your home. You can find tons of tutorials online, but sometimes it’s nice to have a little inspiration. If you’re looking for unique gift ideas that are sure to be appreciated, check out this awesome guide for 138 gifts that won’t get tossed under the bed.
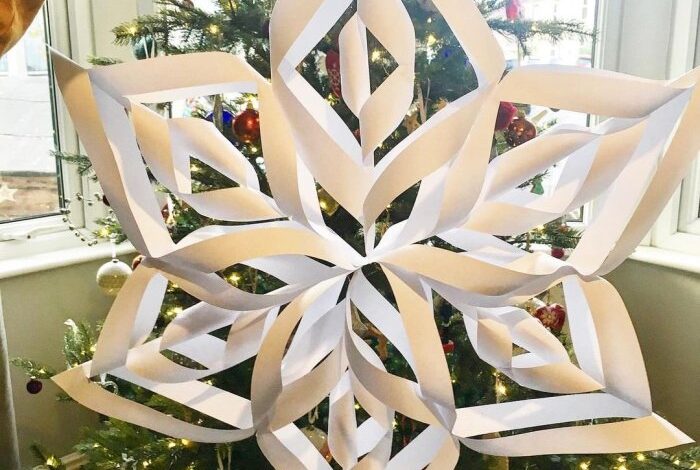
Once you’ve finished your snowflake, why not hang it from the ceiling and create a beautiful winter wonderland?
Principles of Paper Folding and Cutting
Paper snowflakes are created through a combination of folding and cutting techniques. The basic principle involves folding a square piece of paper multiple times to create a series of triangular sections. These sections are then cut into various shapes, creating intricate designs that are revealed when the paper is unfolded.The complexity of the snowflake design is directly related to the number of folds made.
A simple fold will result in a basic snowflake with fewer points, while multiple folds will create more intricate and detailed patterns.
Types of Snowflake Designs
There are countless variations of snowflake designs, ranging from simple six-pointed stars to complex and intricate patterns. Some common snowflake designs include:
- Basic six-pointed star:This is the simplest snowflake design, created by folding the paper in half twice and cutting a simple shape, such as a triangle or a circle, from the open end. When unfolded, the cut shape will create six points on the snowflake.
- Eight-pointed star:This design is created by folding the paper in half three times and cutting a shape from the open end. This will result in eight points on the snowflake.
- Spiral snowflake:This design involves cutting a spiral shape from the folded paper, creating a unique and intricate pattern when unfolded.
- Geometric snowflake:This design incorporates geometric shapes, such as squares, triangles, and hexagons, to create a more structured and symmetrical snowflake.
- Free-form snowflake:This design allows for greater creativity and freedom of expression. The paper can be folded in any way, and the cuts can be made in any shape or pattern, resulting in a truly unique snowflake.
Materials and Tools
Crafting a 3D paper snowflake requires a few essential materials and tools. These tools are readily available and easy to use, making this a fun and accessible craft for all ages.
Making a 3D paper snowflake is a fun and festive activity, but remember to be careful when taking pictures of your masterpiece! It’s easy to get carried away with the perfect shot, but check out this article on selfie stick dangers funny before you go extending your arm too far.
You don’t want to end up with a crumpled snowflake and a bruised ego. Once you’ve got your safety precautions in place, you can focus on creating a stunning 3D snowflake that’s sure to impress!
Paper Selection
The choice of paper significantly impacts the final appearance and durability of your snowflake.
- Standard Printer Paper:This is the most readily available option, offering a balance of thickness and flexibility. It’s suitable for beginners and allows for intricate cuts and folds.
- Construction Paper:Thicker and more robust than printer paper, construction paper provides a more substantial snowflake. Its variety of colors adds visual interest and allows for unique designs.
- Tissue Paper:Delicate and lightweight, tissue paper creates a soft, ethereal snowflake. It’s ideal for adding a touch of whimsy and for crafting intricate designs.
- Specialty Papers:Explore textured papers, metallic papers, or patterned papers for a unique and personalized snowflake. These papers offer visual interest and add a touch of sophistication.
Tools
The tools used for making paper snowflakes are simple and common household items.
- Scissors:Sharp scissors are essential for precise cutting. Consider using different sizes for intricate designs and for cutting larger sections.
- Ruler:A ruler is useful for creating symmetrical designs and for measuring specific dimensions. It ensures accuracy and helps maintain consistent folds.
- Pencil:A pencil is helpful for sketching designs before cutting. It allows for experimentation and helps avoid accidental cuts.
Cutting Techniques for Snowflake Design: How To Make A 3 D Paper Snowflake
The beauty of paper snowflakes lies in the intricate patterns created through strategic cuts. Mastering different cutting techniques allows you to explore a vast range of designs, from simple and elegant to complex and mesmerizing.
Basic Shapes
Cutting basic shapes like triangles, squares, and circles forms the foundation for more elaborate snowflake designs.
- Triangles: Fold the paper in half, then in half again. Make a diagonal cut from the fold to the edge, creating a triangle. Unfold to reveal a six-pointed star with triangular points.
- Squares: Fold the paper in half, then in half again. Make a horizontal cut across the fold to create a square. Unfold to reveal a snowflake with square-shaped points.
- Circles: Fold the paper in half, then in half again. Cut a curved shape from the fold to the edge, resembling a crescent moon. Unfold to create a snowflake with rounded points.
Intricate Designs
For intricate designs, multiple cuts and folds are required, demanding precision and patience.
- Multiple Cuts: Experiment with different cut patterns within each fold, creating intricate details. For example, try cutting small triangles, squares, or circles along the edges of the folded paper. Each cut will be reflected in multiple locations when unfolded.
- Folds: Explore different folding techniques beyond the basic four-fold. Try folding the paper in thirds, creating a six-fold, or even more complex folds for intricate designs.
- Symmetry: Remember that each cut on the folded paper will be reflected in multiple locations when unfolded. This allows you to create symmetrical designs effortlessly.
Tips for Creating Intricate Designs, How to make a 3 d paper snowflake
- Practice: The more you practice, the more comfortable you will become with different cutting techniques.
- Sharp Scissors: Use sharp scissors to ensure clean and precise cuts. Dull scissors can lead to jagged edges and inaccurate designs.
- Light Pressure: Avoid pressing too hard on the paper while cutting. This can cause the paper to tear or become distorted.
- Visualize: Before cutting, visualize the final design in your mind. This will help you plan your cuts and ensure a cohesive and symmetrical outcome.
Advanced Folding and Cutting

Once you’ve mastered the basics of six-fold snowflake creation, you’re ready to explore the world of advanced folding techniques. These methods, like eight-fold and twelve-fold, unlock a whole new level of intricate designs, transforming your snowflakes from simple to stunning.These techniques, while more complex, offer a rewarding challenge, allowing you to create snowflakes with unparalleled complexity and detail.
Eight-Fold Snowflake Folding
Folding a paper sheet eight times creates a snowflake with 16 points, doubling the number of points compared to a six-fold snowflake. This extra complexity allows for more intricate designs and detailed patterns.The eight-fold method involves folding the paper in half four times, ensuring each fold is precise and creates a sharp crease.
The first fold is a simple fold in half, followed by folding the paper in half again, aligning the edges. The third and fourth folds are similar, ensuring the edges are aligned and the creases are sharp.After the final fold, you’ll have a small triangular shape ready for cutting.
The design possibilities are endless, allowing you to create intricate patterns, delicate lines, and even incorporate multiple layers for added depth and dimension.
Twelve-Fold Snowflake Folding
The twelve-fold method is even more complex, requiring six folds to create a snowflake with 24 points. This method involves folding the paper in half three times, followed by folding it in half again, creating a smaller square. The final fold is a diagonal fold, resulting in a triangular shape with 12 layers.This method allows for even more intricate designs, with the potential to create delicate lace-like patterns, complex geometric shapes, and intricate details that wouldn’t be possible with simpler folding techniques.
Intricate Designs with Advanced Folding
Advanced folding techniques allow you to create truly stunning snowflakes. The eight-fold and twelve-fold methods offer a platform for creating intricate patterns, delicate lines, and complex geometric shapes. For example, an eight-fold snowflake can be designed with delicate, overlapping patterns, creating a visual illusion of depth and dimension.
A twelve-fold snowflake can feature complex geometric shapes, such as interwoven triangles, intricate spirals, and delicate lace-like patterns.
Challenges and Rewards of Complex Snowflakes
Creating complex snowflakes using advanced folding techniques requires patience, precision, and a keen eye for detail. It’s a rewarding challenge, requiring you to carefully plan your cuts, ensure precise folds, and meticulously execute your design.The reward for this effort is a truly unique and stunning snowflake, a testament to your creativity and patience.
These snowflakes are not only beautiful but also a reflection of your skill and dedication to the craft.