Cute DIY Draft Stopper: Keep Warm and Cozy This Winter
Cute DIY draft stoppers are a fun and affordable way to keep your home warm and cozy during the colder months. Not only do they prevent chilly drafts from sneaking in, but they also add a touch of personality to your decor.
Whether you’re a seasoned crafter or just starting out, this guide has something for everyone.
We’ll explore a variety of cute and creative designs, from fabric and recycled materials to natural elements. You’ll learn how to create your own draft stoppers using simple techniques like sewing, knitting, crocheting, and gluing. We’ll also discuss customization options, placement tips, and maintenance advice to ensure your draft stoppers stay effective and beautiful for years to come.
Draft Stoppers: A DIY Guide to Cozy Comfort
Feeling a chill in your home, even with the heater blasting? That’s likely due to drafts sneaking in through windows and doors. Draft stoppers are a simple yet effective solution to keep the warmth in and the cold out, making your home more comfortable and energy-efficient.
While you can purchase ready-made draft stoppers, making your own is a fun and affordable project. DIY draft stoppers offer the advantage of customization, allowing you to create unique designs that perfectly match your home’s decor. Plus, you get the satisfaction of creating something useful with your own hands.
Types of DIY Draft Stoppers
There are numerous ways to craft your own draft stoppers, each with its own benefits and aesthetic appeal. Here are some popular types:
- Fabric Draft Stoppers:These are made by filling a fabric tube with stuffing like rice, beans, or even old clothes. They are easy to sew and can be decorated with buttons, ribbons, or fabric scraps.
- Rope Draft Stoppers:This type involves braiding or twisting ropes together to create a thick, flexible draft stopper. They are durable and can be easily adjusted to fit different door or window gaps.
- Foam Draft Stoppers:Foam is a readily available and inexpensive material that can be easily shaped into draft stoppers. You can use self-adhesive foam strips or cut out custom shapes from foam sheets.
- DIY Draft Snakes:These are long, cylindrical draft stoppers that are typically filled with fabric scraps, rice, or beans. They are ideal for blocking drafts under doors.
DIY Draft Stopper Ideas

Now that you’re equipped with the knowledge of how draft stoppers work and their benefits, let’s dive into the fun part – crafting your own! With a little creativity and some readily available materials, you can create a draft stopper that complements your home decor while keeping the chill out.
Fabric Draft Stoppers
Fabric draft stoppers are a popular choice for their versatility and ease of customization. They can be made with various fabrics, from cozy fleece to stylish patterned textiles, allowing you to match them to your existing décor.
- Sewn Fabric Tube:This classic design involves sewing a fabric tube filled with stuffing, such as rice, beans, or even old clothes. You can add decorative touches like buttons, ribbons, or embroidery.
- Materials:Fabric (cotton, fleece, felt, etc.), sewing machine, thread, stuffing (rice, beans, old clothes, etc.), measuring tape, scissors, pins.
- Steps:
- Cut two fabric rectangles of the desired length and width, adding seam allowance.
- Pin the rectangles right sides together and sew along the long edges, leaving one short edge open.
- Turn the tube right side out and fill it with stuffing.
- Sew the remaining short edge closed.
- No-Sew Fabric Tube:For those who prefer to avoid sewing, a no-sew option using fabric glue is a great alternative.
- Materials:Fabric (cotton, fleece, felt, etc.), fabric glue, stuffing (rice, beans, old clothes, etc.), measuring tape, scissors.
- Steps:
- Cut two fabric rectangles of the desired length and width, adding a small overlap for gluing.
- Apply fabric glue to the edges of the rectangles and press them together, overlapping the edges.
- Let the glue dry completely.
- Fill the tube with stuffing.
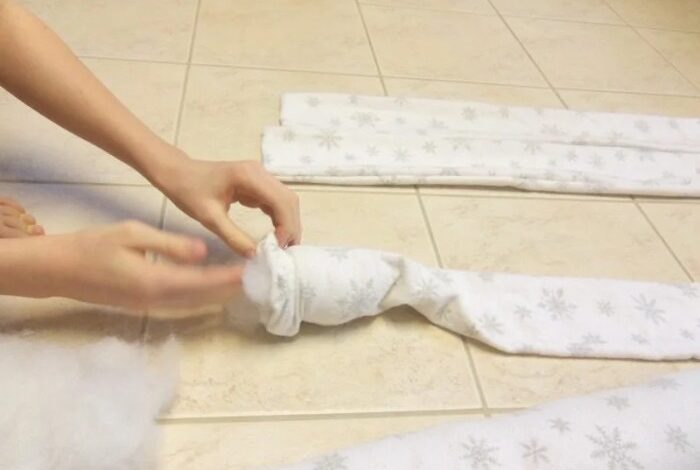
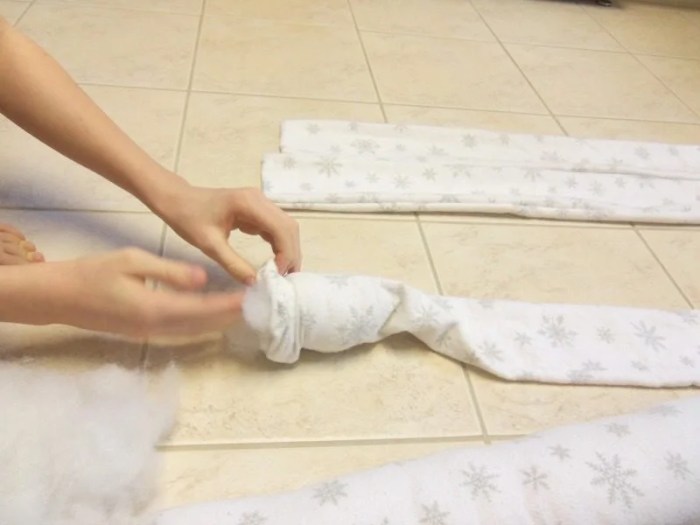
- Fabric Sock Draft Stopper:This is a simple and fun project that utilizes old socks.
- Materials:Old socks, stuffing (rice, beans, old clothes, etc.), sewing machine, thread, scissors.
- Steps:
- Turn the sock inside out and sew the open end closed.
- Turn the sock right side out and fill it with stuffing.
Materials and Tools

Draft stoppers can be made with a variety of materials, from simple and readily available items to more specialized supplies. The tools required for crafting them are generally basic and easily found in most households.
Materials
The choice of materials for your draft stopper will depend on your desired look, budget, and the size of the gap you need to seal. Here is a table summarizing common materials and their advantages and disadvantages:
| Material | Advantages | Disadvantages |
|---|---|---|
| Fabric scraps | Affordable, easy to find, versatile | May require additional stuffing for effectiveness |
| Old socks | Convenient, already have a shape, cozy | May be too thin for larger gaps |
| Rice | Natural, inexpensive, readily available | May be prone to spills or leaks |
| Beans | Natural, inexpensive, readily available, heavier than rice | May be noisy when walking on |
| Foam pipe insulation | Durable, effective for larger gaps, readily available | May be difficult to shape |
| Pool noodles | Easy to cut and shape, lightweight, readily available | May be prone to tears or damage |
Tools
Here are some essential tools for crafting your draft stoppers:
- Scissors:For cutting fabric, foam, or other materials to size.
- Sewing needle and thread:For stitching fabric draft stoppers.
- Measuring tape:For accurately measuring the gaps you need to seal.
- Hot glue gun:For attaching materials or securing the draft stopper to the door or window frame.
- Fabric marker:For marking fabric before cutting.
“Most of the materials for DIY draft stoppers can be found around your home or at a local craft store. The tools are also commonly found in most households.”
Crafting Techniques
Now that you’ve gathered your materials and tools, it’s time to delve into the fun part: crafting your draft stopper! There are several techniques you can use, each with its own charm and level of difficulty. Let’s explore some of the most popular methods.
Sewing
Sewing is a classic and versatile technique for creating draft stoppers. It allows for intricate designs, personalized touches, and the use of a wide variety of fabrics.
- Choose your fabric:Opt for fabrics that are durable and thick enough to block drafts. Felt, fleece, and canvas are excellent choices. You can also use recycled materials like old sweaters or denim.
- Cut and sew:Measure the area you want to seal and cut your fabric accordingly. Sew the fabric into a tube shape, leaving an opening for stuffing. Turn the tube right-side out and stuff it with a filling material like rice, beans, or fabric scraps.
Sew the opening closed.
- Add embellishments:Get creative with embellishments! You can sew on buttons, ribbons, or appliqués to add a personal touch.
Here’s a simple illustration of a sewn draft stopper: Imagine a long, rectangular piece of fabric folded in half, lengthwise. The raw edges are sewn together along the long sides, creating a tube. One end of the tube is left open for stuffing, while the other end is closed.
The tube is then filled with rice or beans, and the open end is sewn shut. You can add buttons or ribbons along the sewn edges for a decorative touch.
Keeping warm during the winter is essential, and a cute DIY draft stopper can be a fun and frugal way to do it. It’s a great project to do with the kids, especially if you’re looking for fun frugal family Christmas traditions like those found on this website.
Not only will you save money on your heating bill, but you’ll also have a unique and charming decoration for your home. So gather your craft supplies and get creative!
Knitting
Knitting offers a cozy and textural approach to draft stopper creation. The warmth of the yarn and the intricate patterns you can create add a touch of elegance to your home.
- Choose your yarn:Select a yarn that is thick and warm. Wool, acrylic, or a blend of both are great options. Consider the color and texture you want to achieve.
- Knit a tube:Knit a tube using your chosen yarn and needles. The length of the tube should correspond to the area you want to seal. You can create a simple knit stitch or experiment with different patterns.
- Stuff and finish:Once you’ve knitted the tube, stuff it with a filling material like rice, beans, or fabric scraps. Use a needle and yarn to close the opening of the tube.
Imagine a knitted tube, like a long, cozy sock. It’s made with thick, warm yarn in a beautiful pattern. The tube is filled with rice, and the open end is carefully sewn shut. This knitted draft stopper adds a touch of warmth and charm to any space.
Crocheting
Crocheting offers a similar level of coziness and texture as knitting, with a different approach to creating the fabric. Crocheting allows for a wide range of patterns and textures, adding a unique touch to your draft stoppers.
You know, sometimes the simplest DIY projects are the most satisfying. Like those cute draft stoppers you can whip up with a few scraps of fabric and some stuffing. Speaking of simple and satisfying, my family has a fun frugal Christmas tradition of making a nativity scene out of recycled materials.
It’s a great way to get the kids involved and teaches them about the story of Christmas. Check out this tutorial for some inspiration! Anyway, back to those draft stoppers – they’re a perfect way to keep the cold out and add a touch of personality to your home.
- Choose your yarn:Similar to knitting, select a yarn that is thick and warm. Wool, acrylic, or a blend of both are great options. Consider the color and texture you want to achieve.
- Crochet a tube:Crochet a tube using your chosen yarn and hook. The length of the tube should correspond to the area you want to seal. You can create a simple single crochet stitch or explore more intricate patterns.
- Stuff and finish:Once you’ve crocheted the tube, stuff it with a filling material like rice, beans, or fabric scraps. Use a needle and yarn to close the opening of the tube.
Imagine a crocheted tube, similar to a long, cozy scarf. It’s made with thick, warm yarn in a beautiful, intricate pattern. The tube is filled with rice, and the open end is carefully sewn shut. This crocheted draft stopper adds a touch of warmth and handmade charm to any space.
Gluing
Gluing offers a quick and easy way to create draft stoppers. This technique is particularly useful for creating simple, functional draft stoppers.
- Choose your materials:You can use various materials for gluing, such as felt, foam, or even cardboard. Choose a strong adhesive that is suitable for the materials you’re using.
- Cut and glue:Cut your chosen material into the desired shape and size. Use the adhesive to glue the pieces together, creating a tube or a flat, sealable shape.
- Add weight:For a more effective draft stopper, add weight to the glued material. You can use sand, pebbles, or even small weights.
Imagine a flat, rectangular piece of felt. It’s glued along the edges to form a tube shape. The tube is filled with sand for weight and then placed along the bottom of a door to seal any gaps.
This simple, glued draft stopper effectively blocks drafts and adds a touch of warmth to your home.
Customization and Personalization
Your DIY draft stopper is more than just a functional item; it’s an opportunity to add a personal touch to your home. By customizing and personalizing your draft stoppers, you can create unique pieces that perfectly reflect your style and enhance your home decor.
Fabric Patterns and Embellishments
Fabric patterns are a great way to personalize your draft stoppers. You can choose from a wide variety of patterns to match your existing decor or create a unique look. For example, you could use floral patterns for a romantic look, geometric patterns for a modern look, or plaid patterns for a classic look.
Embellishments can add an extra touch of personality to your draft stoppers. You can use buttons, beads, ribbons, or even small pieces of fabric to create unique designs. For example, you could add a row of buttons to the top of a draft stopper or use a ribbon to tie a bow around the middle.
Paint Techniques
Painting is another great way to personalize your draft stoppers. You can use different colors, patterns, and techniques to create unique designs. For example, you could paint a simple design on a plain fabric draft stopper or use stencils to create more intricate patterns.
- Stencils: Stencils are a great way to create intricate designs on your draft stoppers. You can find stencils in a variety of patterns, from simple geometric shapes to more complex floral designs. Simply place the stencil on your draft stopper and use a paintbrush or sponge to apply the paint.
- Sponging: Sponging is a technique that creates a textured look. Simply dip a sponge into paint and dab it onto the surface of your draft stopper. You can use different colors of paint to create a unique design.
- Freehand Painting: If you’re feeling creative, you can freehand paint your own designs on your draft stoppers. Use a paintbrush and acrylic paint to create any design you can imagine.
Personalized Draft Stoppers for Different Room Styles
Here are some ideas for personalized draft stoppers that will complement different room styles:
- Modern Room: A draft stopper made from a simple geometric fabric, like a chevron or a herringbone pattern, will add a touch of modern style to your room. You could even add a few metallic accents to the draft stopper to give it a more contemporary look.
Looking for a cute and practical DIY project? Try making a draft stopper! It’s a great way to keep the chill out and the warmth in, especially during those colder months. Plus, it’s a fun and easy craft that you can personalize with different fabrics and embellishments.
And if you’re looking for more gift ideas for babies and toddlers, check out this gift guide baby toddler for some inspiration. Once you’ve finished your draft stopper, you can even wrap it up as a thoughtful homemade gift for a friend or family member with a little one!
- Rustic Room: A draft stopper made from burlap or a natural-colored fabric, like linen, will complement a rustic room. You could add a few embellishments, like twine or burlap ribbon, to give it a more rustic feel.
- Bohemian Room: A draft stopper made from a vibrant fabric with a bold pattern, like paisley or floral, will add a touch of bohemian flair to your room. You could even add a few beads or tassels to the draft stopper to give it a more bohemian look.
Placement and Installation: Cute Diy Draft Stopper
Now that you’ve crafted your cozy draft stoppers, it’s time to put them to work! Strategic placement is key to maximizing their effectiveness. Think of your draft stoppers as little soldiers guarding your home against chilly intruders. Let’s explore the best spots to station them.
Identifying Draft Prone Areas, Cute diy draft stopper
Drafts often sneak in through the gaps around windows and doors, especially older ones. Pay close attention to these areas:
- Window and Door Frames:The gaps between the frame and the window/door sash are prime draft entry points. This is where your draft stoppers will be most effective.
- Baseboards:If you feel a cool breeze near the floor, it’s likely coming from gaps between the baseboards and the floor.
- Under Doors:The space beneath doors is a common draft pathway. This is where door snakes and draft stoppers are particularly helpful.
Securing Draft Stoppers
Once you’ve identified the draft culprits, it’s time to secure your draft stoppers. The method will vary depending on the type of draft stopper you’ve made:
- Door Snakes:Simply position the door snake at the bottom of the door. You can use adhesive tape or a door wedge to keep it in place.
- Fabric Draft Stoppers:These can be secured with adhesive tape, Velcro, or even tacks. Choose a method that suits your door or window material.
- DIY Draft Stopper Rolls:These can be attached with Velcro, adhesive tape, or simply tucked into the gap. If using adhesive tape, make sure it’s strong enough to hold the weight of the roll.
Alternative Solutions
Not all doors and windows are created equal. Here are some alternative solutions for different types of openings:
- Sliding Doors:For sliding doors, consider using a long, flexible draft stopper that can be tucked into the track.
- French Doors:For French doors, use a combination of door snakes and fabric draft stoppers to seal both the bottom and sides.
- Bay Windows:Bay windows can be tricky. Use a combination of fabric draft stoppers and window film to create a barrier against drafts.
Maintenance and Care
Just like any other handcrafted item, your DIY draft stoppers require a bit of care and attention to ensure they remain cozy and effective for a long time. A little maintenance goes a long way in preserving their functionality and extending their lifespan.
Cleaning and Storage
Regular cleaning is essential to maintain the hygiene and appearance of your draft stoppers. Dust, pet hair, and other debris can accumulate over time, affecting their effectiveness and potentially causing unpleasant odors.
- For fabric draft stoppers, gentle hand washing with mild detergent is recommended. Avoid using harsh chemicals or bleach, as they can damage the fabric and its color.
- Air-dry the fabric draft stoppers completely to prevent mildew and maintain their shape. Avoid using a dryer, as the heat can shrink or distort the fabric.
- For draft stoppers made from natural materials like rice or beans, simply vacuum them with a soft brush attachment. Avoid using a beater bar, as it can damage the materials.
- Store your draft stoppers in a cool, dry place, away from direct sunlight and moisture. This helps prevent fading, mold, and deterioration.
Addressing Wear and Tear
Over time, your draft stoppers might show signs of wear and tear, such as loose seams, fraying fabric, or worn-out stuffing. These issues can be easily addressed with a few simple repairs.
- For loose seams, use a needle and thread to stitch them back together. You can also use fabric glue for a quick fix.
- Fraying fabric can be trimmed with scissors or reinforced with a fabric sealant.
- If the stuffing has become lumpy or flattened, you can replace it with fresh stuffing.
Conclusion
Creating DIY draft stoppers is a rewarding and practical endeavor that can significantly improve your home’s comfort and energy efficiency. By utilizing simple materials and crafting techniques, you can personalize these cozy additions to suit your style and needs, adding a touch of warmth and charm to your living spaces.
Benefits of DIY Draft Stoppers
The benefits of using DIY draft stoppers are numerous and contribute to a more comfortable and energy-efficient home environment.
- Reduced Energy Bills:By effectively sealing gaps and cracks, draft stoppers prevent cold air from entering and warm air from escaping, leading to lower heating costs during winter.
- Improved Indoor Comfort:Draft stoppers eliminate drafts, creating a more comfortable and inviting atmosphere, especially during colder months.
- Reduced Noise Pollution:Draft stoppers can also help reduce noise pollution from outside sources, creating a quieter and more peaceful indoor environment.
- Environmental Sustainability:By reducing energy consumption, DIY draft stoppers contribute to environmental sustainability and reduce your carbon footprint.