Corn Husk Wreath Tutorial: A Step-by-Step Guide
Corn husk wreath tutorial: Dive into the world of natural crafting and learn how to create a stunning corn husk wreath, a timeless piece that embodies rustic charm and eco-friendly elegance.
From gathering materials to finishing touches, this tutorial will guide you through every step, allowing you to craft a unique and beautiful wreath that will add a touch of warmth and personality to your home. Whether you’re a seasoned crafter or a curious beginner, this step-by-step guide will equip you with the skills and knowledge to create a masterpiece using the simple beauty of corn husks.
Introduction to Corn Husk Wreaths
Corn husk wreaths have been a cherished part of crafting traditions for generations, bringing a touch of rustic charm and natural beauty to homes and celebrations. Their origins can be traced back to Native American cultures, who used corn husks for a wide range of purposes, including weaving baskets, mats, and even clothing.
The appeal of corn husk wreaths lies in their natural beauty, versatility, and eco-friendly nature. Corn husks, a readily available byproduct of the corn harvest, offer a sustainable and biodegradable alternative to traditional wreath materials. Their warm, earthy tones and unique textures add a touch of rustic elegance to any decor, while their versatility allows for endless creative possibilities.
Types of Corn Husk Wreaths
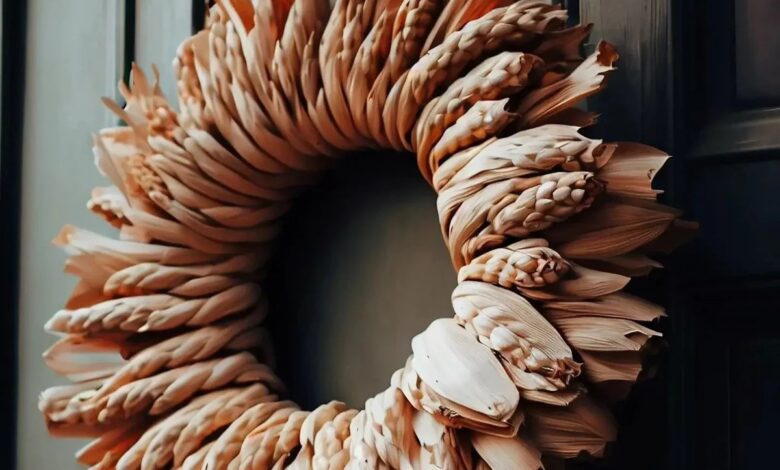
Corn husk wreaths come in a variety of sizes, shapes, and designs, reflecting the creativity of the crafters.
- Traditional Round Wreaths: These classic wreaths are typically circular in shape, ranging from small, tabletop arrangements to large, impressive door wreaths. They are often adorned with dried flowers, berries, or other natural elements to enhance their rustic charm.
- Heart-Shaped Wreaths: Heart-shaped wreaths are a popular choice for romantic occasions, such as weddings or Valentine’s Day. They can be decorated with delicate flowers, ribbons, or other romantic embellishments.
- Square or Rectangular Wreaths: These unique designs offer a modern twist on the traditional wreath. They can be used to showcase seasonal themes or create a statement piece for a minimalist decor.
- Wreaths with Unique Shapes: Some crafters experiment with more unconventional shapes, such as stars, animals, or abstract designs, adding a touch of whimsy and individuality to their creations.
Gathering Materials
Before embarking on your corn husk wreath crafting journey, it’s crucial to gather the necessary materials. These materials will be the building blocks of your unique and rustic creation.
Corn Husks
The heart of any corn husk wreath lies in the corn husks themselves. Choosing the right husks is key to achieving a durable and aesthetically pleasing wreath.
- Sourcing Corn Husks:Corn husks can be obtained from various sources. Local farmers’ markets, grocery stores, and even your own garden can provide a bounty of husks.
- Selecting Fresh Husks:When selecting corn husks, opt for those that are fresh, pliable, and free from any signs of damage or decay. Fresh husks are easier to work with and will hold their shape better.
- Storing Corn Husks:To preserve the quality of your corn husks, store them in a cool, dry place. You can also freeze them for extended storage. Freezing helps maintain their flexibility and prevents them from becoming brittle.
Wire
Wire serves as the foundation for your corn husk wreath, providing the structural support needed to hold the husks together.
- Types of Wire:Various types of wire are suitable for wreath making. Common choices include floral wire, chicken wire, and even wire coat hangers.
- Floral Wire:Floral wire is a thin, flexible wire that is easy to bend and shape. It’s ideal for creating intricate designs and securing small clusters of corn husks.
- Chicken Wire:Chicken wire offers a sturdier option for larger wreaths. It’s a bit more challenging to work with but provides excellent support for heavier arrangements.
- Wire Coat Hangers:Wire coat hangers can be straightened and used as a base for your wreath. They are readily available and offer a budget-friendly solution.
Additional Materials
Beyond corn husks and wire, a few additional materials will enhance your wreath-making experience.
I’m loving all the fall crafts lately, especially making a corn husk wreath. It’s so simple and rustic, and it really brings the autumn vibes into my home. While I was working on it, I started thinking about other cozy crafts, like those adorable yarn pom pom snowballs I saw on this website.
They’d be perfect for a wintery centerpiece! Now, back to my corn husk wreath – I think I’ll add some dried berries and leaves for a pop of color.
- Scissors:Scissors are essential for trimming and shaping the corn husks. Sharp scissors will make the process smoother and more precise.
- Glue:Glue is necessary for securing the corn husks to the wire frame. A strong, all-purpose glue is recommended for long-lasting results.
- Optional Embellishments:To personalize your wreath, consider incorporating optional embellishments. These can include ribbons, dried flowers, berries, or even small ornaments.
Preparing the Corn Husks
The first step in making a corn husk wreath is to prepare the husks. This involves cleaning, drying, and softening them to make them pliable and easy to work with.
Cleaning and Drying the Corn Husks
Once you’ve gathered your corn husks, it’s essential to clean them thoroughly. Start by rinsing them under cold water to remove any dirt or debris. You can then gently scrub them with a soft brush if needed. After cleaning, lay the husks out flat on a clean surface, such as a drying rack or a table, to air dry completely.
I love how crafting a corn husk wreath brings a touch of rustic charm to my home. It’s a reminder of simpler times, and it’s so satisfying to create something beautiful with my own hands. The earthy scent of the husks always makes me think of warm summer days, and I can’t help but be reminded of a delicious meal I recently made – prosciutto with cardamom scented peas and purple carrots.
The combination of sweet, savory, and aromatic flavors is simply divine! And just like the wreath, this dish is a perfect representation of nature’s bounty.
This process can take a few days, depending on the humidity and temperature.
I love making corn husk wreaths, especially during the fall. It’s such a fun and rustic craft! I’m always looking for ways to add some extra flair to my wreaths, and I recently discovered a great tutorial for ric rac burlap and felt accessories in 15 minutes.
The colors and textures of these accessories would be perfect for adding a touch of whimsy to my corn husk wreaths. I can’t wait to try it out!
Softening the Corn Husks
Once the husks are completely dry, they’ll need to be softened to make them more pliable. There are a few methods you can use to soften corn husks:
- Steaming:Place the husks in a steamer basket over boiling water for 15-20 minutes, or until they are soft and pliable.
- Boiling:Boil the husks in a pot of water for 10-15 minutes, or until they are soft.
- Soaking:Soak the husks in a bowl of warm water for several hours, or overnight.
After softening, you can gently squeeze out any excess water and lay the husks flat to dry slightly. They should still be pliable enough to work with, but not dripping wet.
Shaping Corn Husks
Once the corn husks are softened, you can start shaping them into different forms for your wreath. There are several techniques you can use, including:
- Braiding:This technique involves weaving together three or more strips of corn husks to create a braid. You can use braids to create a variety of designs, such as loops, spirals, and rosettes.
- Twisting:This technique involves twisting a single strip of corn husk around itself to create a spiral shape. This can be used to create a variety of decorative elements, such as swirls and curls.
- Weaving:This technique involves interlacing strips of corn husks to create a woven pattern. Weaving can be used to create a variety of decorative elements, such as baskets, mats, and even small wreaths.
Basic Corn Husk Shapes
Here are a few basic corn husk shapes you can create:
Loops
To create a loop, simply braid together three strips of corn husk and then tie the ends together. You can then use the loop to create a variety of designs, such as a simple circle or a more elaborate swirl.
Spirals
To create a spiral, twist a single strip of corn husk around itself. You can then use the spiral to create a variety of designs, such as a simple coil or a more elaborate swirl.
Rosettes
To create a rosette, braid together three strips of corn husk and then fold the braid in half. You can then use the rosette to create a variety of designs, such as a simple flower or a more elaborate star.
Building the Wreath Base

A sturdy and well-shaped wire base is crucial for a beautiful and long-lasting corn husk wreath. It provides the structure to hold the corn husks in place and ensures the wreath maintains its shape over time. The wire base acts as the foundation for the entire project, so it’s important to create one that is both strong and adaptable to your desired design.
Determining the Size and Shape
The size and shape of the wire base should be chosen based on the intended design of the wreath. For a smaller, more compact wreath, a smaller base will suffice. Larger wreaths, on the other hand, will require a larger base to accommodate the volume of corn husks.
The shape of the base can be circular, oval, or even square, depending on the desired look.
For example, a circular base is ideal for a traditional wreath, while an oval base might be better suited for a more modern design.
Constructing the Base
- Materials:You will need heavy-duty wire, wire cutters, and pliers.
- Cutting the Wire:Cut a length of wire that is long enough to create the desired circumference of the wreath. The wire should be long enough to overlap slightly when joined, creating a strong and secure connection.
- Bending and Shaping:Use pliers to bend the wire into a circle or oval shape. The wire should be bent evenly and smoothly to ensure a consistent shape.
- Securing the Base:Once the desired shape is achieved, overlap the ends of the wire and twist them together using pliers to secure the base. The overlap should be long enough to create a strong and secure connection that will prevent the wire from coming undone.
Finishing Touches
The finishing touches are what truly bring your corn husk wreath to life. They’re the details that elevate it from a simple craft project to a beautiful and unique piece of decor. Think of them as the final strokes of a painting, adding depth, personality, and a touch of magic to your creation.
Adding Color and Texture
These final touches are crucial for creating a cohesive and balanced design. You can add color and texture to your wreath using various techniques:
Adding ribbons and bows
Ribbons come in a variety of colors, patterns, and textures, allowing you to add a touch of elegance, whimsy, or rustic charm to your wreath.
Using natural elements
Think about incorporating dried flowers, pinecones, berries, or even small gourds for a more natural and seasonal look.
Adding embellishments
You can also use small decorative items like beads, buttons, or even miniature figurines to add a personal touch.
Creating Visual Flow, Corn husk wreath tutorial
The key to a successful wreath is to create a sense of visual flow. This means ensuring that the elements are arranged in a way that is pleasing to the eye. Here are some tips:
Start with a focal point
This could be a large bow, a cluster of flowers, or even a decorative item. Everything else should be arranged around this focal point.
Use a variety of sizes and shapes
Don’t be afraid to mix and match different sizes and shapes of embellishments to create visual interest.
Balance the design
Make sure the wreath doesn’t feel too heavy on one side. Distribute the elements evenly to create a balanced and harmonious look.
Final Steps
Once you’re happy with the design, it’s time to finish up:
Trim excess wire
Use wire cutters to trim any excess wire from the back of the wreath.
Conceal glue
If you’ve used glue to attach any embellishments, use a small amount of glue to secure any loose strands of corn husks to conceal the glue.
Add a hanger
Use a wire hanger or ribbon loop to hang your wreath.
Displaying and Preserving the Wreath: Corn Husk Wreath Tutorial

Your beautiful corn husk wreath deserves a prominent spot where it can be admired. Choosing the right location will enhance its visual appeal and ensure its longevity. Consider factors like lighting, background, and the overall décor of your space to create a harmonious display.
Choosing the Perfect Location
The right location can truly elevate your corn husk wreath. Consider these factors to make the most of its rustic charm:
- Lighting:Natural light is ideal, as it will highlight the natural textures and colors of the corn husks. Avoid placing the wreath in direct sunlight, as this can cause fading and damage. A well-lit corner or a spot near a window with filtered sunlight would be perfect.
- Background:A contrasting background will make the wreath stand out. A plain wall or a wall with a neutral color scheme would be a good choice. You can also use a patterned wallpaper or a piece of fabric as a backdrop to add visual interest.
- Overall Décor:The wreath should complement the existing décor of your space. If your home has a rustic or farmhouse style, the wreath will fit right in. If your décor is more modern, you can choose a wreath with a minimalist design or add a touch of color with ribbons or embellishments.
Preserving the Wreath’s Beauty
A little care goes a long way in preserving the beauty and longevity of your corn husk wreath. Follow these tips to keep it looking its best:
- Dusting:Regularly dust the wreath with a soft brush or a feather duster. Avoid using harsh chemicals or abrasive cleaners, as these can damage the corn husks.
- Moisture:Keep the wreath away from moisture. Avoid placing it in humid areas or near sources of water. If the wreath gets damp, allow it to air dry completely before storing it.
- Insects:Corn husks can attract insects. To prevent infestation, you can store the wreath in a sealed container or use a natural insect repellent, such as cedarwood oil.
Storing the Wreath
When the time comes to store your corn husk wreath, it’s important to do it properly to prevent damage. Here are some tips:
- Clean and Dry:Before storing, ensure the wreath is clean and completely dry. Dust it off and allow it to air dry completely if it’s been exposed to moisture.
- Storage Container:Store the wreath in a breathable container or a large plastic bag. Avoid using airtight containers, as this can trap moisture and lead to mold growth.
- Cool and Dry Place:Store the wreath in a cool, dry place, such as a closet or attic. Avoid storing it in areas with high humidity or fluctuating temperatures.
Repurposing the Materials
Even after the wreath has served its purpose, the corn husks can be repurposed for other crafts or projects. Here are some ideas:
- Compost:Corn husks are a great addition to your compost pile. They add structure and help aerate the compost, promoting healthy decomposition.
- Mulch:You can use the corn husks as mulch in your garden. They will help retain moisture, suppress weeds, and add nutrients to the soil.
- Crafting:Get creative and use the corn husks to make other crafts, such as ornaments, baskets, or even paper.