Dutch Braid Tutorial: Mastering the Classic Hairstyle
Dutch braid tutorials are everywhere, but how do you truly master this classic hairstyle? From its origins to modern variations, the Dutch braid is a versatile and timeless style. Whether you’re a braiding novice or a seasoned pro, this guide will equip you with the knowledge and techniques to create flawless Dutch braids that turn heads.
We’ll cover everything from the essential tools and supplies you’ll need to the step-by-step instructions, ensuring you can confidently braid your own hair. We’ll also explore different variations, including side braids, fishtail braids, and halo braids, and offer tips for adapting the technique to different hair types and lengths.
Get ready to embrace the world of Dutch braiding!
Step-by-Step Guide to Braiding: Dutch Braid Tutorial
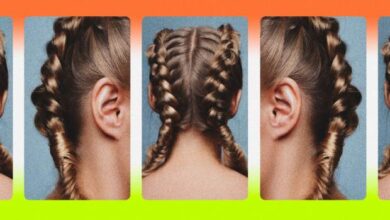
The Dutch braid, also known as an inverted French braid, is a beautiful and versatile hairstyle that can be worn for any occasion. It involves braiding the hair under itself, creating a raised, three-dimensional braid. This guide will take you through the process step-by-step, helping you master this intricate hairstyle.
I’m always on the lookout for new hair tutorials, especially ones that are easy to follow and look amazing. A Dutch braid tutorial is one of my favorites – it’s so versatile and can be dressed up or down. But while I’m practicing my braiding skills, I also like to browse through real estate listings, and I recently found a really cool article on this is a fun way to look at a house for sale.
It gave me some great ideas for how to approach viewing a house, and I think it’s definitely something I’ll keep in mind the next time I’m looking for a new place. Anyway, back to the Dutch braid tutorial – I’m definitely going to try out that new variation I saw on YouTube.
It’s all about finding creative inspiration, whether it’s in the world of hair styling or real estate!
Preparing Your Hair
Before you start braiding, ensure your hair is prepped for a smooth and manageable braid. This includes brushing out any tangles and applying a styling product, like hairspray or serum, to hold the braid in place.
Okay, so I’m finally mastering this Dutch braid tutorial, and it’s feeling pretty magical. It’s like I’m channeling my inner Disney princess, except instead of a glass slipper or a talking teapot, I’ve got a perfectly braided crown. Speaking of Disney princesses, did you see that article about Cinderella and Belle battling it out ?
Anyway, back to the braid – once I’m done, I’m definitely going to rock this new ‘do and feel like a true fairytale queen!
- Brush your hair thoroughlyto remove any knots or tangles. This will make the braiding process much easier and prevent any snags.
- Apply a styling productto your hair, like hairspray or serum. This will help to keep your hair smooth and prevent flyaways, ensuring a neat and polished braid.
- Section your hairat the crown of your head, creating a triangular section. This section will be the starting point for your Dutch braid.
Starting the Braid
The first few steps are crucial for establishing a strong foundation for your braid. Pay attention to the tension and the direction of the strands to ensure a smooth and even braid.
I’m really into mastering different hair braiding styles lately, and the Dutch braid is definitely one of my favorites. It’s so versatile and looks great for both casual and formal occasions. Speaking of versatility, I’ve been seeing some really cool DIY projects lately, like how to create a greenhouse out of a trampoline ! I’m definitely inspired to try that next.
Anyway, back to braiding, I’m going to try a Dutch braid with a fishtail twist next, I think it will look amazing.
- Divide the triangular sectioninto three equal strands.
- Cross the right strandunder the middle strand, then cross the left strand under the new middle strand. This creates the first stitch of your Dutch braid.
- Pick up a small section of hairfrom the right side of your head and add it to the right strand. This is the first step in incorporating more hair into your braid.
- Cross the right strandunder the middle strand.
- Pick up a small section of hairfrom the left side of your head and add it to the left strand.
- Cross the left strandunder the middle strand.
Continuing the Braid
Repeat the steps above, adding hair to each strand as you work your way down the head. Maintaining consistent tension throughout the braid is key to achieving a neat and even result.
- Continue braiding, adding hair to each strand as you go. Pick up small sections of hair from the sides of your head and incorporate them into the braid. This will gradually incorporate all of your hair into the braid.
- Maintain tensionthroughout the braid. This will help to prevent the braid from becoming loose or unraveling. Use your fingers to gently pull on the strands to ensure they are taut.
- Keep the braid close to the head. This will give you a more polished and refined look. If the braid starts to drift away from your head, gently adjust it back into place.
Finishing the Braid, Dutch braid tutorial
Once you reach the nape of your neck, continue braiding until you have no more hair to incorporate. Secure the end of the braid with a hair tie.
- Once you reach the nape of your neck, continue braiding until you have no more hair to incorporate.
- Secure the end of the braidwith a hair tie. You can use a small elastic band or a hair tie that matches your hair color.
- Optional:You can add a decorative hair tie or a ribbon to the end of the braid for a more polished look.
Tips for Success
Here are some tips to help you achieve a flawless Dutch braid:
- Practice makes perfect. Don’t get discouraged if your first few attempts aren’t perfect. The more you practice, the better you will become at braiding.
- Use a mirrorto help you see what you are doing. This will make it easier to ensure that the braid is even and symmetrical.
- Don’t be afraid to experimentwith different hair textures and lengths. Dutch braids can be worn on hair of all types, so have fun and try different styles.
Tips and Tricks for Success

Mastering the Dutch braid takes practice, but with a few key tips and tricks, you can achieve a flawless look. These pointers will help you avoid common mistakes and create a braid that is both beautiful and long-lasting.
Common Mistakes to Avoid
It’s important to understand the common pitfalls when braiding Dutch braids. By avoiding these mistakes, you can ensure a smoother braiding experience and a more polished final result.
- Uneven Sections:Using uneven sections can lead to a lopsided braid. Ensure each section is roughly the same size for a balanced look.
- Too Tight Braiding:Tight braiding can cause discomfort and scalp pain. Aim for a secure but not overly tight braid.
- Not Enough Hairspray:Hairspray helps to keep the braid in place and prevent flyaways. Apply a light mist throughout the braiding process and once the braid is complete.
- Pulling the Hair Too Tight:This can lead to discomfort and even breakage. Use a gentle touch while braiding, and be careful not to pull too hard on the hair.
Managing Hair Texture and Thickness
Hair texture and thickness play a significant role in the braiding process. These tips can help you manage your hair effectively.
- Fine Hair:Fine hair may be more prone to slipping out of the braid. Consider using a volumizing mousse or spray to add texture and grip.
- Thick Hair:Thick hair can be challenging to braid, especially for beginners. Use a wide-tooth comb to detangle the hair before braiding and divide it into smaller sections.
- Curly Hair:Curly hair can be a bit more difficult to braid. Consider straightening the hair before braiding or use a styling cream to tame the curls.
Styling Dutch Braids for Different Hair Lengths and Face Shapes
The versatility of Dutch braids allows for a variety of styles to suit different hair lengths and face shapes.
- Short Hair:For short hair, consider a half-up Dutch braid. This style adds a touch of elegance while keeping the hair out of the face.
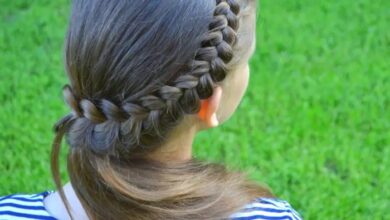
- Long Hair:Long hair offers more options for styling Dutch braids. You can create a full Dutch braid down the back, or try a side braid for a more casual look.
- Round Face:A Dutch braid that starts high on the head and is swept to the side can help to elongate a round face.
- Oval Face:Most styles work well with an oval face shape, but consider a Dutch braid that starts low on the head and flows down the back for a more dramatic look.
Dutch Braids for Different Hair Types
Dutch braids are a versatile hairstyle that can be worn by people with all hair types. However, some techniques may need to be adapted depending on the texture and thickness of your hair.Here, we’ll discuss how to braid Dutch braids on straight, wavy, and curly hair, and how to adapt the technique for thick or fine hair.
We’ll also provide tips for styling Dutch braids on hair with highlights or lowlights.
Braiding Dutch Braids on Straight Hair
Straight hair is generally easier to braid than wavy or curly hair because it’s less prone to tangling. To braid Dutch braids on straight hair, start by sectioning your hair into three equal parts. Then, cross the left section over the middle section, and then cross the right section over the middle section.
Continue braiding in this way, adding more hair to each section as you go.
Braiding Dutch Braids on Wavy Hair
Wavy hair can be a bit more challenging to braid than straight hair because it’s more prone to tangling. To prevent tangles, use a detangling spray or conditioner before braiding. You can also try braiding your hair in smaller sections, which will help to keep the braids neat and tidy.
Braiding Dutch Braids on Curly Hair
Curly hair can be the most challenging to braid, but it’s definitely possible. To braid Dutch braids on curly hair, start by detangling your hair thoroughly. Then, use a curling cream or gel to help define your curls and make them easier to braid.
You can also try braiding your hair in larger sections, which will help to create a looser, more relaxed look.
Braiding Dutch Braids on Thick Hair
Thick hair can be difficult to braid because it’s heavy and can pull on your scalp. To prevent discomfort, start by sectioning your hair into smaller sections. This will make the braiding process easier and less stressful on your scalp.
You can also try using a hair oil or serum to help smooth down the hair and make it easier to braid.
Braiding Dutch Braids on Fine Hair
Fine hair can be difficult to braid because it’s prone to slipping out of the braid. To prevent this, start by using a volumizing spray or mousse to add some thickness to your hair. You can also try braiding your hair in smaller sections, which will help to keep the braids in place.
Styling Dutch Braids on Hair with Highlights or Lowlights
Highlights and lowlights can add a lot of dimension to Dutch braids. To style Dutch braids on hair with highlights or lowlights, start by braiding your hair in the usual way. Then, use a hairspray or gel to set the braids in place.
You can also try using a curling iron to add some waves or curls to the ends of the braids.