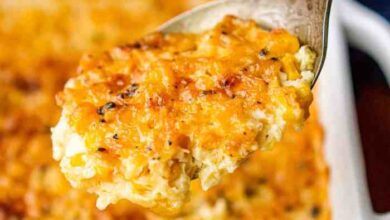
You Are Doing It All Wrong: How To Make A Moist Thanksgiving Turkey
You are doing it all wrong how to make a moist thanksgiving turkey – You Are Doing It All Wrong: How To Make A Moist Thanksgiving Turkey. We’ve all been there, carving into a Thanksgiving turkey, only to find dry, disappointing meat. But don’t despair! This year, we’re going to conquer dry turkey and unlock the secrets to a juicy, flavorful centerpiece that will have everyone raving.
From choosing the right bird to mastering the cooking process, we’ll cover everything you need to know to create a Thanksgiving turkey that’s as moist as it is delicious.
Think of it this way: a dry turkey is a tragedy. It’s a missed opportunity to experience the full glory of Thanksgiving dinner. But with the right knowledge and techniques, you can transform your turkey from a culinary disappointment to a masterpiece.
So, grab your apron, get ready to learn, and let’s embark on a journey to Thanksgiving turkey perfection!
Understanding the Problem

A dry Thanksgiving turkey is a common culinary tragedy, leaving many with a disappointing meal. The culprit? A lack of moisture in the meat, resulting in a tough and unappetizing experience.
Factors Contributing to a Dry Turkey
The key to a juicy turkey lies in understanding the science behind moisture retention during cooking. Here are some factors that contribute to a dry turkey:
- Overcooking:The most common reason for dry turkey is overcooking. When meat is cooked for too long, muscle proteins contract, squeezing out moisture.
- High Heat:Cooking a turkey at too high a temperature can lead to rapid surface browning before the interior has a chance to cook through, resulting in a dry, tough bird.
- Lack of Basting:Basting with pan drippings or broth helps to keep the turkey moist, but infrequent basting or skipping it altogether can lead to dryness.
- Small Turkey:Smaller turkeys tend to cook faster, making them more prone to overcooking.
- Inadequate Brining:Brining involves soaking the turkey in a salt-water solution, which helps to retain moisture and enhance flavor. However, inadequate brining can fail to achieve these benefits.
- Stuffing the Turkey:Stuffing a turkey can create a moist environment inside, but it also slows down cooking time, potentially leading to overcooking the turkey.
Choosing the Right Turkey
You’ve tackled the problem of dryness, but the journey to a moist Thanksgiving turkey starts even before you think about brining or roasting. Choosing the right turkey is crucial for setting the stage for a juicy, flavorful centerpiece. Let’s delve into the factors that influence turkey moisture and how to pick the perfect bird for your Thanksgiving feast.
Types of Turkeys
The type of turkey you choose significantly impacts its moisture. Here’s a breakdown of the most common options:
- Fresh Turkeys:These turkeys are never frozen and offer the freshest flavor and texture. They typically have a shorter shelf life and require careful handling.
- Frozen Turkeys:Frozen turkeys are a convenient option, offering a longer shelf life and ease of storage. However, they can sometimes be drier than fresh turkeys due to moisture loss during the freezing process. Look for turkeys that have been frozen quickly to minimize moisture loss.
- Brined Turkeys:Brining involves soaking the turkey in a salt solution, which helps retain moisture and adds flavor. Brined turkeys are often juicier than unbrined ones. You can buy pre-brined turkeys or brine your own.
- Self-Basting Turkeys:These turkeys have a cavity filled with butter or other fats, which helps keep the meat moist during cooking. However, they may not be as flavorful as other options.
Turkey Size and Breed
The size and breed of your turkey also play a role in its moisture.
You’re probably thinking about brining, or maybe even stuffing your turkey, but trust me, those are just distractions. The real key to a moist Thanksgiving turkey lies in the roasting process. And, you know what else is a great gift idea for your neighbors this Christmas?
A beautiful, personalized towel! Check out these 41 neighbor Christmas gift idea towel ideas for inspiration. Anyway, back to the turkey – the secret is to keep the heat low and slow, letting the bird cook evenly and retain its juices.
It’s all about patience, just like finding the perfect Christmas gift for your neighbors!
- Size:Smaller turkeys (10-14 pounds) cook faster and more evenly, resulting in a more moist bird. Larger turkeys (16-20 pounds) can be challenging to cook evenly, potentially leading to dry breast meat.
- Breed:Broad-breasted white turkeys are the most common breed, but they tend to be less flavorful and can be prone to dryness. Heritage turkeys, like the Bourbon Red or the Bronze, are smaller, more flavorful, and generally more moist. However, they can be harder to find.
Choosing a Moist Turkey
Here are some tips for selecting a turkey with good moisture content:
- Check the Packaging:Look for turkeys with a tight, shrink-wrapped package, indicating proper freezing and minimal moisture loss. Avoid turkeys with freezer burn, which can lead to dryness.
- Feel the Breast:The breast meat should feel firm and springy, not mushy or soft. This suggests good moisture retention.
- Look for a Good Ratio:The turkey should have a good balance between breast and thigh meat. A larger breast area can make it challenging to cook the entire bird evenly.
Preparing the Turkey for Optimal Moisture
The key to a juicy Thanksgiving turkey lies in pre-cooking techniques that infuse moisture into the meat. One of the most effective methods is brining, which involves soaking the turkey in a salt-water solution.
Forget the dry, rubbery turkey nightmares of the past! This year, we’re going for juicy, flavorful perfection. And who better to share it with than you? So, before we dive into the secrets of a moist Thanksgiving turkey, I have a question: will you go with me on this culinary adventure?
Because trust me, once you experience the magic of a perfectly cooked turkey, you’ll never go back to dry bird again!
Brining the Turkey
Brining is a technique that involves soaking the turkey in a salt-water solution, which helps to retain moisture and enhance flavor. This is especially beneficial for dry-heat cooking methods like roasting, where the turkey can easily become dry. Here’s a step-by-step guide to brining a turkey:
- Choose a brine recipe:There are many brine recipes available, but a basic brine typically includes salt, sugar, and water. You can also add other ingredients like herbs, spices, or citrus fruits to enhance the flavor.
- Prepare the brine:Combine the ingredients in a large container and stir until the salt and sugar dissolve. Make sure the container is large enough to hold the turkey completely submerged.
- Prepare the turkey:Rinse the turkey thoroughly inside and out. Pat it dry with paper towels. If desired, remove the giblets and neck from the cavity.
- Submerge the turkey:Place the turkey in the brine solution, ensuring it is completely submerged. Cover the container and refrigerate for 12-24 hours.
- Remove and rinse:After the brining time is complete, remove the turkey from the brine and rinse it thoroughly with cold water. Pat it dry with paper towels.
Alternative Pre-Cooking Techniques
Besides brining, other pre-cooking techniques can help ensure a moist turkey:
- Dry Brining:This method involves rubbing the turkey with salt and leaving it uncovered in the refrigerator for 12-24 hours. The salt draws moisture out of the turkey, but then re-absorbs it, creating a flavorful and juicy bird.
- Butterflying:This technique involves flattening the turkey by removing the backbone and spreading the breast open. It allows for faster and more even cooking, ensuring the breast meat doesn’t dry out.
Mastering the Cooking Process: You Are Doing It All Wrong How To Make A Moist Thanksgiving Turkey
The secret to a moist turkey lies not just in preparation but also in mastering the cooking process. Proper roasting temperature and time, combined with the right cooking method, are essential for achieving a juicy and flavorful bird.
Roasting Temperature and Time
The temperature at which you roast your turkey directly affects its moisture content. Roasting at too high a temperature can lead to a dry turkey, while roasting at too low a temperature can result in undercooked meat. The ideal temperature for roasting a turkey is 325°F (165°C).
This temperature allows the turkey to cook evenly and slowly, ensuring that the juices have time to distribute throughout the meat.The roasting time depends on the size of the turkey. A general rule of thumb is to allow 15 minutes per pound of turkey for an unstuffed turkey and 20 minutes per pound for a stuffed turkey.
For example, a 12-pound turkey will take approximately 3 hours to roast at 325°F (165°C).
Listen, if you’re still stuffing your turkey the night before Thanksgiving, you’re doing it all wrong! That’s like trying to organize your morning routine the day before a big presentation – chaotic and bound to lead to disaster. A well-organized morning routine, like the one you can find here , will leave you feeling calm and collected, ready to tackle even the most challenging culinary tasks.
Just like a good morning routine sets you up for success, a properly prepped turkey ensures a moist and flavorful feast. So, ditch the last-minute chaos and embrace a little planning for a Thanksgiving turkey that everyone will rave about.
Cooking Methods and Moisture Retention
While roasting is the most common method for cooking a turkey, other methods, such as grilling and smoking, can also yield delicious results. Each method has its own impact on moisture retention.
- Roasting:This method involves cooking the turkey in a preheated oven, typically at 325°F (165°C). Roasting is a reliable method that provides even cooking and allows for consistent moisture retention. It is best for achieving a crispy skin and juicy meat.
- Grilling:Grilling a turkey offers a smoky flavor and can be a great option for outdoor gatherings. However, grilling can be more challenging to control the temperature and moisture retention compared to roasting. To ensure a moist turkey, it’s crucial to maintain a consistent heat and use a meat thermometer to check for doneness.
- Smoking:Smoking a turkey involves cooking it over low heat in a smoker, using wood chips to impart a smoky flavor. This method can result in a tender and flavorful turkey. However, it requires careful monitoring to ensure the turkey cooks evenly and doesn’t dry out.
Step-by-Step Guide for Roasting a Turkey
Here’s a step-by-step guide for roasting a turkey with techniques for ensuring moisture:
- Preheat oven:Preheat your oven to 325°F (165°C). This ensures the turkey cooks evenly and quickly.
- Prepare the turkey:Remove the turkey from the refrigerator and pat it dry with paper towels. This helps to achieve crispy skin.
- Season the turkey:Season the turkey generously with salt, pepper, and any other desired herbs and spices. Rub the seasoning under the skin and all over the turkey.
- Roast the turkey:Place the turkey in a roasting pan and roast for 15 minutes per pound for an unstuffed turkey or 20 minutes per pound for a stuffed turkey.
- Basting:During the roasting process, baste the turkey with pan juices every 30-45 minutes. This helps to keep the turkey moist and flavorful.
- Check for doneness:Use a meat thermometer to check the internal temperature of the turkey. The turkey is done when the internal temperature reaches 165°F (74°C) in the thickest part of the thigh.
- Rest the turkey:Once the turkey is cooked, remove it from the oven and let it rest for 15-20 minutes before carving. This allows the juices to redistribute throughout the meat, resulting in a more flavorful and moist turkey.
Monitoring the Turkey’s Progress
The moment of truth is approaching! It’s time to ensure your turkey is cooked to perfection while maintaining its juicy tenderness. To achieve this, understanding the signs of doneness and implementing the right techniques is crucial. This involves mastering the use of a meat thermometer and exploring alternative methods to gauge the turkey’s readiness.
Using a Meat Thermometer
A meat thermometer is the most reliable tool for determining turkey doneness. It eliminates guesswork and ensures the turkey is cooked safely to the recommended internal temperature.
- Insert the thermometer into the thickest part of the thigh, making sure it doesn’t touch any bone.
- The turkey is considered done when the thermometer registers 165°F (74°C) in the thigh.
- Avoid opening the oven door frequently, as this can cause the turkey to lose heat and extend cooking time.
Checking for Doneness Without a Thermometer, You are doing it all wrong how to make a moist thanksgiving turkey
While a meat thermometer is the most accurate method, there are other techniques you can use to assess doneness.
- The Leg Test:Gently wiggle the turkey’s leg. If it feels loose and moves easily, the turkey is likely done.
- The Pop-Up Timer:Some turkeys come with a pop-up timer that indicates doneness. However, these timers are not always reliable, so it’s best to use a meat thermometer for confirmation.
Preventing Overcooking and Maintaining Moisture
Overcooking is a common issue that leads to dry, tough turkey. To prevent this, consider the following:
- Rest the Turkey:After cooking, let the turkey rest for 15-20 minutes before carving. This allows the juices to redistribute, ensuring a moist and flavorful result.
- Basting:Basting the turkey during cooking helps keep it moist. However, basting too frequently can actually lead to dryness. Basting every 30-45 minutes is sufficient.
- Cover the Turkey:Covering the turkey with foil during the final hour of cooking can help prevent it from drying out.
Serving the Turkey
The final step in your Thanksgiving turkey journey is serving it. But before you carve and plate, remember that patience is key. Just like a fine wine, your turkey needs time to rest and allow the juices to redistribute, ensuring a moist and flavorful feast.
Resting the Turkey
Allowing the turkey to rest for at least 15-20 minutes after cooking is crucial for preserving its moisture. During cooking, the juices are pushed to the surface. Resting allows the juices to redistribute throughout the meat, resulting in a more succulent and flavorful turkey.
Cover the turkey loosely with foil to keep it warm while it rests.
Carving Techniques for Moisture Retention
Carving a turkey can be a delicate process, and improper technique can lead to dry meat. Here are some tips for carving your turkey while preserving its moisture:
- Use sharp knives:Dull knives will tear the meat, releasing juices. Use a sharp carving knife or electric carving knife for clean cuts.
- Carve against the grain:This helps to separate the fibers and create tender, juicy slices.
- Carve in sections:Start with the breast, then move to the legs and thighs. Remove the wings last.
Creating Flavorful Gravy
Turkey drippings are the foundation for a delicious gravy. Here’s how to create a flavorful gravy that complements your turkey:
- Deglaze the pan:After removing the turkey, pour off excess fat from the roasting pan. Add a cup of broth or wine to the pan and scrape up the browned bits on the bottom. This process, called deglazing, creates a flavorful base for the gravy.
- Thicken the gravy:Use a cornstarch slurry (a mixture of cornstarch and cold water) or a roux (a mixture of butter and flour) to thicken the gravy. Whisk the slurry or roux into the deglazed drippings and cook until the gravy reaches your desired consistency.
- Season the gravy:Salt and pepper are essential, but you can also add other seasonings like garlic powder, onion powder, or herbs to enhance the flavor.