How to Curl Your Hair with a Curling Wand
How to curling wand curls? It’s a question that has plagued many a hair enthusiast! Curling wands are a fantastic tool for creating a variety of looks, from beachy waves to tight curls, and mastering them can open up a whole new world of styling possibilities.
But with so many different types and techniques, it can feel overwhelming to know where to start.
This guide will walk you through everything you need to know about curling wands, from choosing the right one for your hair type to perfecting your technique. We’ll cover the basics, explore different styles, and provide tips for achieving the perfect curls.
Get ready to unleash your inner hairstylist and learn how to create gorgeous, bouncy curls with a curling wand!
Curling Wand Basics

Curling wands are a popular styling tool for achieving various curl styles. Understanding the different types and features of curling wands can help you choose the right one for your hair type and desired look.
Types of Curling Wands
Curling wands come in various sizes, materials, and temperature settings. Here’s a breakdown of the different types and their pros and cons:
- Barrel Size:The barrel size determines the size of the curl. Smaller barrels create tighter curls, while larger barrels create looser waves. For example, a 1-inch barrel will create tight curls, while a 2-inch barrel will create looser waves.
- Material:Curling wands are made from various materials, each with its own advantages and disadvantages.
- Ceramic:Ceramic barrels distribute heat evenly, minimizing heat damage. They are also known for their smooth surface, which helps prevent snags and frizz.
- Tourmaline:Tourmaline barrels emit negative ions, which help reduce frizz and static. They also heat up quickly and distribute heat evenly.
- Titanium:Titanium barrels heat up quickly and maintain a consistent temperature. They are also very durable and resistant to wear and tear.
- Temperature Settings:Most curling wands have adjustable temperature settings. This allows you to choose the appropriate temperature for your hair type. Fine or damaged hair may require a lower temperature, while thicker hair may require a higher temperature.
Pros and Cons of Different Curling Wand Types
Here’s a table summarizing the pros and cons of different curling wand types:
| Type | Pros | Cons |
|---|---|---|
| Ceramic | Even heat distribution, smooth surface, minimizes heat damage | May not heat up as quickly as other materials |
| Tourmaline | Reduces frizz and static, heats up quickly, even heat distribution | May be more expensive than other materials |
| Titanium | Heats up quickly, consistent temperature, durable | Can be more expensive than other materials, may be too hot for fine or damaged hair |
How to Use a Curling Wand Safely and Effectively
Here’s a step-by-step guide on how to use a curling wand safely and effectively:
- Prepare your hair:Start with clean, dry hair. Apply a heat protectant spray to shield your hair from heat damage.
- Section your hair:Divide your hair into small sections. This will help you curl each section evenly.
- Wrap your hair around the barrel:Starting at the bottom of the section, wrap your hair around the barrel of the curling wand. Hold the hair in place for a few seconds, depending on the desired curl.
- Release the curl:Gently release the curl from the wand. Don’t pull or tug on the hair, as this can cause damage.
- Style your curls:Once you’ve curled all of your hair, you can style your curls as desired. You can use a comb to brush out the curls for a looser look, or leave them as is for tighter curls.
- Set your curls:To help your curls last longer, use a light hairspray.
Choosing the Right Curling Wand

Choosing the right curling wand is essential for achieving the desired look. Factors like your hair type, preferred curl size, and budget all play a role in making the best decision.
Hair Type
Your hair type significantly influences the curling wand you should choose.
- Fine hair:Fine hair tends to be more delicate and may not hold curls as well as thicker hair. Look for a wand with a smaller barrel size (1/2 to 1 inch) and a lower heat setting to avoid damage.
- Medium hair:Medium hair offers a balance between fine and thick hair, allowing for greater versatility in wand size and heat settings. You can experiment with different barrel sizes (1 to 1.5 inches) and heat settings based on your desired curl type.
- Thick hair:Thick hair requires a wand with a larger barrel size (1.5 to 2 inches) and a higher heat setting to ensure even heat distribution and curl formation.
Desired Curl Size
The size of the curling wand barrel directly affects the size of your curls.
Mastering curling wand curls is all about finding the right technique and heat setting for your hair type. But before you start, why not add a little fun to the process? Check out this awesome DIY project for creating fabric countdown links, counting down never looked so good diy fabric countdown links , to mark the days leading up to your next hair styling session! You can even use the countdown links as a reminder to practice different curling wand techniques and experiment with different styles.
- Small barrels (1/2 to 1 inch):These barrels create tight, bouncy curls that are perfect for achieving a vintage or romantic look.
- Medium barrels (1 to 1.5 inches):These barrels produce loose, effortless curls that are suitable for everyday wear.
- Large barrels (1.5 to 2 inches):These barrels create soft, wavy curls that are ideal for adding volume and texture to your hair.
Budget
Curling wands come in a wide range of prices, from budget-friendly options to high-end models.
- Budget-friendly:Look for wands with basic features and a lower price tag. These wands may not have advanced features like temperature control or interchangeable barrels, but they can still deliver decent results.
- Mid-range:Mid-range wands offer a balance of features and affordability. They often include temperature control, multiple heat settings, and a few interchangeable barrels.
- High-end:High-end wands are designed for professional use and often come with advanced features like ceramic barrels, digital temperature control, and a wide range of interchangeable barrels.
Popular Curling Wand Brands and Models
Several reputable brands offer high-quality curling wands.
Mastering curling wand curls is all about finding the right technique and products, but sometimes a little inspiration goes a long way. If you’re looking for a thoughtful gift for your neighbor, why not check out this list of 41 neighbor Christmas gift idea towels ?
They might be just the thing to help them relax and unwind after a long day, leaving them ready to tackle those curls with confidence!
- T3:T3 is known for its innovative and high-performance styling tools. Their curling wands feature advanced technologies like ceramic barrels and digital temperature control, ensuring even heat distribution and healthy curls.
- GHD:GHD is a popular choice for professional stylists and consumers alike. Their curling wands are known for their sleek design, precise temperature control, and consistent curl formation.
- Hot Tools:Hot Tools offers a wide range of curling wands at affordable prices. Their wands feature various barrel sizes and heat settings, making them suitable for different hair types and curl preferences.
Choosing the Right Curling Wand for Different Hair Types and Curl Preferences
- Fine hair:A smaller barrel size (1/2 to 1 inch) and a lower heat setting are recommended. Consider a curling wand with a ceramic barrel for even heat distribution and less damage.
- Medium hair:A medium barrel size (1 to 1.5 inches) and a moderate heat setting are suitable. Experiment with different barrel sizes and heat settings to find the perfect combination for your desired curl type.
- Thick hair:A larger barrel size (1.5 to 2 inches) and a higher heat setting are necessary for even heat distribution and curl formation. A curling wand with a tourmaline or ceramic barrel can help prevent heat damage.
- Loose waves:A large barrel size (1.5 to 2 inches) is ideal for creating soft, wavy curls.
- Tight curls:A smaller barrel size (1/2 to 1 inch) is best for achieving tight, bouncy curls.
- Beachy waves:A medium barrel size (1 to 1.5 inches) can create effortless, beachy waves.
Curling Wand Techniques
Now that you’ve chosen the perfect curling wand for your hair type and desired look, let’s dive into the techniques that will help you achieve those gorgeous curls. From wrapping your hair around the barrel to creating loose waves, there are several methods to explore.
Let’s break it down.
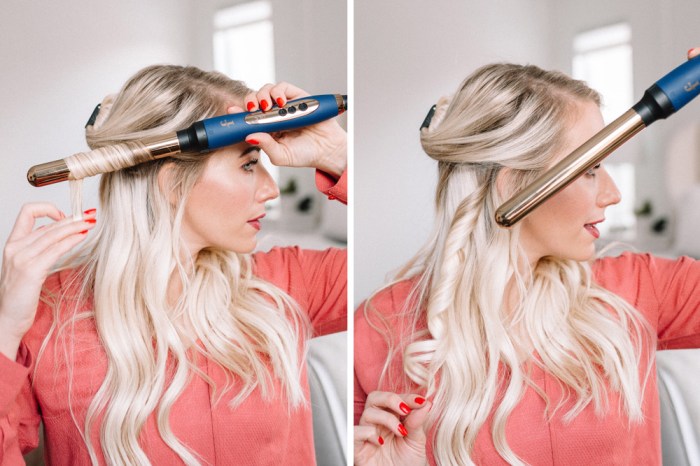
Wrapping Hair Around the Barrel
This is the most common curling wand technique, and it’s relatively simple to master. It involves wrapping your hair around the barrel of the wand, holding it for a few seconds, and then releasing it. To achieve a consistent curl pattern, you’ll want to section your hair before you begin.
- Start by dividing your hair into small sections, about 1-2 inches wide. This ensures that each section of hair is evenly heated and curled.
- Next, take a section of hair and wrap it around the barrel of the wand, starting at the bottom and working your way up.
- Hold the section in place for a few seconds, depending on the thickness of your hair and the heat setting of your wand. The longer you hold it, the tighter the curl will be.
- Once you’ve held the section for the desired amount of time, gently release it from the wand.
- Repeat this process for each section of hair until your entire head is curled.
Using a Clamp
Some curling wands come with a clamp, which can be helpful for keeping your hair in place while you curl it. The clamp allows you to wrap your hair around the barrel without worrying about it slipping.
- Start by dividing your hair into small sections, as you did with the previous technique.
- Next, take a section of hair and place it between the clamp of the wand.
- Wrap the hair around the barrel, making sure to keep the clamp securely in place.
- Hold the section for a few seconds, and then release it from the clamp.
- Continue this process until your entire head is curled.
Creating Loose Waves
If you’re looking for a more relaxed, beachy look, you can use a curling wand to create loose waves. This technique involves wrapping your hair around the barrel for a shorter amount of time and then releasing it.
- Start by dividing your hair into small sections.
- Next, take a section of hair and wrap it around the barrel of the wand for a few seconds, just enough to heat it up.
- Gently release the section from the wand.
- Repeat this process for each section of hair.
- Once your hair is completely curled, use your fingers to gently tousle the waves and create a more relaxed look.
Sectioning Your Hair
Sectioning your hair is a crucial step in achieving even and consistent curls. It ensures that each section of hair is evenly heated and curled, resulting in a more polished look.
- Start by dividing your hair into 4 sections: two at the top, two at the bottom.
- Next, divide each of those sections into smaller sections, about 1-2 inches wide.
- This allows you to work with smaller, more manageable sections of hair, making it easier to wrap them around the barrel of the wand.
Using Heat Protectant Spray
Heat protectant spray is a must-have for anyone using a curling wand. It helps to shield your hair from the heat of the wand, preventing damage and breakage.
Learning how to use a curling wand to create those perfect bouncy curls is a skill that takes practice, but the results are totally worth it! If you’re looking for a thoughtful Mother’s Day gift idea, maybe consider gifting her a curling wand and a fun tutorial on how to use it.
You can even find some great inspiration for other Mother’s Day gifts here. Once you’ve mastered the curling wand, you can create all sorts of styles, from loose waves to tight spirals. So, get practicing, and you’ll be a curling wand pro in no time!
- Apply a heat protectant spray to your hair before you start curling.
- Make sure to distribute the spray evenly throughout your hair, paying particular attention to the ends.
- This will help to protect your hair from heat damage and keep it looking healthy and shiny.
Achieving Specific Curl Styles
Now that you’ve mastered the basic curling wand techniques, let’s explore some specific curl styles you can create.
Beach Waves
Beach waves are a popular and versatile style that can be achieved with a curling wand. To create beach waves, use a larger barrel curling wand and wrap your hair around it for a shorter amount of time.
- Use a curling wand with a barrel size of 1-1.5 inches.
- Wrap your hair around the barrel for a few seconds, just enough to heat it up.
- Once you’ve curled all of your hair, use your fingers to gently tousle the waves and create a more relaxed look.
- You can also use a texturizing spray or sea salt spray to add volume and texture to your beach waves.
Tight Curls
For tight curls, use a smaller barrel curling wand and wrap your hair around it for a longer amount of time.
- Use a curling wand with a barrel size of 0.5-1 inch.
- Wrap your hair around the barrel and hold it for 10-15 seconds.
- Once you’ve curled all of your hair, use a curling cream or mousse to define the curls and prevent frizz.
Voluminous Waves
Voluminous waves can be achieved by using a curling wand with a larger barrel and wrapping your hair around it for a shorter amount of time.
- Use a curling wand with a barrel size of 1.5-2 inches.
- Wrap your hair around the barrel for a few seconds, just enough to heat it up.
- Once you’ve curled all of your hair, use a volumizing spray or mousse to add volume and lift to your waves.
Curling Wand Styles: How To Curling Wand Curls
Curling wands come in various shapes and sizes, each designed to create a specific curl pattern. The right wand will depend on your hair type, desired curl size, and personal preference.
Curling Wand Styles
Curling wand styles can be categorized based on their barrel shape, size, and material. Here is a table that summarizes some popular curling wand styles:
| Style | Description | Curling Technique | Example |
|---|---|---|---|
| Classic Curling Wand | This is the most common type of curling wand. It has a cylindrical barrel that creates loose, bouncy curls. | Wrap hair around the barrel, starting from the bottom and working your way up. | This style is perfect for creating loose, beachy waves on medium-length hair. The curls will be soft and flowing, adding volume and texture to the hair. |
| Conical Curling Wand | This type of curling wand has a tapered barrel that gets smaller towards the end. It creates curls that are tighter at the roots and looser at the ends. | Wrap hair around the barrel, starting from the wider end and working your way down. | This style is ideal for creating voluminous curls on long hair. The tighter curls at the roots provide lift and volume, while the looser curls at the ends create a more natural look. |
| Spiral Curling Wand | This wand has a spiral-shaped barrel that creates defined, spiral curls. | Wrap hair around the barrel, following the spiral pattern. | This style is perfect for creating tight, springy curls on short to medium-length hair. The spiral curls add a playful and whimsical touch to the hair. |
| Triple Barrel Curling Wand | This wand has three barrels that create three distinct waves or curls simultaneously. | Section hair and wrap it around the three barrels. | This style is ideal for creating a textured, beachy wave on long hair. The three barrels create a more voluminous and defined wave than a single barrel wand. |
| Crimper Curling Wand | This wand has a crimped barrel that creates a textured, wavy look. | Run hair through the crimped barrel, creating a wavy pattern. | This style is perfect for creating a casual, tousled look on short to medium-length hair. The crimped waves add texture and dimension to the hair. |
Curling Wand Maintenance

Just like any other styling tool, your curling wand needs proper care and attention to ensure it lasts for years to come. Taking the time to clean and store your curling wand correctly can prevent damage and extend its lifespan, allowing you to enjoy beautiful curls for a long time.
Cleaning Your Curling Wand
Regular cleaning of your curling wand is crucial to prevent product buildup and maintain its optimal performance.
- Unplug and Allow to Cool:Before cleaning, always unplug your curling wand and let it cool down completely. This prevents burns and ensures that the barrel doesn’t crack or warp from sudden temperature changes.
- Wipe Down the Barrel:Use a soft, damp cloth to gently wipe down the barrel of your curling wand. You can use a mild cleaning solution, such as a mixture of water and dish soap, if needed. Avoid using harsh chemicals or abrasive cleaners, as they can damage the surface of the barrel.
- Clean the Heating Element:If your curling wand has a removable heating element, carefully detach it and clean it according to the manufacturer’s instructions. This is important for maintaining consistent heat distribution and preventing any buildup that can affect performance.
- Remove Hair Buildup:If you notice any hair buildup on the barrel or heating element, use a small, blunt object, such as a toothpick, to carefully remove it. Avoid using sharp objects that can scratch the surface.
- Dry Thoroughly:After cleaning, ensure that your curling wand is completely dry before storing it. This prevents moisture from damaging the internal components.
Storing Your Curling Wand, How to curling wand curls
Proper storage of your curling wand can help prevent damage and keep it in top condition.
- Use a Heat-Resistant Bag:Store your curling wand in a heat-resistant bag or case to protect it from dust, scratches, and other potential damage. This is especially important if you travel with your curling wand.
- Store in a Cool, Dry Place:Keep your curling wand in a cool, dry place, away from direct sunlight or heat sources. This prevents the barrel from warping or the internal components from malfunctioning.
- Wrap the Cord:Wrap the cord of your curling wand neatly around the barrel or base of the wand. This prevents tangles and keeps the cord from becoming damaged.
- Avoid Storing Near Water:Keep your curling wand away from water or any other liquids. This prevents the possibility of electrical shock or damage to the internal components.
Preventing Curling Wand Damage
- Avoid Dropping:Dropping your curling wand can cause serious damage to the barrel, heating element, or internal components. Handle it with care and avoid placing it on unstable surfaces.
- Use Heat Protectant Spray:Always apply a heat protectant spray to your hair before using a curling wand. This helps to shield your hair from heat damage and prevents breakage.
- Avoid Using on Wet Hair:Never use a curling wand on wet hair. This can cause serious damage to your hair and potentially damage the curling wand itself. Always make sure your hair is completely dry before styling.
- Clean Regularly:As mentioned earlier, regular cleaning of your curling wand is essential to prevent product buildup and maintain its optimal performance. This can also help prevent damage to the barrel and internal components.
Troubleshooting Common Curling Wand Problems
- Uneven Heating:If your curling wand is not heating evenly, it may be due to product buildup or a faulty heating element. Clean the barrel thoroughly and check for any visible damage to the heating element. If the problem persists, consider contacting the manufacturer for assistance.
- Not Reaching Desired Temperature:If your curling wand is not reaching the desired temperature, it may be due to a faulty thermostat or a power issue. Check the power cord and ensure it is properly plugged in. If the problem persists, contact the manufacturer for assistance.
- Barrel Not Turning On:If your curling wand is not turning on, it may be due to a power issue or a faulty switch. Check the power cord and ensure it is properly plugged in. If the problem persists, contact the manufacturer for assistance.