
How To Dutch Braid Tutorial
How to Dutch Braid: A Step-by-Step Tutorial for Flawless Braids
The Dutch braid, also known as an inside-out French braid or a reversed French braid, is a versatile and elegant hairstyle that adds a touch of sophistication to any look. Unlike a traditional French braid where strands are woven over each other, a Dutch braid involves tucking the strands under each other, creating a braid that stands out from the scalp. This tutorial will guide you through the process of creating a perfect Dutch braid, from simple single braids to more intricate variations, making it accessible for beginners and a refresher for those with some braiding experience. Understanding the mechanics of a Dutch braid is crucial for mastering this technique, as it allows for greater control and a more defined, raised braid. The key difference lies in the direction of the strand crossing: over for French, under for Dutch. This subtle shift in technique results in a dramatically different aesthetic, with the Dutch braid appearing to "pop" out from the head, offering a bold and textured look.
To begin your Dutch braiding journey, gather the necessary tools. You’ll need a brush or comb to detangle and smooth the hair, creating a clean canvas for braiding. Hair ties are essential for securing the end of the braid, and optionally, you might want bobby pins to tuck away any stray hairs for a polished finish. For those with fine or slippery hair, a texturizing spray or dry shampoo can provide extra grip, making the braiding process smoother and more manageable. It’s always best to start with dry or slightly damp hair; extremely wet hair can be more challenging to grip and control, while bone-dry hair might be prone to flyaways. Before you even pick up your comb, ensure you have adequate lighting and a mirror, ideally a three-way mirror, to see the back of your head if you’re braiding your own hair. This allows for better visualization and correction of any mistakes as you go. Preparation is key, and having everything within reach will streamline the entire process, reducing frustration and enhancing your chances of success on your first try.
The fundamental Dutch braid technique starts with sectioning the hair. For a single braid at the back of your head, begin by dividing a section of hair at the crown into three equal strands. Hold the left strand in your left hand, the middle strand in your right hand, and the right strand in your left hand (or adjust based on your dominant hand and comfort). The goal is to maintain tension and control over each strand throughout the braiding process. Imagine you’re holding three distinct ropes, and your goal is to weave them together in a specific pattern. The initial sectioning is critical for the overall appearance of the braid, so take your time to ensure the strands are roughly equal in size. This will contribute to a balanced and symmetrical braid.
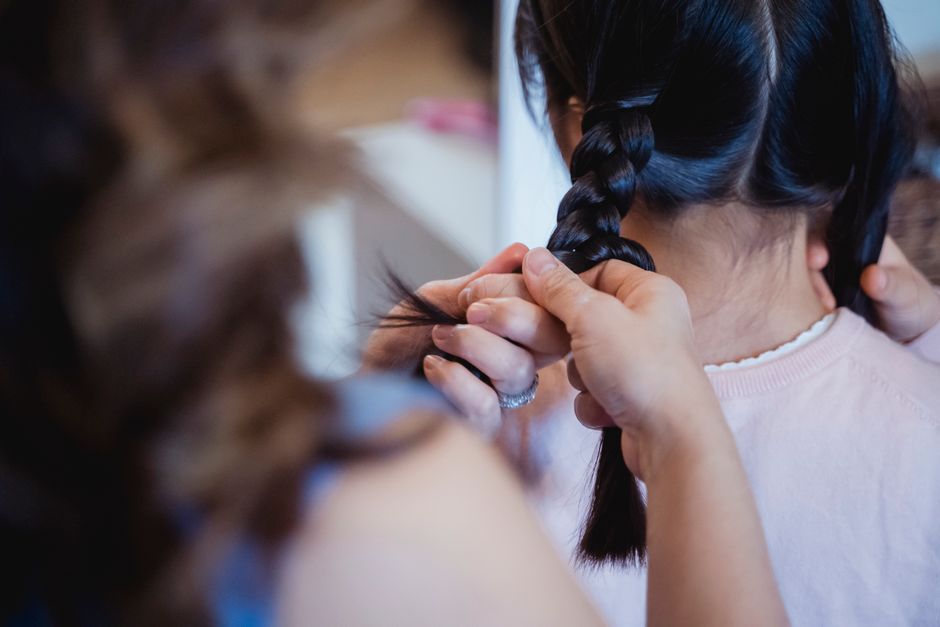
Now, initiate the braiding by crossing the right strand under the middle strand. The original middle strand now becomes the right strand, and the original right strand is now in the middle. Next, cross the left strand under the new middle strand. Again, the original middle strand becomes the left strand, and the original left strand is now in the middle. You’ve just completed your first "stitch" of the Dutch braid. The defining characteristic of the Dutch braid is this "under" motion. It’s the inverse of a traditional French braid where you would cross over. This inward tucking motion is what creates the raised, prominent braid effect.
The next crucial step is incorporating new hair. After completing your first few stitches, begin to add hair to the strands as you tuck them under. Take a small section of loose hair from the right side of the head, near the hairline, and combine it with the current rightmost strand before you tuck it under the middle strand. Similarly, take a small section of loose hair from the left side of the head and combine it with the current leftmost strand before you tuck it under the middle strand. The size of these added sections will determine the thickness of your braid. For a finer braid, take smaller sections; for a thicker braid, take larger sections. Consistency in the size of these additions is important for an even appearance.
Continue this process, alternating between the left and right sides, always adding a section of loose hair to the outermost strand before tucking it under the middle. Maintain consistent tension on all strands to keep the braid neat and prevent it from loosening. As you move down the head, gradually shift the angle of your braiding to follow the desired direction of your braid, whether it’s straight down the back, to the side, or in a crown. The key to a smooth transition is to ensure that the added hair blends seamlessly with the existing strands, creating a continuous and unbroken flow. Periodically check the tension; if the braid starts to loosen, gently pull on the strands to tighten it.
Once you reach the nape of the neck, or when there’s no more loose hair to incorporate, continue with a standard three-strand braid until you reach the end of the hair. Secure the end of the braid with a hair tie. For a more polished look, you can carefully use a tail comb to loosen the edges of the braid by gently pulling on each loop. This technique, often called "pancaking" the braid, creates a fuller, more bohemian appearance. Start from the bottom of the braid and work your way up, gently tugging on the outer edges of each woven section. Be careful not to pull too hard, or you risk unraveling the braid. This step is entirely optional and depends on the desired aesthetic.
Mastering the single Dutch braid is the foundation for more complex styles. Let’s explore how to create two Dutch braids, often referred to as pigtail Dutch braids. Part the hair down the middle from the forehead to the nape of the neck, creating two equal sections. Work on one section at a time, following the same Dutch braiding technique described above. Start at the front hairline of one section, take a small subsection of hair, divide it into three strands, and begin braiding downwards, incorporating hair from the perimeter of that section. As you work your way down, the braid will naturally curve with the shape of the head. Secure each braid with a hair tie once completed. This is a classic and practical hairstyle, perfect for everyday wear or active pursuits.
For a more elaborate and fashionable look, consider the Dutch crown braid. Begin by parting the hair down the middle or slightly off-center. Start a Dutch braid on one side of the head, near the hairline, at the front. Instead of braiding straight down, you’ll be braiding upwards and around the crown of your head, incorporating hair from the top and sides of your head as you go. As you add hair, guide the braid along the curve of your scalp, creating a halo effect. Continue incorporating hair until you’ve reached the starting point on the other side of your head. Once all loose hair is incorporated, finish with a standard three-strand braid and secure it discreetly underneath the crown braid using bobby pins. This style requires a bit more dexterity and practice but is incredibly striking.
Another popular variation is the Dutch fishtail braid. While the Dutch braid uses three strands, the fishtail braid uses two. To create a Dutch fishtail braid, you’ll essentially be incorporating the fishtail technique within the Dutch braiding structure. This can be approached in a couple of ways. One method involves creating a Dutch braid and then transforming sections of it into fishtail braids as you go, which is quite advanced. A more accessible approach is to create a Dutch braid and then, for the final three-strand braid section at the end, convert that into a fishtail braid. To do this, divide the remaining hair into two strands. Take a small piece of hair from the outside of one strand and cross it over to join the other strand. Repeat on the opposite side. This creates the intricate woven look of a fishtail within the raised structure of the Dutch braid.
For those with shorter hair or seeking a more textured braid, consider the half-up Dutch braid. Section off the top half of your hair from the temples upwards. Divide this top section into three strands at the crown and begin a Dutch braid, incorporating hair from the sides of the top section only. Braid downwards towards the back of your head, leaving the bottom half of your hair loose. Once you’ve incorporated all the desired hair from the top section, secure the end of the braid with a small hair tie. You can then either leave the rest of the hair down or style it further. This is a chic and effortless way to keep hair out of your face while still showcasing a braided detail.
To enhance the longevity and appearance of your Dutch braid, consider these finishing tips. A light mist of hairspray can help tame flyaways and keep the braid in place throughout the day. If your braid feels too tight or uncomfortable, gently loosen the loops as mentioned earlier. For a softer, more romantic look, you can pull out small face-framing tendrils of hair from around your hairline before or after braiding. If you’re struggling with grip, especially with very fine or silky hair, using a texturizing spray or a small amount of pomade on the strands before you start can make a significant difference. Some braiders also find it helpful to slightly dampen their hands or the hair itself before beginning.
Practicing is paramount to achieving mastery. Don’t be discouraged if your first few attempts aren’t perfect. Every time you braid, you’ll gain a better understanding of tension, strand manipulation, and the flow of the hair. Experiment with different section sizes, braid thicknesses, and placements. Try braiding on a friend or family member to get a different perspective and practice braiding on the back of the head, which is often the most challenging. Watching video tutorials can also be incredibly helpful, as you can visually follow the hand movements and see the braid developing in real-time. Understanding the underlying principles of the Dutch braid will allow you to adapt the technique to various hair types and styles, making it a truly indispensable skill in your hairstyling arsenal. The beauty of the Dutch braid lies in its versatility and the ability to transform a simple braid into a statement piece.
