
This Is The Perfect Way To Make Penguin Pancakes
The Perfect Way to Make Penguin Pancakes: A Step-by-Step Guide to Adorable Breakfasts
Creating penguin pancakes is a delightful way to transform a breakfast staple into a playful and visually appealing treat. This guide will walk you through every step, ensuring your penguin pancakes are not only adorable but also delicious. We’ll cover everything from essential ingredients and equipment to detailed instructions for batter preparation, cooking, and the crucial decorating process that brings these charming birds to life. The SEO focus here is on capturing search queries related to "penguin pancakes," "easy pancake recipes," "fun breakfast ideas," "kid-friendly breakfast," "creative pancake art," and "how to make animal pancakes." By optimizing for these keywords and providing comprehensive, actionable information, this article aims to be the definitive resource for anyone looking to master the art of penguin pancakes.
The foundation of any great pancake, including our penguin creations, lies in a well-balanced batter. For approximately 10-12 standard-sized pancakes, you will need the following dry ingredients: 2 cups of all-purpose flour, 2 tablespoons of granulated sugar, 2 teaspoons of baking powder, and ½ teaspoon of salt. The wet ingredients are equally important: 2 large eggs, 1 ¾ cups of milk (whole milk provides the richest flavor and texture, but 2% or even a dairy-free alternative like almond or soy milk can be used), and 2 tablespoons of melted unsalted butter. It’s imperative to use fresh baking powder for optimal lift, ensuring your pancakes are fluffy and light, the perfect canvas for our penguin design. Sifting the dry ingredients together is a recommended step, as it helps to aerate the flour and prevent lumps from forming in the batter, leading to a smoother consistency.
Beyond the basic batter, specific tools are essential for creating the distinct shapes and features of penguin pancakes. You’ll need a good quality non-stick griddle or frying pan. A medium-sized scoop or ladle is ideal for portioning the batter evenly. For the penguin’s body, a standard round pancake shape is sufficient, but for the head and extremities, a few specialized items come in handy. A small squeeze bottle, often used for condiments like ketchup or mustard, is perfect for drizzling precise amounts of batter for the penguin’s head. Alternatively, a small, heat-resistant spoon can be used, though a squeeze bottle offers more control. For the beak and feet, you’ll need a small amount of orange or yellow food coloring to tint a separate, smaller portion of batter. A toothpick or a small skewer will be crucial for drawing finer details and for carefully placing the colored batter. Finally, for decoration, you’ll require black and white frosting or edible food coloring pens, and small edible googly eyes or black nonpareils for the pupils.
The process begins with preparing the pancake batter. In a large mixing bowl, whisk together the flour, sugar, baking powder, and salt. In a separate, smaller bowl, lightly beat the eggs. Then, whisk in the milk and melted butter until thoroughly combined. Create a well in the center of the dry ingredients and pour in the wet ingredients. Stir gently until just combined. It is crucial not to overmix the batter, as this can develop the gluten in the flour, resulting in tough pancakes. A few small lumps are perfectly acceptable. Allow the batter to rest for about 5-10 minutes; this brief resting period allows the baking powder to begin its leavening action, contributing to a lighter texture.
While the main batter rests, prepare the colored batter for the penguin’s extremities. Take about ½ cup of the main batter and place it in a small bowl. Add a few drops of orange or yellow food coloring and stir until the color is evenly distributed. If you’re using yellow, it will create a slightly warmer-toned beak. If using orange, you’ll achieve a more traditional penguin beak color. This colored batter should have a similar consistency to the main batter. If it seems too thick, you can add a teaspoon of milk at a time until it reaches the desired fluidity for easy drizzling. This step is critical for achieving distinct and well-defined features on your penguin pancakes.
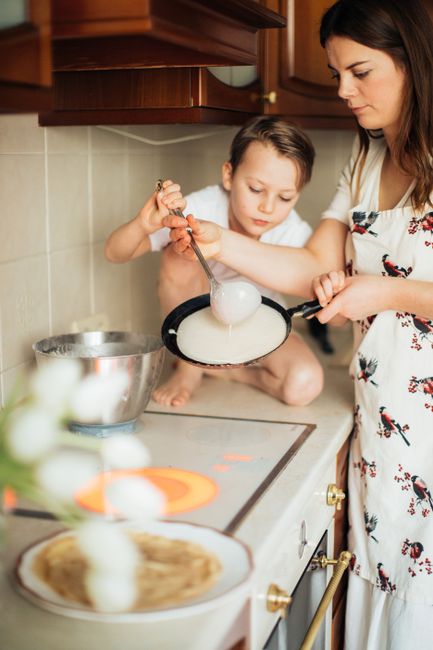
Now comes the artistic part: cooking and shaping the penguin pancakes. Heat your griddle or frying pan over medium heat. Lightly grease it with butter or cooking spray. Once the griddle is hot (a drop of water should sizzle and evaporate quickly), pour about ½ cup of the main batter onto the griddle to form a standard round pancake shape. This will be the penguin’s body. Immediately after pouring the main batter, and while the batter is still wet, use your squeeze bottle or small spoon to create the penguin’s head. Drizzle a smaller circle of the main batter on top of the larger circle, slightly overlapping. The batter will spread, so aim for a shape that resembles a pear or a tadpole attached to the body. This is where practice makes perfect, and the squeeze bottle offers the most control over the shape and size of the head.
Once the pancake starts to bubble on the surface and the edges look set, it’s time to add the colored batter for the beak and feet. Using your squeeze bottle filled with the orange or yellow batter, carefully drizzle a small triangle shape onto the top half of the "head" circle to create the beak. Then, draw two small, rounded shapes at the bottom of the main body circle to represent the feet. Be deliberate with your movements; the batter will spread, so thinner lines will result in more defined features. You can also use a toothpick to gently guide the batter or create more intricate shapes if desired. The key is to work relatively quickly before the pancake sets too much.
After adding the colored batter, carefully flip the penguin pancake using a spatula. Cook for another 1-2 minutes on the second side, or until golden brown and cooked through. The cooking time will vary depending on the heat of your griddle and the thickness of your pancakes. Overcooking can lead to burnt edges and a dry pancake, so keep a close eye on it. The goal is a fluffy, evenly cooked pancake with distinct, colored features. Repeat this process for each penguin pancake, ensuring your griddle is maintained at a consistent medium heat. Cleaning your griddle between batches can prevent burnt bits from sticking and affecting the appearance of subsequent pancakes.
Once your penguin pancakes are cooked and stacked, it’s time for the final decorative touches that truly bring them to life. You’ll need black and white frosting or edible food coloring pens. Using a toothpick or a fine-tipped decorating tool, draw two small black circles for the eyes on the "head" of the penguin. For a more realistic and fun look, you can add tiny white dots within the black circles to represent highlights, giving them a "sparkle." Next, use the black frosting or pen to outline the edges of the penguin’s "wings" on the sides of its body. You can create simple curved shapes extending from the sides. Finally, fill in the wing areas with black frosting or color.
For the ultimate adorable touch, consider using edible googly eyes. These are readily available at most craft or baking supply stores and add an instant dose of personality. Alternatively, you can use small black nonpareils or edible black pearls for the pupils. If you don’t have frosting, edible food coloring pens are a great alternative for drawing the details. Ensure the pens are specifically designed for food use. For a more artistic flair, you could even use a small amount of melted chocolate for the black details. The possibilities are endless, and the more creative you are, the more unique and charming your penguin pancakes will be.
To elevate the penguin pancake experience, consider presenting them with a few simple accompaniments. A dusting of powdered sugar can mimic snow, adding to the Antarctic theme. A few blueberries can represent icebergs or pebbles. A dollop of whipped cream can serve as a fluffy cloud. Serving these penguin pancakes with fresh fruit, like sliced strawberries or kiwi, adds a healthy and colorful dimension to the breakfast. The vibrant colors of the fruit will contrast beautifully with the black and white of the penguins, making the entire plate visually appealing and delicious.
When teaching children how to make penguin pancakes, emphasize the importance of adult supervision, especially around the hot griddle. Allow them to help with measuring and mixing the dry ingredients, and if they are old enough and supervised, they can assist with drizzling the colored batter for the beak and feet, under close guidance. Providing them with their own squeeze bottles can make the process more engaging and fun. The act of creating a character from batter is a fantastic way to foster creativity and fine motor skills. This activity can transform a routine breakfast into an exciting culinary adventure for young ones.
The success of your penguin pancakes also hinges on the quality of your ingredients. Fresh, good-quality flour and baking powder will contribute to a superior texture. Using a good milk will enhance the richness of the flavor. For the coloring, natural food colorings can be used if you prefer to avoid artificial dyes, though they might produce a less vibrant hue. The butter used for greasing the pan also adds to the flavor profile; unsalted butter allows you to control the saltiness of the overall dish. Experimenting with different types of milk, like buttermilk, can also result in a tangier and more tender pancake.
Troubleshooting common issues is part of mastering any recipe. If your pancakes are sticking to the griddle, ensure it’s properly heated and greased. Too low a heat can also lead to flat, dense pancakes. If your batter is too thick, it will be difficult to drizzle and shape; adding a small amount of milk will rectify this. Conversely, if the batter is too thin, the shapes might spread too much. In this case, you can add a tablespoon of flour at a time until the desired consistency is achieved. If the colored batter runs into the main batter before cooking, it’s likely due to the griddle temperature being too low, causing the main batter to spread excessively. Maintaining a consistent medium heat is key.
Finally, the visual appeal of penguin pancakes is a significant part of their charm. When decorating, consider the different breeds of penguins and how their markings vary. Some penguins have yellow or orange markings around their eyes or chests, which can be replicated with creative use of colored frosting. You can also experiment with different sizes and shapes to create a whole colony of penguins. The goal is to have fun and let your imagination run wild. The SEO benefit of creating detailed, visual instructions and offering tips for customization is that it caters to a wider audience, from beginners looking for simple instructions to experienced decorators seeking inspiration.
In conclusion, the perfect way to make penguin pancakes involves a precise yet adaptable batter recipe, the right tools for shaping and drizzling, careful cooking techniques, and a creative approach to decorating. By following these steps, you can consistently create these adorable and delicious breakfast treats that are sure to delight both children and adults. The emphasis on clear instructions, ingredient quality, and decorative techniques ensures that this guide serves as a comprehensive and valuable resource for anyone seeking to master the art of penguin pancakes, optimizing for search engines and user satisfaction alike. The detailed breakdown of each stage, from batter preparation to final embellishments, provides readers with all the knowledge they need to confidently embark on this fun and rewarding culinary project.
