Floating Frame Tutorial: A Step-by-Step Guide
Floating frame tutorial – it’s a phrase that conjures up images of elegant artwork seemingly suspended in mid-air, a captivating display that adds a touch of sophistication to any space. This tutorial will guide you through the process of crafting your own floating frame, from selecting the right materials to finishing touches that enhance the overall aesthetic.
Whether you’re a seasoned artist or a DIY enthusiast, this comprehensive guide will empower you to create stunning floating frames that showcase your prized artwork, photographs, or cherished mementos. Get ready to explore the art of framing with a unique twist.
Assembling the Frame
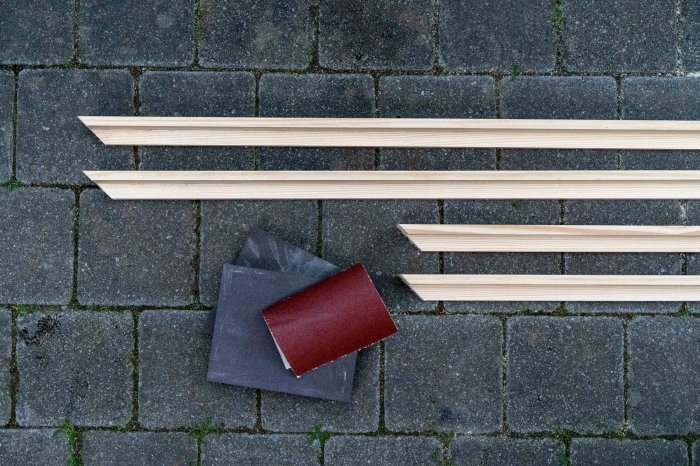
Now that you have all the necessary materials, it’s time to assemble the frame. This process is straightforward and can be done with basic tools. We will cover the steps involved in creating a secure and stable frame, as well as some tips for achieving a professional finish.
Creating a Secure and Stable Frame
The key to a stable floating frame is ensuring that the corners are securely joined and that the frame is properly aligned. Here are the steps involved:
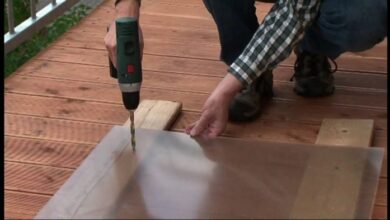
- Joining the Corners:Using a miter saw, cut the frame pieces at a 45-degree angle. This ensures a perfect fit when the corners are joined. To secure the corners, you can use a variety of methods, including wood glue, corner blocks, or brads.
Floating frames are a great way to add dimension and interest to your walls, and they’re surprisingly easy to create. If you’re looking for a unique and rustic touch, consider using reclaimed shutters as the frame. You can find some great ideas for a shutter message board online, which could inspire you to create a floating frame that’s both functional and stylish.
Once you’ve got your frame built, you can personalize it with your favorite photos, artwork, or even a collection of your favorite quotes.
Wood glue provides a strong bond, while corner blocks offer additional support. Brads can be used to further secure the corners, especially for larger frames.
- Alignment:Once the corners are joined, use a level to ensure that the frame is perfectly square and level. You can use shims to adjust the frame if necessary. A perfectly aligned frame will ensure that your artwork hangs straight and evenly.
- Securing the Frame:Once the frame is aligned, you can use clamps to hold the corners in place while the glue dries. If you are using corner blocks, make sure to secure them with screws or brads. You can also use a brad nailer to secure the frame from the back, further enhancing its stability.
Achieving a Professional Finish
To achieve a professional finish, pay attention to the following details:
- Sanding:After assembling the frame, sand the corners and edges to smooth out any rough spots and create a seamless finish. Use a fine-grit sandpaper for a smooth surface.
- Finishing:You can choose to stain or paint the frame to match your decor or artwork. Use a high-quality paint or stain for a durable finish. Ensure that the paint or stain is applied evenly and smoothly. You can also apply a sealant to protect the frame from moisture and scratches.
- Cleanliness:Keep your workspace clean and organized. Wipe down the frame with a damp cloth to remove any dust or debris before applying paint or stain. This will help to prevent imperfections in the finish.
Attaching the Artwork

Once your floating frame is assembled, it’s time to add the star of the show – your artwork. The way you attach it will depend on the artwork’s material, size, and your desired aesthetic.
Creating a floating frame tutorial is a fun way to showcase your favorite artwork, but sometimes the cost of framing can add up. If you’re looking for budget-friendly alternatives, check out this list of two thoughtful gifts under 1 that can make a big impact.
Once you’ve got your materials, you can easily apply the floating frame technique to your DIY project, and you’ll be amazed at the professional results.
Adhesive Methods, Floating frame tutorial
Adhesive methods are often preferred for lightweight artworks, such as prints, photographs, and drawings.
Creating a floating frame tutorial can be a fun and rewarding project. It’s all about taking something ordinary and turning it into something unique and eye-catching. As I work on these tutorials, I’m reminded of how thankful I am for the opportunity to share my creativity with others.
What are you thankful for ? Maybe it’s the simple things, like being able to create something beautiful with your own hands. I’m sure that same sense of accomplishment will shine through in your floating frame tutorial.
- Double-Sided Tape:This is a simple and readily available option. Choose a tape specifically designed for mounting artwork, as it will be less likely to leave residue. Apply the tape to the back of your artwork, then carefully press it into the frame’s rabbet.
- Adhesive Mounting Squares:These small, adhesive squares are great for securing corners and preventing artwork from sliding. They are particularly useful for larger pieces.
- Adhesive Mounting Strips:Similar to adhesive mounting squares, these strips offer a more secure hold for larger or heavier artworks.
Clips and Hangers
Clips and hangers provide a more secure and often reversible mounting option.
- Picture Hangers:These come in various sizes and styles, and can be attached to the back of the artwork using a small nail or tack. Then, simply hang the artwork from the frame’s rabbet.
- Spring Clips:Spring clips are a versatile option that can be used for a variety of artwork sizes and materials. They are typically attached to the frame’s rabbet and then used to secure the artwork.
Other Mounting Methods
There are several other methods for attaching artwork to a floating frame.
- Floating Frames with Built-in Mounting Systems:Some floating frames come with built-in mounting systems, such as a system that uses a tension rod to hold the artwork in place. This can be a convenient and secure option.
- Custom Mounting:If you’re working with a unique or valuable artwork, you may want to consider custom mounting. This involves creating a mount board or backing that is specifically designed to fit your artwork. This method provides a secure and professional-looking finish.
Tips for Secure Mounting
- Choose the Right Method:The method you choose will depend on the artwork’s material, size, and weight. Consider the following factors:
- Weight:Heavier artworks will require more secure mounting methods.
- Material:Some materials, such as canvas, may be more susceptible to damage from certain mounting methods.
- Size:Larger artworks will require more support to prevent sagging.
- Use a Level:Ensure your artwork is straight and level before attaching it to the frame.
- Test Before Attaching:Before applying any adhesive or attaching clips, test the mounting method on a scrap piece of material to ensure it works properly.
- Use a Sharp Knife:If you are using adhesive mounting squares or strips, use a sharp knife to cut them to the correct size. This will help prevent damage to the artwork.
Finishing Touches
Adding finishing touches to your floating frame can elevate its aesthetic appeal and provide a final layer of protection. You can explore various techniques to achieve the desired look, including paint, stain, or varnish.
Applying Paint or Stain
Paint or stain can significantly enhance the appearance of your frame. Consider the overall style of your artwork and the room where it will be displayed when selecting a color or finish. Here are some tips for applying paint or stain:* Prepare the surface:Clean the frame thoroughly with a damp cloth to remove dust and debris.
Sand the surface lightly to create a smooth finish.
Choose the right paint or stain
Select a paint or stain that is suitable for wood. Consider using a primer if you are painting over a dark surface.
Apply evenly
Use a brush or roller to apply the paint or stain evenly to the frame. Allow the paint or stain to dry completely before applying additional coats.
Seal the finish
Apply a clear sealant to protect the paint or stain from damage.
Varnishing the Frame
Varnish is a clear coating that protects the frame from scratches, moisture, and UV rays. It can also enhance the natural beauty of the wood.* Choose the right varnish:Select a varnish that is suitable for the type of wood and the finish you desire.
Some varnishes are designed for indoor use, while others are suitable for outdoor use.
Apply evenly
Use a brush or a spray gun to apply the varnish evenly to the frame. Allow the varnish to dry completely before applying additional coats.
Sand between coats
Sand lightly between coats to create a smooth finish.
Protecting the Frame
To ensure the longevity of your frame, consider the following tips for protection:* Avoid direct sunlight:Direct sunlight can fade the paint or stain and damage the wood.
Keep it away from moisture
Moisture can warp or damage the frame.
Handle with care
Avoid dropping or bumping the frame.
Clean regularly
Dust the frame regularly to prevent the buildup of dirt and debris.
Displaying the Artwork: Floating Frame Tutorial
Now that your floating frame is assembled and your artwork is securely attached, it’s time to showcase your masterpiece! The way you display your artwork can significantly impact its overall aesthetic and the overall feel of your space.
Floating Frame Placement
Choosing the right location for your floating frame is crucial. Consider the size and weight of the artwork, the available wall space, and the surrounding decor. * Wall Mount Options:Floating frames can be mounted using various methods.
Wire Hanging System
This system is ideal for heavier artwork and offers a sleek, minimalist look.
D-Rings and Picture Wire
A classic and reliable option, D-rings and picture wire provide a secure hold for most artworks.
Sawtooth Hangers
A simple and easy-to-use option, sawtooth hangers are suitable for lighter artworks.* Suitable Locations:
Living Room
A prominent wall in the living room is a great place to showcase a statement piece.
Bedroom
A floating frame above the headboard can add a touch of elegance to the bedroom.
Hallway
A hallway can be transformed into an art gallery with a series of floating frames.
Office
A floating frame featuring a motivational quote or a piece of art that inspires you can enhance your workspace.
Dining Room
A large artwork displayed above the dining table can be a focal point of the room.
Creating a Visually Appealing Display
Consider the Size and Scale
The size of the artwork should be proportionate to the wall space. Too small of a piece can get lost, while too large of a piece can overwhelm the space.
Play with Color and Texture
The color and texture of the floating frame and artwork should complement the surrounding decor. Consider using contrasting colors to create a bold statement or matching colors to create a cohesive look.
Experiment with Arrangement
If you’re displaying multiple floating frames, experiment with different arrangements. You can create a symmetrical look with evenly spaced frames or an asymmetrical look with frames of varying sizes and shapes.
Add Lighting
Proper lighting can enhance the beauty of your artwork. Consider using spotlights or track lighting to highlight the piece.