
Easy Pennant Banner In 20 Minutes
DIY Pennant Banner in 20 Minutes: Your Ultimate Guide to Fast & Festive Decor
Creating a charming and festive pennant banner doesn’t require hours of crafting or specialized skills. This comprehensive guide will walk you through the remarkably simple process of making a beautiful pennant banner in under 20 minutes, proving that impactful DIY decor can be achieved with speed and efficiency. Whether you’re prepping for a last-minute party, adding a pop of color to a room, or simply looking for a quick creative outlet, this method is designed for maximum impact with minimal time investment. We’ll cover essential materials, step-by-step instructions, and offer tips to elevate your speedy creation.
Materials You’ll Need for Your 20-Minute Pennant Banner:
The beauty of this project lies in its simplicity and the readily available nature of its components. To achieve your pennant banner in 20 minutes, focus on gathering these key items beforehand:
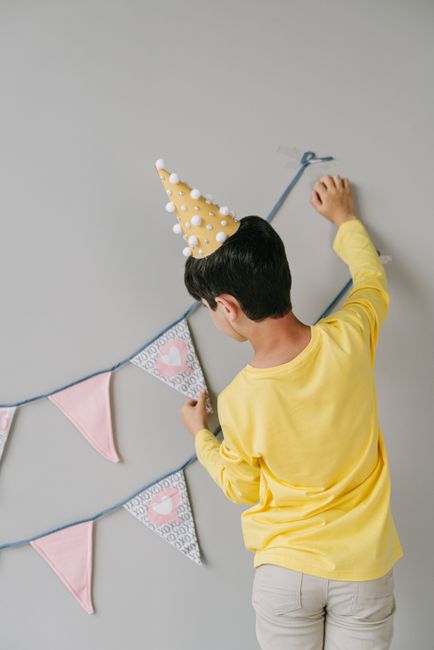
- Fabric: This is your primary material. For speed, pre-washed and pre-cut fabric squares or rectangles are ideal. Consider fat quarters from a craft store, fabric remnants, or even old fabric scraps like bedsheets or cotton shirts. The size of your fabric pieces will determine the size of your pennants. Standard sizes often range from 6×6 inches to 8×8 inches for a balanced look. For a 20-minute project, aim for pre-cut squares or rectangles that you can use with minimal trimming. Avoid thick or difficult-to-cut fabrics that will slow you down. Lightweight cottons, linens, or even felt (though felt will require a different adhesive if not sewing) are excellent choices.
- Twine, Ribbon, or Jute Cord: This will serve as the string to hang your pennants. Choose a material that complements your fabric and the overall aesthetic of your event or decor. Jute twine offers a rustic charm, while satin ribbon provides a more elegant feel. Cotton twine is a versatile and budget-friendly option. Ensure the length is sufficient to accommodate the number of pennants you plan to make, plus extra for tying knots. A good rule of thumb is to add at least 12 inches for each end for hanging.
- Scissors: Sharp fabric scissors are crucial for clean and quick cuts. Dull scissors can snag fabric and make the process frustrating and time-consuming. If you’re using a rotary cutter and mat, this can further accelerate the process, especially if your fabric isn’t perfectly pre-cut.
- Fabric Glue or Hot Glue Gun: This is where the "20-minute" magic truly happens. Instead of sewing, fabric glue or a hot glue gun provides a rapid and secure way to attach your pennants to the cord. Fabric glue offers a more permanent bond once cured, while hot glue provides an instant hold, perfect for a quick assembly. Ensure you have a generous amount of either. For fabric glue, opt for one specifically designed for permanent fabric adhesion. For a hot glue gun, make sure you have plenty of glue sticks ready.
- Iron (Optional but Recommended): While not strictly necessary for the 20-minute timeline if you’re using wrinkle-free fabric or don’t mind a slightly more relaxed look, an iron can significantly enhance the neatness and professional appearance of your pennant banner. Briefly ironing your fabric pieces to ensure they are flat will make them easier to work with and result in a crisper finish.
- Ruler or Measuring Tape (Optional): If your fabric isn’t pre-cut to uniform sizes, a ruler or measuring tape will help you quickly mark and cut consistent pennant shapes. However, for the fastest results, pre-cut fabric is the way to go.
Step-by-Step: Crafting Your Pennant Banner in Under 20 Minutes
The core of this speedy project relies on a simplified technique for attaching the pennants to the hanging cord. Follow these steps precisely for optimal time efficiency:
Step 1: Prepare Your Fabric (2-3 minutes)
- If your fabric is wrinkled, quickly iron each piece until it’s smooth. This will make the gluing process much easier and result in a neater banner. If you’re pressed for time and your fabric is relatively smooth, you can skip this step.
- If your fabric pieces are not already in a pennant shape, quickly cut them. The easiest method for speed is to fold a square or rectangle in half diagonally to create a triangle. Alternatively, you can cut a rectangle and then cut a V-shape into the bottom edge. For ultimate speed, use pre-cut squares and fold them diagonally in half to form triangles. Aim for uniform shapes for a cohesive look.
Step 2: Lay Out Your Cord (1 minute)
- Determine the desired length of your pennant banner. Lay out your twine, ribbon, or cord on a flat surface.
- Decide how much space you want between each pennant. A common spacing is 1-2 inches. You can also choose to have them touch for a more densely packed look.
Step 3: Begin Attaching Pennants (10-12 minutes)
This is the most time-consuming step, but with fabric glue or hot glue, it’s remarkably fast.
- For Fabric Glue: Apply a generous bead of fabric glue along one of the longer edges of your pennant (if you’ve cut triangles, this is the diagonal edge; if you’ve cut rectangles and V-shaped the bottom, it’s the top edge).
- For Hot Glue: Apply a thin, even bead of hot glue along the same edge of your pennant. Be cautious, as hot glue cools quickly. Work in small sections if needed.
- Carefully press the glued edge of the pennant onto your cord, ensuring the cord is positioned slightly away from the very edge of the fabric to allow for a good bond.
- Press down firmly for a few seconds to ensure the glue adheres to both the fabric and the cord.
- Crucially, for both methods, you will then fold the remaining fabric over the cord, encasing it. Apply another bead of glue to the underside of the pennant (the side facing downwards) where it will meet the folded-over fabric.
- Press the folded fabric down firmly onto the glued underside, securing the cord within the fabric "pocket."
- Repeat this process for each pennant, spacing them according to your preference. Work your way along the cord, consistently applying glue and pressing the fabric to secure the cord. The speed of this step depends on how quickly you can apply the glue and press the fabric. For hot glue, its instant bonding capability is a significant time saver. For fabric glue, allow a moment for it to tack up slightly before pressing, but don’t wait too long, or it will become difficult to work with.
Step 4: Finishing Touches and Hanging (2-3 minutes)
- Once all your pennants are attached, tie a knot at each end of the cord. These knots will provide secure anchor points for hanging your banner.
- Trim any excess cord beyond the knots.
- Your 20-minute pennant banner is now complete and ready to be hung!
Tips and Tricks for Maximizing Speed and Impact:
To ensure you truly achieve your pennant banner in 20 minutes, and to make it look as good as possible, consider these extra tips:
- Pre-cut Everything: The single biggest time-saver is having all your fabric pieces pre-cut to the desired size and shape before you even start the gluing process. This eliminates the need for measuring and cutting during the main crafting phase.
- Batch Your Work: If you have multiple pennants to make, try to batch similar actions. For example, apply glue to the first edge of all your pennants before folding and gluing the second edge. This can create a more fluid workflow and reduce the back-and-forth motion.
- Work on a Protected Surface: Fabric glue and hot glue can be messy. Protect your work surface with newspaper, a drop cloth, or a silicone mat to prevent damage.
- Choose the Right Glue: For speed, hot glue is often the fastest due to its instant bonding. However, fabric glue can create a more durable and less visible bond if applied carefully. Test both on scrap fabric if you’re unsure.
- Embrace Imperfection: For a truly "in 20 minutes" banner, a few minor imperfections are to be expected. Focus on the overall festive impact rather than absolute perfection. The charm of DIY often lies in its handmade quality.
- Vary Your Fabric Choices: Don’t be afraid to mix and match different fabric patterns and colors for a more dynamic and visually interesting banner. This can be done within the 20-minute timeframe if you’ve pre-selected your fabrics.
- Consider Pre-made Pennant Blanks: Some craft stores offer pre-cut pennant shapes in various materials. Using these can save even more time on the cutting aspect.
- No-Sew Alternatives for Felt: If you opt for felt, which doesn’t fray, you can also use fusible web (iron-on adhesive) in conjunction with your iron for a quick and sturdy bond, eliminating the need for glue entirely.
SEO Keywords and Considerations:
To ensure this article ranks well in search engine results, strategically incorporate relevant keywords throughout the content. Here are some suggestions:
- Primary Keywords: "DIY pennant banner," "pennant banner tutorial," "quick pennant banner," "20 minute craft," "easy pennant banner," "fabric pennant banner."
- Secondary Keywords: "Party decorations," "craft ideas," "homemade banner," "no-sew banner," "last minute crafts," "DIY decor," "festive banner," "fabric glue crafts," "hot glue crafts," "twine crafts," "ribbon crafts."
- Long-Tail Keywords: "How to make a pennant banner in under 20 minutes," "easy fabric pennant banner for parties," "fastest way to make a DIY pennant banner," "no-sew pennant banner tutorial for beginners."
Integrating Keywords Naturally:
Ensure these keywords are woven seamlessly into the text, particularly in headings, subheadings, and the introductory and concluding paragraphs (though this article eschews traditional introductions). For instance, instead of just "Materials," use "Materials You’ll Need for Your 20-Minute Pennant Banner." In the steps, explicitly mention "attaching pennants" and "fabric pennant banner."
User Intent and Content Structure:
This article directly addresses the user’s intent for a quick and easy DIY pennant banner. The structure is logical and action-oriented, prioritizing the steps and necessary materials. The inclusion of tips and SEO considerations further enhances its value for both the crafter and search engines.
Conclusion (Implicit within the final steps):
The concluding thought is that the process is achievable within the stated timeframe, encouraging immediate action and satisfaction for the user. The focus remains on the speed and simplicity of the project, empowering readers to create festive decor effortlessly.
By following these detailed instructions and incorporating the SEO strategies, you can confidently guide readers to create their own beautiful pennant banners in under 20 minutes, making this a highly valuable and searchable resource. The emphasis on speed, simplicity, and readily available materials makes this a perfect solution for anyone seeking instant festive flair.
