
How To 3d Braid Hair Tutorial
Mastering the 3D Braid: A Comprehensive Tutorial for Intricate Hairstyles
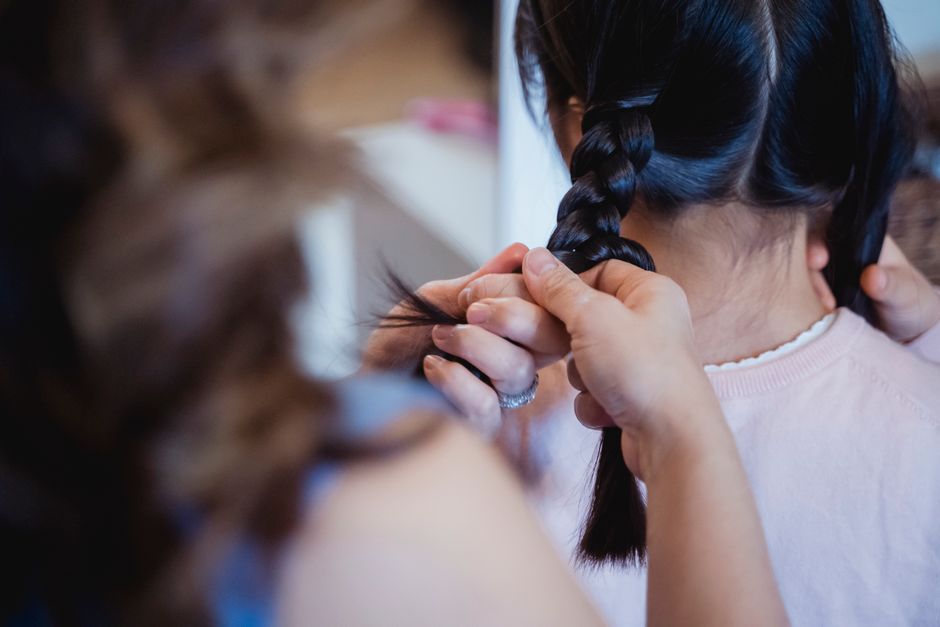
The 3D braid, also known as a Dutch braid or inside-out braid, offers a stunning dimension and visual appeal that elevates any hairstyle. Unlike the traditional French braid where strands are woven over each other, the 3D braid involves weaving each outer strand under the middle strand. This technique creates a raised, more prominent braid that truly pops. This tutorial will guide you through the process, from understanding the fundamental principles to executing various 3D braid styles.
Understanding the Core 3D Braid Mechanism
The essence of a 3D braid lies in reversing the traditional weaving direction. In a French braid, you take an outside strand and cross it over the middle strand. For a 3D braid, you take an outside strand and tuck it under the middle strand. This "underhand" technique pushes the braid outward, creating the signature lifted appearance.
Before beginning, ensure hair is detangled and ideally slightly damp. This provides better grip and control. You can also use a styling product like a texturizing spray or light hold mousse to enhance grip and prevent flyaways.
Step-by-Step Guide to a Basic 3D Braid
This fundamental technique can be applied to a single section of hair, forming the basis for more complex styles.
-
Sectioning: Begin by sectioning off the hair you intend to braid. For a single braid, this might be the entire ponytail, or a specific section along the hairline. For a more controlled start, consider a triangular section at the front of the head.
-
Initial Three Strands: Divide the chosen section of hair into three equal strands: Strand A (left), Strand B (middle), and Strand C (right).
-
The First Underhand Cross: Take Strand A (the left strand) and bring it under Strand B (the middle strand). Strand A is now the new middle strand.
-
The Second Underhand Cross: Now, take Strand C (the right strand) and bring it under the new middle strand (which was originally Strand B). Strand C is now the new middle strand.
-
Adding Hair (The "Pick-Up"): This is where the 3D braid truly differentiates itself. Before continuing the underhand cross, you need to add hair to the outer strands.
-
Left Side Pick-Up: With Strand A (now on the left) as your working strand, gather a small, consistent section of loose hair from the left side of the head. Incorporate this new hair into Strand A.
-
Right Side Pick-Up: With Strand C (now on the right) as your working strand, gather a small, consistent section of loose hair from the right side of the head. Incorporate this new hair into Strand C.
-
Consistency is Key: The size of the "pick-up" sections will determine the tightness and appearance of the braid. Smaller, consistent sections will create a more intricate and defined braid, while larger sections will result in a chunkier braid. Aim for sections of roughly equal size on both sides to maintain symmetry.
-
-
The Underhand Cross with Added Hair: Now, perform the underhand cross with the combined strands:
-
Take the augmented Strand A (left) and bring it under the current middle strand. The augmented Strand A becomes the new middle strand.
-
Take the augmented Strand C (right) and bring it under the new middle strand. The augmented Strand C becomes the new middle strand.
-
-
Repeat and Progress: Continue this pattern of:
- Picking up a small section of hair from the side.
- Adding it to the corresponding outer strand.
- Crossing that augmented strand under the middle strand.
- Repeat on the other side.
-
Securing the Braid: As you move down the head, keep tension on the strands to maintain a neat braid. Once you reach the end of the section where there is no more loose hair to pick up, you will transition into a standard three-strand braid, still continuing the underhand technique (underneath, underneath, underneath). Secure the end with a hair tie.
Advanced 3D Braid Techniques and Styles
Once you’ve mastered the basic 3D braid, you can explore various applications to create more complex and visually stunning hairstyles.
1. The Crown 3D Braid (Halo Braid)
This elegant style frames the face and is perfect for formal occasions.
- Starting Point: Begin by sectioning off a portion of hair at the front hairline, above one ear.
- Initial Three Strands: Divide this section into three equal strands.
- The Underhand Weave: Start a 3D braid, working backward along the hairline. On each side, pick up small sections of hair from the crown of the head, incorporating them into the outer strands before crossing them under the middle.
- Continuing the Arc: Continue this process, gradually curving the braid around the head towards the opposite ear.
- Securing: Once the braid has encompassed the entire head and you’ve reached the starting ear, secure the end with a bobby pin or hair tie, tucking it neatly into the braid. You can loosen the edges of the braid slightly for a softer, fuller look.
2. Double 3D Braids
This classic style involves two symmetrical braids.
- Parting: Create a clean middle part from the forehead to the nape of the neck.
- Individual Braids: Treat each side as a separate section. You can opt for classic 3D braids that start at the hairline and go down, or you can create a more intricate look by starting higher on the head and incorporating hair from the top of the head.
- Consistency: Ensure the size of your pick-up sections and the tension are consistent on both sides for a balanced appearance.
- Finishing: Secure each braid with a hair tie at the end.
3. Fishtail 3D Braid Hybrid
While a true fishtail braid uses only two strands and involves crossing small pieces from the outside to the inside, you can incorporate a 3D braiding motion for a unique texture. This is more about adding dimension to a fishtail than a pure 3D fishtail.
- Start with a Fishtail: Begin a standard fishtail braid by taking two sections and crossing small pieces from the outer edge of one section to the inner edge of the other.
- Introduce 3D Technique: At certain intervals, instead of just crossing a piece over, try to tuck a small section of hair under the main two strands before completing the fishtail cross. This requires significant practice and finesse.
- Visual Impact: This hybrid creates a textured, almost woven effect that is distinct from a traditional fishtail.
4. Incorporating 3D Braids into Ponytails
Adding a 3D braid to a ponytail can instantly elevate a simple style.
- Braiding a Section: Before creating your ponytail, braid a section of hair from the hairline using the 3D technique. This can be a single French-style braid or multiple smaller braids.
- Integrating into the Ponytail: Once the 3D braid is complete, gather all the hair, including the braided section, into a ponytail. You can either let the braid lie flat against the head and incorporate it into the base of the ponytail, or you can wrap the braid around the ponytail elastic for a decorative element.
- Pouf Effect: For a variation, create a 3D braid at the crown of the head, leaving the rest of the hair loose. Then, gather the loose hair into a ponytail, allowing the 3D braid to sit on top as a decorative pouf.
5. The Waterfall 3D Braid
This is a visually captivating braid that appears to cascade down the hair.
- Starting Point: Begin at the hairline with three strands, just like a regular 3D braid.
- The "Dropping" Technique: As you work across the head, after you cross a strand under the middle strand, let that same strand "drop" loose, allowing it to hang.
- Picking Up New Strands: Immediately pick up a new section of loose hair from below to replace the dropped strand and use it in the next underhand cross.
- Creating the Waterfall: This process of dropping and picking up creates the illusion of a waterfall effect, with strands of hair intermittently falling out of the braid.
Tips for Perfecting Your 3D Braid
- Tension Control: Maintaining consistent tension is crucial. Too loose, and the braid will look messy. Too tight, and it can be uncomfortable and pull on the scalp. Practice finding that sweet spot.
- Mirror, Mirror: Use a mirror to check your work, especially when starting out. This helps you visualize the placement of your hands and strands.
- Section Size: Experiment with different section sizes. Smaller sections create finer detail, while larger sections result in a bolder braid.
- Lubrication: If your hair is prone to static or tangles, a tiny amount of hair oil or serum applied to your fingertips can help.
- Practice Makes Perfect: The 3D braid, like any intricate hairstyle, requires practice. Don’t get discouraged if your first attempts aren’t flawless. Keep trying, and you’ll improve with each braid.
- Hair Type Considerations:
- Fine Hair: Fine hair may benefit from texturizing sprays or backcombing the roots slightly for added grip and volume.
- Thick Hair: Thick hair might require smaller sections to avoid overwhelming the braid.
- Curly Hair: Curly hair can be beautifully showcased with 3D braids, but it may be a bit more challenging to manage. Consider braiding when hair is damp and using a curl-enhancing product.
- Patience: Especially with more complex styles, patience is key. Take your time, focus on each step, and enjoy the process of creating beautiful hair.
Troubleshooting Common 3D Braid Issues
- Uneven Braids: This is usually due to inconsistent section sizes when picking up hair or uneven tension. Be mindful of symmetry and tension on both sides.
- Fraying Braids: If your braid starts to fray, it might be because your pick-up sections are too large or you’re not maintaining enough tension as you braid.
- Pain or Discomfort: If the braid is causing pain, it’s likely too tight. Loosen the strands slightly, focusing on distributing the tension evenly.
- Bumpy Appearance: This can occur if the strands aren’t being crossed smoothly under the middle strand. Ensure a clean, consistent tuck.
By understanding the fundamental underhand weaving technique and practicing diligently, you can master the 3D braid and unlock a world of intricate and beautiful hairstyles. From elegant crown braids to playful double braids, the 3D braid offers a versatile and impressive way to enhance your hair’s natural beauty.
