
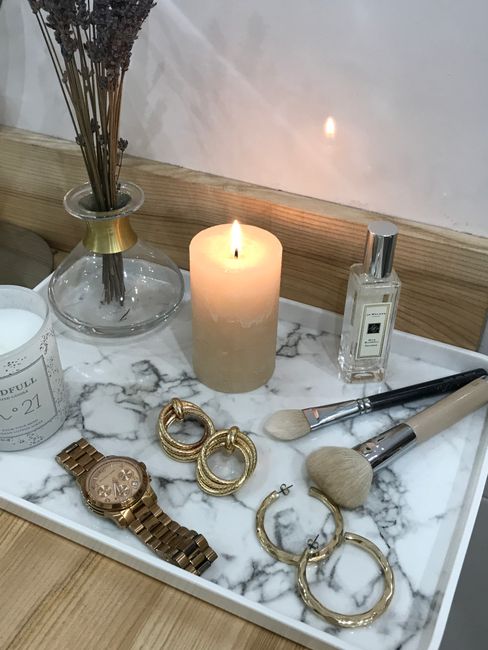
Diy Marble Vanity Tray
DIY Marble Vanity Tray: Elevate Your Space with Elegant Storage Solutions
Creating a DIY marble vanity tray offers a sophisticated and functional upgrade to any bathroom or dressing area. This project is more than just a storage solution; it’s an opportunity to infuse your personal style into your décor with a touch of luxury. The timeless appeal of marble, combined with the satisfaction of a handmade item, makes this a rewarding DIY endeavor. This article will guide you through the entire process, from selecting materials to the final finishing touches, ensuring you achieve a beautiful and durable piece. We will cover various techniques, material considerations, and design variations to cater to different skill levels and aesthetic preferences. Whether you’re a seasoned DIYer or a beginner looking to embark on a stylish project, this comprehensive guide will equip you with the knowledge and confidence to create your own stunning marble vanity tray.
The allure of marble lies in its natural beauty, unique veining patterns, and inherent elegance. While genuine marble slabs can be expensive and challenging to work with for DIY projects, there are several accessible alternatives that mimic its look and feel with greater ease and affordability. For a true marble experience, consider utilizing marble tiles. These are readily available at most home improvement stores and come in a wide range of colors, sizes, and finishes, from polished to honed. Another excellent option is contact paper or vinyl with a realistic marble print. This is an extremely budget-friendly and beginner-friendly solution that can instantly transform a plain tray or surface into something that appears to be genuine marble. For a more substantial and tactile experience, consider using a faux marble painting technique on a wooden or MDF base. This involves layering different paint colors and glazes to create depth and mimic the natural variations found in real marble. Each of these methods offers a distinct advantage, allowing you to tailor the project to your budget, skill level, and desired outcome. This guide will detail the steps for using marble tiles, as this offers a good balance between a genuine marble aesthetic and DIY feasibility.
To embark on your DIY marble vanity tray project, gather the following essential materials. For a tile-based tray, you will need marble tiles of your desired size and color. Consider the dimensions of your vanity and the items you intend to store to determine the appropriate tile size. You’ll also need a sturdy base for your tray. Options include a pre-made wooden tray, a piece of MDF (Medium-Density Fiberboard), or even a thick piece of plywood. Ensure the base is smooth and free of imperfections. For adhering the tiles, a strong adhesive is crucial. Depending on the weight of your tiles and the desired durability, consider using a tile adhesive specifically designed for stone, or a robust construction adhesive. For filling the gaps between the tiles, grout is essential. White or grey grout is a classic choice that complements most marble patterns. For a more subtle look, consider colored grout that matches your tiles. You will also need tools for cutting and shaping. If your tiles are not pre-cut to size, a tile nipper or a wet saw will be necessary. For applying adhesive and grout, a notched trowel or a putty knife will be useful. A grout float is ideal for spreading grout evenly. Sponges and a clean cloth will be needed for cleaning excess grout. Finally, for a polished and protected finish, consider a tile sealer. This will protect your marble from stains and moisture, prolonging its lifespan and maintaining its beauty. Don’t forget safety gear, including safety glasses and gloves, especially when cutting tiles or working with adhesives and grout.
The first step in constructing your DIY marble vanity tray is preparing the base. If you are using a pre-made wooden tray, ensure it is clean, dry, and free of any loose paint or varnish. Lightly sand the surface to create a slightly rough texture, which will improve adhesion. If you are using MDF or plywood, cut it to your desired tray dimensions. Sand the edges smooth. If you are aiming for a more refined look, you can add a lip or border to your base using wooden strips. These can be mitered at the corners for a professional finish and adhered using wood glue and clamps, or small nails. Once the base is prepared and any additions are secured, clean it thoroughly to remove any dust or debris. This meticulous preparation ensures a smooth and stable foundation for your marble tiles, which is critical for the longevity and aesthetic appeal of your finished tray. The surface should be completely dry before proceeding to the tiling stage.
Now comes the exciting part: tiling your base. Before applying any adhesive, lay out your marble tiles on the base in your desired pattern. This allows you to visualize the final result and make any necessary adjustments to the layout. Consider the orientation of the veining in the marble tiles to create a cohesive and visually pleasing design. You can opt for a simple grid pattern, or explore more intricate arrangements like a herringbone or staggered layout. Once you are satisfied with the arrangement, begin adhering the tiles. Apply a thin, even layer of tile adhesive to the back of each tile, or to a section of the base, using a notched trowel. The notches on the trowel help to spread the adhesive evenly, ensuring good contact and preventing air pockets. Press each tile firmly into place, wiggling it slightly to ensure it adheres well. Work in small sections to prevent the adhesive from drying out before you can place the tiles. Use tile spacers to maintain consistent gaps between the tiles, which will later be filled with grout. If any adhesive squeezes out from between the tiles, wipe it away immediately with a damp cloth before it hardens.
After the adhesive has fully cured (refer to the adhesive manufacturer’s instructions for curing times, which can range from 24 to 48 hours), it’s time for grouting. Grout is crucial for filling the spaces between the tiles, adding structural integrity, and creating a polished finish. Before you begin, ensure your tiles are clean and free of any adhesive residue. Mix your chosen grout according to the manufacturer’s instructions. It should have a consistency similar to thick peanut butter. Using a grout float, spread the grout over the tiles, working it into the gaps at a 45-degree angle. Ensure all the spaces between the tiles are completely filled. Once you have covered all the tiled areas, hold the grout float at a steeper angle and scrape off the excess grout from the surface of the tiles. Work diagonally across the tiles to avoid pulling grout out of the joints.
After allowing the grout to set for the time recommended by the manufacturer (typically 15-30 minutes), it’s time for the crucial cleaning process. Dampen a clean sponge with water and wipe the surface of the tiles in a circular motion. Rinse the sponge frequently in clean water to avoid spreading the grout haze. Be careful not to use too much water, as this can weaken the grout. You may need to go over the surface several times to remove all the grout residue and achieve a clean, polished look. For stubborn haze, a slightly damp microfiber cloth can be effective. Once the initial cleaning is complete, let the grout cure for at least 24-48 hours. During this curing period, avoid any heavy use or moisture on the tray.
Once the grout has completely cured, it’s time to seal your marble vanity tray. Sealing is a vital step to protect the porous marble and grout from stains and moisture, which are common in bathroom environments. Choose a high-quality penetrating sealer specifically designed for natural stone and grout. Apply the sealer according to the manufacturer’s instructions. Typically, this involves applying the sealer with a clean cloth or brush, allowing it to penetrate the surface for a specified amount of time, and then buffing off any excess. You may need to apply multiple coats for maximum protection. This sealing process will not only safeguard your beautiful creation but also enhance the richness of the marble’s color and veining. Regular reapplication of the sealer, typically every 6-12 months depending on usage, will ensure the long-term beauty and durability of your DIY marble vanity tray.
Beyond the basic tile application, you can further enhance your DIY marble vanity tray with several design variations and finishing touches. Consider adding metallic accents. Small brass or gold-toned embellishments, such as decorative corner protectors or knob-like feet, can elevate the tray’s sophistication and add a touch of glamour. If you’ve opted for a wooden base, painting it a contrasting or complementary color before tiling can add another layer of visual interest. For instance, a matte black base can make the marble stand out beautifully, while a soft pastel color can create a more serene aesthetic. If you are working with larger marble tiles, you might consider cutting them into specific shapes or creating a mosaic effect by incorporating smaller mosaic tiles or glass beads into the grout lines. For a completely different aesthetic, explore the faux marble painting technique. This involves layering acrylic paints, glazes, and even crackling mediums on a prepared wooden or MDF base to mimic the intricate patterns and depth of real marble. This method offers immense creative freedom and can be a more budget-friendly and beginner-friendly alternative to using actual tiles. The key to any successful DIY project is personalization, so feel free to experiment and adapt these ideas to suit your unique style and décor.
The benefits of creating your own DIY marble vanity tray extend far beyond mere aesthetics. Customization is a significant advantage. You have complete control over the size, shape, color of marble, and grout, allowing you to create a piece that perfectly complements your existing décor and meets your specific storage needs. This personalized approach ensures your tray is not only functional but also a true reflection of your style. Cost-effectiveness is another major draw. By opting for DIY, you can achieve a high-end, luxurious look at a fraction of the cost of purchasing a pre-made marble tray. This makes luxury accessible and allows you to allocate your budget to other home improvement projects. The satisfaction of accomplishment is also invaluable. The process of creating something beautiful and functional with your own hands is incredibly rewarding. It’s a tangible reminder of your skills and creativity. Furthermore, a DIY marble vanity tray can be a unique and thoughtful gift for friends and family. Its timeless elegance and practical utility make it a present that will be cherished for years to come. Finally, understanding the materials and construction methods used in this project can empower you to tackle other DIY home décor projects, fostering a sense of self-sufficiency and creative confidence.
In conclusion, a DIY marble vanity tray project is a highly achievable and immensely rewarding endeavor. Whether you opt for the tactile elegance of marble tiles, the simplicity of marble-effect contact paper, or the artistic freedom of faux marbling, the result is a stylish and functional piece that adds a touch of luxury to your personal space. By carefully selecting your materials, meticulously following the construction steps, and embracing personalization, you can create a truly unique vanity tray that elevates your home organization and reflects your individual style. This guide has provided a comprehensive roadmap to empower you on your DIY journey, from initial planning to the final protective seal. Embrace the process, enjoy the creative freedom, and revel in the satisfaction of transforming a simple idea into a beautiful and enduring piece of home décor. The enduring appeal of marble ensures that your DIY creation will remain a statement of elegance and functionality for years to come.
