Fabulous Earring Holder Tutorial: Create a Stylish Storage Solution
Fabulous earring holder tutorial! Ever struggled to find the perfect pair of earrings in a tangled mess? We’ve all been there! But fear not, because today we’re diving into the world of earring holder creation, discovering how to craft a stylish and functional storage solution that will keep your precious jewelry organized and easily accessible.
This tutorial will guide you through the process, step-by-step, from choosing the right materials to adding personal touches, so you can create a truly unique piece that reflects your style.
Imagine a world where your earrings are neatly displayed and ready to be chosen, no more digging through a jumbled drawer or a tangled mess on your vanity. With this tutorial, you can turn that dream into reality, creating a custom earring holder that’s both beautiful and practical.
We’ll explore different design ideas, materials, and techniques to help you unleash your creativity and make a statement with your jewelry organization. Get ready to transform your earring storage from chaotic to chic!
Earring Holders: Why You Need One and How to Make Your Own
Every jewelry enthusiast knows the struggle: tangled necklaces, misplaced earrings, and the constant fear of losing a precious piece. That’s where a good earring holder comes in. It’s more than just storage; it’s a way to organize, display, and protect your beloved earrings.
Reasons to Create Your Own Earring Holder, Fabulous earring holder tutorial
There are numerous reasons why you might want to create your own earring holder. It’s a fun and creative project that allows you to express your personal style. You can customize it to match your décor and perfectly fit your earring collection.
Plus, making your own is often more affordable than buying a pre-made one.
- Personalization:You can design it to reflect your unique taste and style, from the materials used to the overall design.
- Cost-Effectiveness:DIY earring holders can be significantly cheaper than buying them, especially if you use repurposed materials.
- Creative Expression:It’s a chance to showcase your artistic skills and create something beautiful and functional.
Overview of the Tutorial
This tutorial will guide you through the process of creating a stunning and practical earring holder. We’ll explore various materials and techniques, providing step-by-step instructions and helpful tips along the way. Whether you’re a seasoned crafter or a beginner, this tutorial will equip you with the knowledge and confidence to make a truly unique and beautiful earring holder.
Design Ideas: Fabulous Earring Holder Tutorial
Now that you know the benefits of an earring holder, it’s time to explore the exciting world of design possibilities! The beauty of crafting your own earring holder is the endless creative freedom you have. From classic and elegant to whimsical and modern, the possibilities are truly boundless.
My latest DIY project is a fabulous earring holder tutorial using an old picture frame and some colorful fabric scraps. It’s a great way to organize your jewelry and add a personal touch to your dressing area. Speaking of creative projects, I recently stumbled upon a fun idea for frugal Christmas traditions – making matching pajamas out of old paint cans! Check out this article for the full instructions.
Now back to my earring holder, I’m thinking of adding some beads and charms for a more whimsical look.
Design Ideas
Here are some inspiring design ideas to get your creative juices flowing:
- Simple and Sleek:This design emphasizes functionality and minimalism. It could be a simple board with hooks or a small, minimalist sculpture with strategically placed grooves.
- Geometric Shapes:Geometric shapes like triangles, squares, or circles can create a modern and visually appealing earring holder. Consider using wood, metal, or acrylic for these shapes.
- Natural Elements:Embrace the beauty of nature by incorporating elements like branches, driftwood, or stones. These natural materials can create unique and rustic earring holders.
- Personalized Touches:Make your earring holder truly your own by adding personal touches like your initials, favorite quotes, or meaningful symbols.
- Theme-Based Designs:If you have a favorite theme, like travel, animals, or nature, you can create an earring holder that reflects your interests.
Examples of Different Styles and Shapes
To further illustrate these design ideas, let’s delve into specific examples:
| Design Name | Description | Image Description |
|---|---|---|
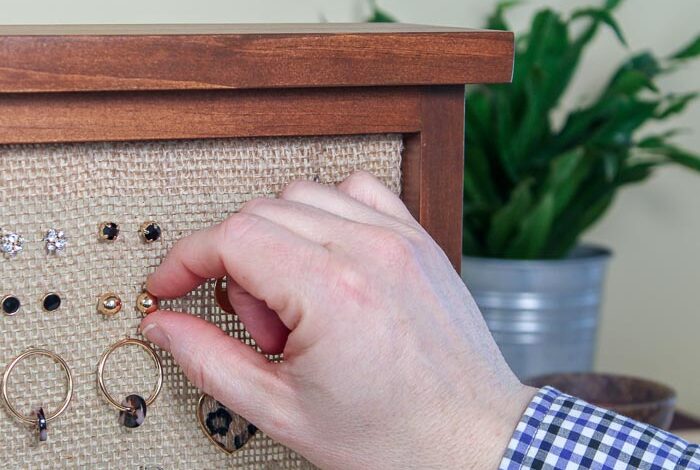
| Minimalist Wall-Mounted Holder | A simple, rectangular wooden board with evenly spaced hooks for earrings. The board can be painted or stained to match your decor. | A minimalist wall-mounted earring holder made of a rectangular piece of light-colored wood with 10 evenly spaced silver hooks. The board is mounted on a white wall. |
| Geometric Triangle Holder | A sleek and modern design made of a triangular piece of metal. The triangle has small holes drilled along the edges to hold earrings. | A metallic triangle-shaped earring holder with small holes drilled along the edges, where earrings can be hung. The triangle is made of polished silver metal and stands upright on a flat surface. |
| Rustic Branch Holder | A rustic and natural design made from a branch of driftwood. The branch has been cleaned and treated, and small hooks have been attached to hold earrings. | A rustic branch of driftwood, about 12 inches long, is used as an earring holder. It has been cleaned and treated, and small silver hooks have been attached to the branches, allowing earrings to be hung on them. The branch is placed on a wooden table. |
| Personalized Monogram Holder | A charming and personal design made of a piece of wood cut in the shape of a monogram. The monogram is painted or stained, and small hooks are attached to the back for earring storage. | A wooden earring holder shaped like the letter “A”. The letter is painted a light shade of blue, and small silver hooks are attached to the back, allowing earrings to be hung. The holder is placed on a white dresser. |
Tips and Tricks
Making an earring holder can be a fun and rewarding project, and with a few tips and tricks, you can ensure your creation looks professional and lasts for years to come. These tips will help you avoid common mistakes and achieve the best possible results.
Choosing the Right Materials
Selecting the right materials is crucial for a successful earring holder. The type of material you choose will influence the overall look, durability, and ease of construction.
I finally finished my fabulous earring holder tutorial and I’m so excited to share it! It was a bit of a challenge, but I’m really happy with the results. While I was working on it, I started thinking about how to make dinnertime more engaging, so I found a great resource for family dinner questions 4 that really sparked some interesting conversations.
Now, back to my earring holder, I can’t wait to show you all the tips and tricks I learned along the way!
- Wood:A classic choice for earring holders, wood offers a natural, warm aesthetic and can be easily stained or painted. Hardwoods like oak or maple are durable and resistant to scratches. Softwoods like pine or cedar are more affordable but may require more care.
I just finished making a fabulous earring holder tutorial and it was so much fun! It’s a great way to organize your jewelry and keep it all in one place. I’m always looking for new ways to get creative and this project really hit the spot.
Speaking of creative, I also found a great article on 6 ideas on how to entertain your kids featured guest Marie from Make and Take which gave me some great ideas for a family craft day. Now that I’ve got my earrings organized, I’m ready to tackle some fun projects with the kids!
- Metal:Metal earring holders provide a modern, industrial look. Metals like aluminum, brass, or steel are strong and can be easily shaped. However, they can be more challenging to work with than wood.
- Acrylic:Acrylic is a lightweight, transparent material that allows you to showcase your earrings. It is also easy to cut and shape, making it a popular choice for DIY projects.
Preventing Common Mistakes
Here are some common mistakes to avoid when making an earring holder:
- Not sanding the surface:Always sand the surface of your earring holder before painting or staining. This creates a smooth finish and helps the paint or stain adhere better.
- Using the wrong type of paint or stain:Choose paint or stain that is specifically designed for the material you are using. For example, acrylic paint is not suitable for wood.
- Not sealing the surface:Sealing the surface of your earring holder with a sealant will protect it from scratches, moisture, and wear and tear.
- Not leaving enough space between earring hooks:Make sure there is enough space between earring hooks so they don’t get tangled.
Alternative Methods
- Using a drill press:If you are using wood, a drill press can help you create precise holes for your earring hooks.
- Using a hot glue gun:You can use a hot glue gun to attach earring hooks to your earring holder. This is a quick and easy method, but make sure the glue is cool before handling.
- Using a wire hanger:You can create a simple earring holder by bending a wire hanger into a shape. This is a budget-friendly option and can be customized to your liking.
Customization and Personalization
Your earring holder is a reflection of your unique style, and it’s the perfect opportunity to add a personal touch. This section explores ways to customize your earring holder to match your personality and preferences.
Decorative Elements
Beyond functionality, decorative elements add visual appeal and elevate your earring holder’s aesthetic. Here are some ideas for adding decorative elements:
- Paint:A coat of paint can transform your earring holder. You can choose a solid color that complements your decor or opt for a patterned design. For a vintage look, try distressed paint techniques.
- Decoupage:Decoupage involves adhering paper or fabric to a surface with glue or varnish. You can use patterned paper, fabric scraps, or even magazine clippings for a unique look.
- Stencils:Stencils provide an easy way to create intricate patterns. Choose a stencil that complements your style, and use acrylic paint or fabric paint to apply the design.
- Beads and Embellishments:Add a touch of sparkle and texture with beads, rhinestones, or other embellishments. These can be glued or sewn onto the surface of your earring holder.
Personal Touches
Incorporating personal touches makes your earring holder truly unique. Consider these ideas:
- Monogram:Add your initials or a meaningful word to personalize your earring holder. You can use a stencil, a paint pen, or a fabric marker.
- Family Photos:If you’re making a holder for your vanity, consider adding small framed photos of your family or loved ones.
- Travel Souvenirs:Incorporate small souvenirs from your travels, such as seashells, dried flowers, or small pieces of fabric.
- Inspirational Quotes:Paint or decoupage inspirational quotes or phrases onto your earring holder for a motivational touch.
Examples of Personalized Earring Holders
Imagine a vintage-inspired earring holder with a distressed white paint finish, adorned with delicate lace trim and a small framed photo of a cherished grandmother. Or, envision a sleek and modern earring holder painted in a bold, geometric pattern with a touch of metallic paint for a contemporary look.
The possibilities are endless!
Storage and Display

Now that you have your fabulous earring holder, it’s time to think about how you’ll store and display it. A well-organized and visually appealing earring holder can make your jewelry collection even more enjoyable.
Storage Options for Earring Holders
Storing your earring holder depends on your space and preferences. Here are some ideas:
- Dresser or Vanity:A small earring holder can fit nicely on a dresser or vanity, making your earrings easily accessible.
- Wall-Mounted:For a more space-saving option, consider a wall-mounted earring holder. This frees up counter space and creates a decorative element on your wall.
- Jewelry Box:If you have a large jewelry collection, a jewelry box with a dedicated compartment for earrings is an excellent choice. It keeps everything organized and secure.
- Storage Cabinet:For a larger earring holder, you can store it in a dedicated cabinet or drawer in your bedroom. This provides a more discreet and organized storage solution.
Creating a Visually Appealing Display
A visually appealing earring holder can enhance the look of your bedroom or dressing area. Consider these tips:
- Color Coordination:Choose an earring holder that complements the colors of your bedroom or dressing area. You can also use colorful earrings to create a vibrant display.
- Lighting:Good lighting is essential for showcasing your earrings. Place your earring holder near a window or use a small lamp to illuminate it.
- Background:A simple background, such as a plain wall or a piece of fabric, can create a more elegant and refined display.
- Organization:Keep your earring holder organized by grouping similar earrings together. This makes it easier to find what you’re looking for and creates a more visually pleasing display.