
How To Make Homemade Twinkies
Homemade Twinkies Recipe: A Comprehensive Guide to Recreating the Iconic Golden Cake
The quest to recreate the beloved, golden sponge cake with its signature creamy filling often leads bakers down a path of experimentation. This comprehensive guide demystifies the process of making homemade Twinkies, offering detailed instructions, ingredient explanations, and troubleshooting tips to ensure your success. Forget the artificial preservatives and chalky texture of store-bought versions; we’re aiming for a tender, moist cake with a luscious, sweet filling that captures the essence of the original while elevating it with superior ingredients and homemade care.
The foundation of a successful homemade Twinkie lies in its distinctive golden sponge cake. This cake is characterized by its light, airy texture and slightly sweet, vanilla-forward flavor. Achieving this requires a precise balance of ingredients and careful mixing techniques. Unlike traditional butter cakes, Twinkie batter relies heavily on whipped eggs for leavening, contributing to its delicate crumb. The recipe typically involves all-purpose flour, granulated sugar, eggs, milk, vegetable oil (or another neutral-flavored oil like canola or grapeseed), baking powder, salt, and vanilla extract. Some recipes may also incorporate a touch of corn syrup or honey for added moisture and a softer texture. The key is to avoid overmixing once the flour is incorporated, as this can develop gluten and result in a tough cake.
For the creamy, dreamy filling, the traditional approach often utilizes a stabilized cream or custard base. While some copycat recipes employ shortening and powdered sugar, a more authentic and delicious approach involves creating a pastry cream or a stabilized whipped cream. A classic pastry cream involves milk, egg yolks, sugar, cornstarch (as a thickener), and vanilla extract. Cooking this mixture until it thickens and then chilling it is crucial for achieving the right consistency. Alternatively, a stabilized whipped cream can be made by whipping heavy cream with sugar and vanilla, and then incorporating a stabilizer like gelatin or a small amount of cream cheese to prevent it from weeping or deflating. Some recipes even incorporate evaporated milk or condensed milk into the filling for a richer, more condensed sweetness.
The unique shape of a Twinkie requires a specialized pan. The most common and effective tool for making homemade Twinkies is the Twinkie pan, also known as a loaf pan with specific indents or molds. These pans typically have oblong indentations designed to create the characteristic shape. If a dedicated Twinkie pan is unavailable, you can adapt by using a standard mini loaf pan and adjusting the baking time. However, achieving the precise dimensions and the iconic "ridges" will be challenging without the specialized equipment. The pans need to be thoroughly greased and floured to prevent sticking, which is essential for a clean release of the delicate cakes.
Let’s delve into the specifics of the cake batter. Begin by sifting your all-purpose flour with baking powder and salt. This aerates the flour and ensures even distribution of the leavening agents. In a separate, larger bowl, whisk together the granulated sugar and eggs until the mixture is pale yellow and significantly thickened. This process, known as "ribbon stage," incorporates air into the batter, which is vital for the cake’s lightness. Next, gradually add the vegetable oil and vanilla extract to the egg and sugar mixture, whisking until well combined. Now, it’s time to incorporate the dry ingredients into the wet. Add the sifted flour mixture to the wet ingredients in two or three additions, alternating with milk. Begin and end with the dry ingredients. Fold the ingredients together gently until just combined. Overmixing at this stage will develop gluten and result in a dense, chewy cake, which is the antithesis of a Twinkie. The batter should be smooth and pourable, but not overly thin.
Preheat your oven to the specified temperature, typically around 325-350°F (160-175°C). Carefully pour or spoon the batter into your prepared Twinkie pan, filling each mold about two-thirds to three-quarters full. Avoid overfilling, as the cakes will puff up during baking. Smooth the tops gently with an offset spatula if necessary. The baking time will vary depending on your oven and the size of your pan, but generally ranges from 15 to 25 minutes. The cakes are done when they are golden brown, spring back lightly when gently pressed, and a wooden skewer inserted into the center comes out clean.
While the cakes are baking, prepare your filling. For a pastry cream-based filling, whisk together milk, sugar, and egg yolks in a saucepan. Whisk in cornstarch until smooth. Cook over medium heat, stirring constantly, until the mixture thickens to a pudding-like consistency. Remove from heat, stir in vanilla extract, and pour into a clean bowl. Press plastic wrap directly onto the surface of the pastry cream to prevent a skin from forming. Chill thoroughly in the refrigerator for at least 2-3 hours, or until completely cold and firm. For a stabilized whipped cream filling, ensure your heavy cream is very cold. Whip it with powdered sugar and vanilla extract until stiff peaks form. If using a stabilizer, gently fold it in according to package directions. Some recipes incorporate cream cheese, which should be softened and whipped until smooth before gradually adding the whipped cream.
Once the Twinkie cakes have finished baking, let them cool in the pan for about 10-15 minutes before carefully inverting them onto a wire rack to cool completely. This cooling period is critical; attempting to fill warm cakes will cause the filling to melt and leak out. Ensure the cakes are completely cool to the touch before proceeding to the filling stage.
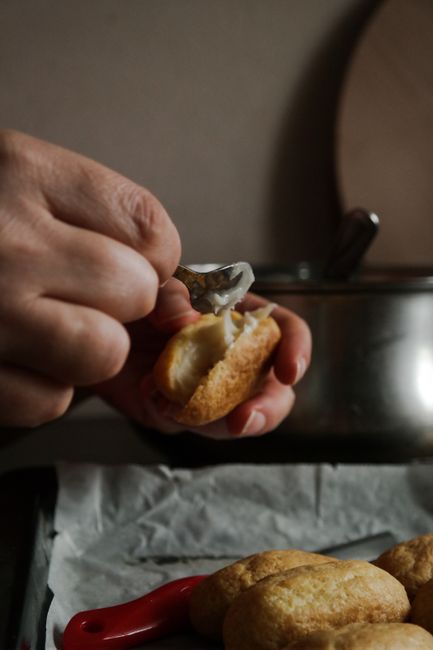
The filling process is where the magic truly happens. Traditionally, Twinkies are injected with filling using a piping bag fitted with a long, thin nozzle. If you have a Twinkie pan with injection holes, this method is straightforward. Otherwise, you can carefully poke three holes into the bottom or side of each cooled cake using a skewer or a thin knife. Gently fill each cake with your prepared filling using a piping bag. Aim to fill each cake evenly, applying gentle pressure until you feel resistance or see a small amount of filling emerge from the sides, indicating the cake is adequately filled. Be careful not to overfill, as this can cause the cakes to split.
For those without a specialized filling nozzle, you can adapt by carefully slicing the cooled cakes horizontally into two layers and spreading the filling between them. While this won’t replicate the injected filling method precisely, it will still result in a delicious and satisfying homemade treat. Ensure the filling is well-chilled and firm enough to hold its shape when spread.
Storage of homemade Twinkies is important to maintain their freshness. Due to the absence of artificial preservatives, homemade Twinkies will have a shorter shelf life than their store-bought counterparts. Store them in an airtight container at room temperature for 1-2 days, or refrigerate them for up to 3-4 days. Refrigeration will help to firm up the filling, which can be desirable for some. Freezing is also an option; wrap individual Twinkies tightly in plastic wrap and then place them in a freezer-safe bag. They can be frozen for up to 1-2 months. Thaw at room temperature before consuming.
Troubleshooting common issues can elevate your homemade Twinkie game. If your cakes are dense, you’ve likely overmixed the batter after adding the flour. Next time, focus on gentle folding until just combined. If your cakes are dry, you might have overbaked them, or your oven temperature might be too high. Ensure you’re using an oven thermometer to verify accuracy. Insufficient leavening can lead to flat cakes; double-check the expiration date of your baking powder. For the filling, if it’s too runny, it might not have been cooked long enough (for pastry cream) or lacked sufficient stabilizer (for whipped cream). If it’s too stiff, it might be too cold or have too much thickener. Adjustments can be made by gently reheating and adding a liquid (for pastry cream) or by whipping in a little more liquid (for whipped cream).
Experimenting with flavor variations can add a personal touch. Consider adding a pinch of cinnamon or nutmeg to the cake batter for a warm spice note. For the filling, you could add a tablespoon of cocoa powder for a chocolate-kissed cream, a touch of lemon zest for a brighter flavor, or even a swirl of fruit puree. These small additions can transform the classic Twinkie into something uniquely yours.
The meticulous process of creating homemade Twinkies, from the precise cake batter to the luscious filling and the iconic shape, offers a rewarding baking experience. By understanding the function of each ingredient and mastering the techniques, you can consistently produce these beloved golden treats that rival, and arguably surpass, their commercial counterparts. The satisfaction of biting into a tender, homemade golden cake filled with a rich, creamy filling is a testament to the power of baking from scratch. This detailed guide provides the roadmap to achieving Twinkie perfection in your own kitchen.
