How to Pipe Frosting Without Buying Tips
How to pipe frosting without buying tips? It might sound impossible, but with a little creativity and a few simple household items, you can achieve professional-looking frosting designs without spending a fortune on specialized piping tips. From using plastic bags to repurposing cardboard tubes, this guide will unveil surprising ways to transform ordinary kitchen items into piping tools.
Get ready to unlock a world of frosting possibilities! We’ll explore various techniques, from using a plastic bag as a makeshift piping tool to discovering the versatility of spoons and forks. We’ll also delve into the secrets of creating smooth, consistent frosting and explore creative decorating ideas that will elevate your baking to new heights.
So, let’s dive into the world of DIY frosting piping and discover how to create stunning designs without breaking the bank.
DIY Piping Nozzles

You don’t need to spend a fortune on fancy piping tips to create beautiful frosting designs. With a little creativity and some common household items, you can easily make your own piping nozzles.
DIY Piping Nozzles Using Household Items
You can create a variety of piping nozzles using common household items, such as plastic bags, bottles, and cardboard tubes. These methods are budget-friendly and allow you to experiment with different shapes and sizes.
Using Plastic Bags
Plastic bags, especially freezer bags, are a great option for creating piping nozzles. They are readily available, inexpensive, and can be easily cleaned.
Materials
- Plastic bag (freezer bags work best)
- Scissors
Steps
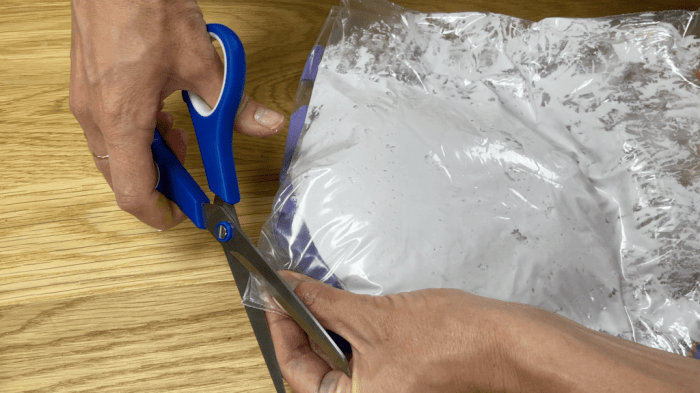
- Cut off the corner of the plastic bag. The size of the cut will determine the size of your piping nozzle.
- For a round nozzle, simply cut a small circle in the corner. For a star-shaped nozzle, cut a small star shape.
- You can also experiment with other shapes, like triangles, squares, or even hearts.
Using Bottles
Plastic bottles, like water bottles or condiment bottles, can also be used to create piping nozzles. They offer a more durable and reusable option compared to plastic bags.
Sometimes, the simplest things are the most resourceful. Like when you’re craving a frosting-covered treat but don’t have the fancy piping tips, try using a plastic bag! Just snip a tiny corner off, and you’re good to go.
It’s like making a pinkalicious bottle cap necklace – a fun, DIY project with unexpected results. So, don’t be afraid to get creative with your frosting techniques, you might be surprised at what you can achieve!
Materials
- Plastic bottle (clean and empty)
- Scissors
- Optional: Hot glue gun (for sealing the nozzle)
Steps
- Cut the top of the bottle off, leaving a small opening at the top.
- Cut a small circle or desired shape in the bottom of the bottle’s opening.
- Optionally, use a hot glue gun to seal the edges of the cut, preventing the frosting from leaking out.
Using Cardboard Tubes
Cardboard tubes, such as those from paper towels or wrapping paper, can be transformed into piping nozzles. They are particularly useful for creating decorative borders or lines.
Materials
- Cardboard tube (clean and empty)
- Scissors
- Optional: Duct tape or masking tape (for securing the nozzle)
Steps
- Cut a small circle or desired shape at one end of the cardboard tube.
- Optionally, use tape to secure the edges of the cut and prevent the frosting from leaking out.
Table of DIY Piping Nozzles, How to pipe frosting without buying tips
| Household Item | Piping Nozzle Type |
|---|---|
| Plastic bag | Round, star, triangle, square, heart |
| Plastic bottle | Round, star, triangle, square, heart |
| Cardboard tube | Round, rectangular |
Using a Plastic Bag
Using a plastic bag for piping frosting is a budget-friendly and easy alternative to using professional piping tips. It allows you to create a variety of designs with just a few simple tools.
Filling and Sealing the Bag
To fill a plastic bag with frosting, first, choose a sturdy, freezer-safe plastic bag. Cut off a corner of the bag, creating an opening that is the desired size for your piping nozzle. The size of the opening will determine the thickness of the frosting lines.
Next, fill the bag with frosting, leaving enough room at the top to seal the bag tightly. Fold the top of the bag over a few times to create a secure seal, and twist the folded portion tightly.
You can totally pipe frosting without buying a ton of tips! There are so many cool things you can do with just a basic piping bag and a little creativity. For example, you can make these awesome mm gravity defying cupcakes that look like they’re floating in mid-air.
And if you want to try even more fun piping techniques, you can find some great DIY tips online. Who needs fancy tools when you have a little imagination?
This will prevent the frosting from leaking out while you pipe.
Creating Piping Designs with a Plastic Bag
Using a plastic bag for piping frosting requires a bit of practice, but once you get the hang of it, you can create a variety of designs. The key is to control the pressure you apply to the bag and the way you hold the bag.
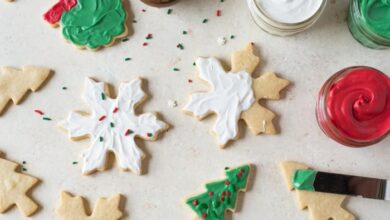
You know how I love to get creative in the kitchen, especially around the holidays. I recently discovered you can use a ziplock bag to pipe frosting without buying fancy tips, which is perfect for making those cute gingerbread cookies.
I’m already planning my outfit for the office party, and I’m thinking about a classic red dress, maybe something like this one. After all, what better way to celebrate than with a festive look and some delicious homemade treats?
Piping Designs, Holding Techniques, and Tips
The following table illustrates different piping designs, holding techniques, and additional tips for using a plastic bag for frosting.
| Piping Design | Bag Holding Technique | Tips |
|---|---|---|
| Stars | Hold the bag upright and squeeze gently, releasing pressure to create a star shape. | Use a small opening in the bag for smaller stars and a larger opening for larger stars. |
| Swirls | Hold the bag at a slight angle and squeeze gently, moving the bag in a circular motion. | Practice swirling on a piece of parchment paper before piping on your cake. |
| Dots | Hold the bag upright and squeeze gently, releasing pressure to create a dot. | Use a small opening in the bag for smaller dots and a larger opening for larger dots. |
| Lines | Hold the bag upright and squeeze gently, moving the bag in a straight line. | Use a small opening in the bag for thinner lines and a larger opening for thicker lines. |
| Rosettes | Hold the bag upright and squeeze gently, releasing pressure to create a rosette shape. | Use a small opening in the bag for smaller rosettes and a larger opening for larger rosettes. |
Alternative Piping Methods
While specialized piping tips offer incredible precision and versatility, there are simpler, more accessible methods to achieve beautiful frosting designs without the need for specialized equipment. This section will explore various techniques that use everyday kitchen tools to create decorative frosting accents.
Using a Spoon
Using a spoon for frosting is a simple and versatile technique, particularly well-suited for creating swirls, dots, and simple shapes.
- Advantages:This method is incredibly easy to learn and requires minimal effort. The rounded shape of the spoon allows for a natural swirl effect, perfect for adding a touch of whimsy to cakes and cupcakes. It also provides good control for creating small dots and lines.
- Disadvantages:While the spoon offers some control, it might not be suitable for intricate designs or precise piping. The shape of the spoon can limit the types of patterns you can create.
- Best Frosting Types:Cream cheese frosting, buttercream frosting, and whipped cream are excellent choices for spoon piping. Their smooth texture and consistency allow for easy manipulation.
Using a Fork
Forks offer a unique approach to frosting decoration, creating a textured and rustic aesthetic.
- Advantages:The prongs of a fork can be used to create interesting patterns, such as zigzags, lines, and even simple flowers. The textured surface of the fork adds a rustic charm to your frosting.
- Disadvantages:The fork might not be ideal for creating precise lines or intricate designs. The size of the fork prongs can limit the detail you can achieve.
- Best Frosting Types:Thick frostings like buttercream, royal icing, and fondant work well with a fork, allowing for the creation of distinct, textured patterns.
Tips for Smooth Piping: How To Pipe Frosting Without Buying Tips
Piping frosting without specialized tips can be a fun and creative way to decorate your baked goods. Achieving smooth and consistent results, however, requires some practice and attention to detail.
Frosting Consistency
The consistency of your frosting plays a crucial role in achieving smooth piping. If the frosting is too thin, it will spread uncontrollably and create messy results. If it is too thick, it will be difficult to pipe and may create uneven lines.
The ideal consistency for piping is similar to that of thick peanut butter.
To adjust the consistency, you can add more powdered sugar to thicken the frosting or more milk or water to thin it out.