
How To Pipe Frosting Without Buying Tips
Mastering Cake Decoration: Piping Frosting Without Specialized Tips
For the aspiring home baker or the budget-conscious decorator, the dream of creating beautifully piped cakes, cookies, and cupcakes might seem out of reach without a hefty investment in a professional piping tip collection. The reality, however, is that the art of frosting manipulation is more about technique and ingenuity than expensive tools. With a few common kitchen staples and a bit of practice, you can achieve impressive results, from delicate swirls to intricate borders, all without purchasing a single specialized piping tip. This comprehensive guide will equip you with the knowledge and methods to transform everyday items into versatile piping tools, enabling you to elevate your baked goods with confidence and creativity. Understanding the fundamental principles of frosting consistency is paramount. Too stiff, and it will be difficult to pipe, leading to broken lines and uneven patterns. Too thin, and it will lose its shape, resulting in a runny mess. The ideal consistency for most piping tasks is often described as “stiff but smooth,” similar to that of mashed potatoes or slightly softened butter. You should be able to hold a dollop on a spoon without it immediately falling off, but it should still be pliable enough to squeeze through a small opening. Achieving this consistency usually involves carefully balancing the fat and sugar content of your frosting recipe. For buttercream, this often means adjusting the ratio of butter to powdered sugar. Cream cheese frostings may require less liquid or a bit more cream cheese to achieve the desired stiffness. Experimentation with your specific recipe is key. A good starting point is to ensure your butter is softened but not melted when you begin creaming it. Gradually add your powdered sugar, alternating with small amounts of liquid (milk, cream, or even water) until you reach the desired texture. If your frosting is too stiff, add liquid a teaspoon at a time, mixing thoroughly after each addition. If it’s too thin, add more powdered sugar or a bit of cornstarch (a tablespoon at a time) to absorb excess moisture. Don’t underestimate the power of chilling. If your frosting is slightly too soft, chilling it in the refrigerator for 15-30 minutes can often firm it up to a more pipeable consistency. Be careful not to over-chill, as this can make it too hard.
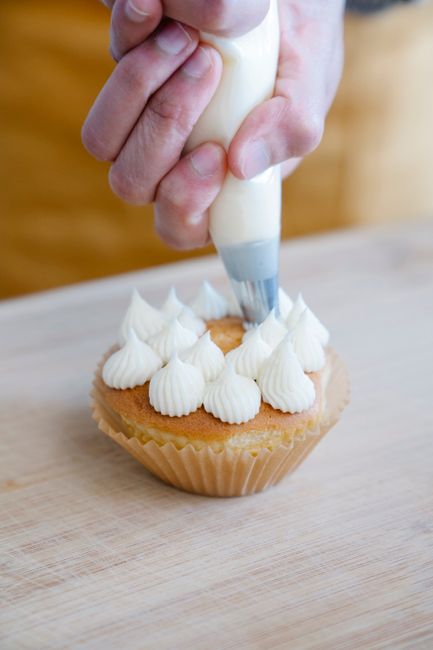
The most accessible and versatile frosting "tip" you can create yourself is the humble plastic bag. Standard resealable plastic bags, like Ziploc bags, are perfect for this purpose. Select a bag that is not too large, as a smaller bag will offer more control. Ensure the bag is clean and dry. You will need a pair of sharp scissors. Carefully fill the plastic bag with your prepared frosting. It’s best to do this by holding the bag open with one hand and scooping frosting in with a spatula or spoon. Aim to fill the bag about halfway to two-thirds full. Overfilling can make it difficult to handle and can lead to blowouts. Once filled, twist the top of the bag tightly to expel any excess air. You can secure the twisted top with a rubber band for added security, though many find it unnecessary if the twist is tight. To create your piping nozzle, simply snip off a small corner of the bag. The size of the snip directly determines the size of the frosting line. Start with a very small cut. You can always make the opening larger if needed by snipping again. For thicker lines, make a larger cut. For delicate details, a tiny snip is sufficient. Different shapes can be achieved by how you cut the corner. A straight, clean snip will produce a round line. A slightly angled cut can create a flatter, ribbon-like effect. Experiment with small snips on a piece of parchment paper first to gauge the output and adjust your cut accordingly. To use, hold the bag with the snipped corner facing down, much like you would hold a professional piping bag. Apply gentle, consistent pressure by squeezing the bag from the top. Practice on a flat surface like a baking sheet lined with parchment paper before attempting to pipe directly onto your baked goods. This allows you to get a feel for the pressure needed and the flow of the frosting.
Beyond the standard plastic bag, various other household items can be transformed into effective piping tools. For creating small, intricate dots or fine lines, a toothpick or skewer can be surprisingly useful. Dip the pointed end of a toothpick into your frosting, picking up a small amount. Then, gently touch the frosting-laden toothpick to your cake or cookie, creating a small dot. By dragging the toothpick slightly after touching, you can create short lines. For more controlled and slightly larger dots, use the rounded end of a lollipop stick or a clean, unused chopstick. Dip the rounded end into the frosting and then press it onto the surface. Rotating the chopstick slightly as you lift can create a more defined swirl. If you need to create a more defined border or outline, consider using a clean, empty condiment bottle or a squeeze bottle. These bottles, commonly used for ketchup, mustard, or salad dressing, offer excellent control. Ensure the bottle is thoroughly washed and dried before use. You might need to trim the tip of the nozzle slightly to achieve the desired opening size. Fill the bottle with your frosting and screw on the cap. Squeeze gently to pipe. This method is particularly good for outlining cookies or creating lettering. For a more rustic, textured effect, a fork can be employed. Dip the tines of a clean fork into your frosting and then drag them across the surface of your cake or cupcakes. This creates a beautiful, swirled, or ridged pattern. Different pressures and angles will yield varied textures. Another creative option for textured frosting is a slotted spoon. Dip the underside of a slotted spoon into frosting and then press it onto your cake. The slots will create a unique, linear pattern. This works well for covering larger areas with a textured finish.
For those seeking to create specific shapes or patterns without dedicated tips, a makeshift piping cone from parchment paper is an invaluable technique. This method closely mimics the function of a traditional piping bag and allows for precise control over the frosting. Take a sheet of parchment paper and cut it into a large square. Fold the square in half diagonally to form a triangle. Place the triangle on a flat surface with the longest edge at the bottom. Take one of the acute corners (either the left or right) and fold it over towards the opposite side, tucking it neatly along the long edge. Continue rolling the paper tightly from that corner towards the opposite point, creating a cone shape. The tighter you roll, the more secure and controlled your cone will be. Once you have a cone shape, tuck the remaining flap of parchment paper into the cone to secure it. You should now have a cone with a pointed tip. To create your piping nozzle, use sharp scissors to snip off the very tip of the cone. Start with a very small cut. You can always make the opening larger by snipping again. The size of the snip will determine the thickness of your piped lines. Fill the parchment cone with frosting, being careful not to overfill it. Fold the open top of the cone down a few times to seal it. Hold the cone near the folded top and squeeze gently to pipe. This method allows for a wide range of line thicknesses and shapes depending on the size of your snip and your squeezing pressure. It’s particularly effective for detailed work and for creating fine lines or dots. Practice on parchment paper first to master the technique and the amount of pressure required.
Understanding how to manage frosting consistency is crucial for successful piping, regardless of the tool you use. If your frosting is too soft, it will spread and lose definition. If it’s too stiff, it will be difficult to extrude and can tear delicate baked goods. For many recipes, a good starting point is a buttercream frosting that is firm enough to hold its shape when scooped but still pliable. This often means ensuring your butter is at room temperature – soft but not melted. When incorporating sugar, add it gradually and mix thoroughly. If your frosting is too stiff, a common fix is to add liquid, such as milk, cream, or even a tablespoon of water, a teaspoon at a time, mixing well after each addition until the desired consistency is reached. Be cautious not to add too much liquid, as this can make the frosting too thin. Conversely, if your frosting is too soft, you can add more powdered sugar, a tablespoon at a time, until it thickens. Alternatively, a small amount of cornstarch (about a tablespoon) can be added to help absorb excess moisture and firm up the frosting. Refrigeration is another powerful tool. If your frosting is slightly too soft, chilling it in the refrigerator for 15-30 minutes can often bring it to a more pipeable consistency. Be careful not to over-chill, as very cold frosting can become stiff and brittle, making it difficult to work with and prone to breaking. Before you begin piping onto your actual baked goods, it is highly recommended to practice your piping techniques on a disposable surface. A sheet of parchment paper, wax paper, or even an overturned baking tray can serve as an excellent practice ground. This allows you to get a feel for the pressure you need to apply, the speed at which you should move, and the output of your chosen makeshift tip. Experiment with different pressures to create thin lines, thick lines, dots, and swirls. Practice making consistent circles and straight lines. This practice phase is critical for building confidence and refining your technique before committing to decorating your finished products. By understanding these fundamental principles and experimenting with readily available materials, you can achieve professional-looking results without the need for specialized piping tips, making cake decorating accessible and enjoyable for everyone.
