
Pantry Reorganized 5 Easy Tips
Pantry Reorganized: 5 Easy Tips for an Efficient and Accessible Kitchen
Achieving a pantry reorganized that maximizes space, minimizes waste, and simplifies meal preparation is a common goal for many homeowners. A chaotic pantry can lead to expired ingredients, forgotten purchases, and frustrating searches for what you need. This article provides five actionable and SEO-friendly tips to help you transform your pantry into an organized, efficient, and visually appealing space. By implementing these strategies, you’ll not only save time and money but also reduce food waste and make cooking a more enjoyable experience. These tips are designed to be accessible for all skill levels, requiring minimal investment and offering maximum impact. We will delve into the core principles of pantry organization, focusing on practical solutions that are easy to replicate and maintain.
Tip 1: Declutter and Deep Clean – The Foundation of Organization
Before you can effectively reorganize your pantry, the crucial first step is a thorough declutter and deep clean. This process involves completely emptying the pantry of all its contents. Lay everything out on your kitchen counters, dining table, or even the floor. This visual inventory is essential for identifying what you have, what you need to discard, and what can be repurposed. As you empty, take this opportunity to clean every surface. Wipe down shelves, remove any sticky residue, vacuum or sweep the floor, and inspect for any signs of pests. A clean slate is paramount for successful organization.
The decluttering phase itself requires a systematic approach. Group similar items together as you pull them out. This will immediately highlight duplicates and items you may have forgotten about. Next, begin the ruthless culling process. Discard any food items that are expired. Check expiration dates meticulously. Don’t just glance; be thorough. For items that are not expired but you know you won’t use, consider donating them to a local food bank if they are still in good condition and unopened. For opened items that are still safe to consume but you’re unlikely to finish, consider if they can be incorporated into a recipe or shared with neighbors. Be honest with yourself about what you will actually consume. Items that are damaged, have opened packaging that compromises freshness, or have an off smell or appearance should be discarded without hesitation. This step is critical for reducing clutter and preventing future waste. The act of physically touching and assessing each item forces a decision, preventing items from lingering indefinitely.
Once you have purged expired and unwanted items, it’s time for the deep clean. This is not just a superficial wipe-down. Use an all-purpose cleaner or a vinegar-water solution to thoroughly clean all shelves, walls, and the pantry floor. For stubborn stains or sticky spots, a little elbow grease might be required. Don’t forget the corners and any crevices where crumbs can accumulate. If your pantry has adjustable shelves, take this opportunity to remove them and wash them separately. This thorough cleaning not only ensures a hygienic environment for your food but also makes the subsequent organizing process much more pleasant. A clean pantry feels inherently more organized and inviting. The psychological impact of a sparkling clean space cannot be overstated and provides a powerful motivation to maintain the organization.
Tip 2: Categorize and Conquer – Grouping for Efficiency
With your pantry empty and sparkling clean, the next essential step is to categorize all your remaining items. This is the cornerstone of an efficient and easily navigable pantry. Think about how you use your pantry and group items accordingly. Common categories include: baking supplies (flour, sugar, baking soda, chocolate chips), grains and pastas (rice, pasta, quinoa, oats), canned goods (soups, vegetables, beans), snacks (chips, crackers, granola bars), breakfast items (cereal, pancake mix), spices and herbs, oils and vinegars, condiments, beverages, and root vegetables (potatoes, onions). The specific categories will depend on your household’s consumption habits and the types of food you store.
The beauty of categorization lies in its ability to create logical zones within your pantry. When you know where to look for specific items, you save significant time and reduce frustration. For example, if you’re making a cake, all your baking ingredients will be together in one accessible area, eliminating the need to rummage through different shelves. This system also helps with inventory management. By seeing all your canned goods together, for instance, you can quickly assess how many cans of tomatoes you have and plan your meals accordingly. This prevents overbuying and ensures you utilize what you have before purchasing more.
When establishing your categories, consider the frequency of use. Items you reach for daily or weekly should be placed at eye level and in easily accessible locations. Less frequently used items, such as seasonal baking supplies or specialty ingredients, can be stored on higher shelves or in the back. This principle of tiered accessibility is a fundamental aspect of ergonomic pantry design. Don’t be afraid to create subcategories if necessary. For example, within "snacks," you might have separate sections for "sweet snacks" and "savory snacks." This level of detail further enhances the ease of finding specific items.
To make categorization visually intuitive, consider using labels. This is a crucial element that bridges the gap between your organizational system and your daily use. Labels clearly identify the contents of containers and the purpose of specific shelves or zones. They are especially helpful for items stored in opaque containers or when multiple family members are using the pantry. Labels can be as simple as handwritten tags or more elaborate printed labels. The key is clarity and consistency. Labels will be further explored in Tip 4.
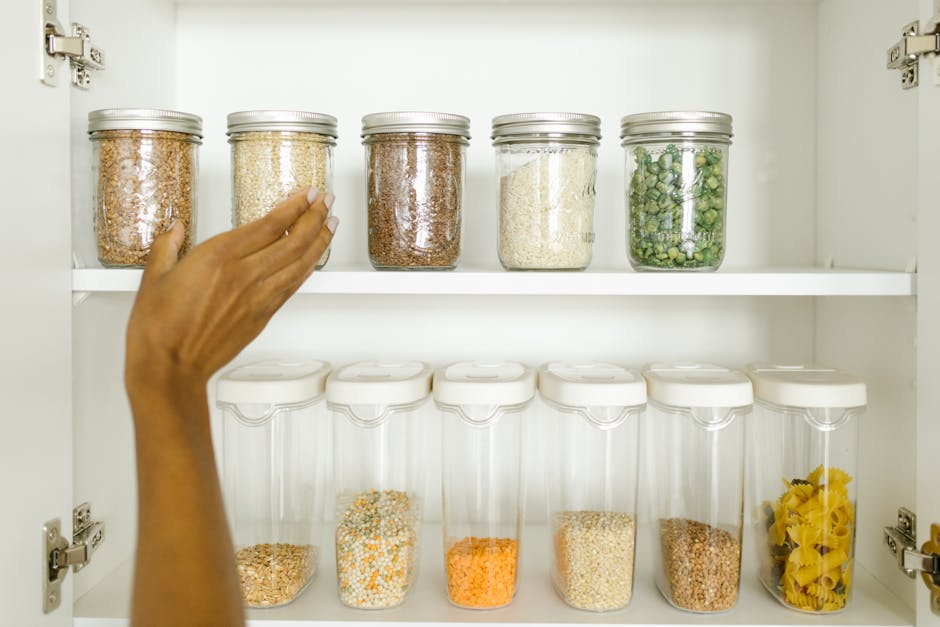
Tip 3: Containerize and Maximize – Smart Storage Solutions
Once you have categorized your pantry items, the next logical step is to invest in smart storage solutions that maximize space and maintain organization. This often involves using various types of containers. Not all items need to be decanted, but many do, and the right containers can transform a jumbled pantry into a streamlined system.
First, consider airtight containers for dry goods like flour, sugar, pasta, rice, cereal, and snacks. These containers not only keep food fresh for longer, preventing spoilage and pest infestation, but they also create a uniform, stackable appearance, which is visually appealing and space-saving. Opt for clear containers whenever possible so you can easily see the contents and monitor supply levels. Materials like BPA-free plastic, glass, or stainless steel are excellent choices. When selecting containers, consider their dimensions. Measure your shelves to ensure the containers will fit comfortably, with enough clearance for easy removal and replacement. Stackable containers are particularly valuable for utilizing vertical space efficiently.
For canned goods, consider using tiered can organizers or stackable bins. These solutions allow you to see all your cans at a glance, preventing items from getting lost at the back and ensuring you use older stock first. Lazy Susans, or turntables, are fantastic for corners or for items like oils, vinegars, and condiments. They allow for easy access to items in the back with a simple spin, eliminating the need to reach or move multiple items.
Utilize vertical space by incorporating shelf risers or stackable bins. Shelf risers can double your shelf space, allowing you to store more items without sacrificing accessibility. Stackable bins are excellent for grouping smaller items like spice packets, tea bags, or granola bars. When using bins, choose ones that are easy to pull out like drawers. Consider clear bins so you can still see what’s inside without having to fully remove them.
Don’t forget about less conventional storage areas. The back of the pantry door can be an excellent place for storing frequently used items like cleaning supplies (if you store them in the pantry), spice racks, or small grocery bags. Over-the-door organizers are readily available and come in various configurations to suit your needs. For bulkier items or those that don’t fit neatly into containers, consider sturdy baskets or bins. These can be used for root vegetables, produce like onions and potatoes, or even as catch-all bins for items that don’t have a dedicated spot. When selecting baskets and bins, consider their breathability, especially for produce, to prevent moisture buildup and premature spoilage. The key is to choose containers that fit your space and your items, promoting both efficiency and aesthetics.
Tip 4: Label Everything – Clarity is Key to Maintenance
Once your pantry is decluttered, categorized, and containerized, the final crucial step to ensuring long-term organization is to label everything. This may seem like a minor detail, but it is arguably one of the most impactful elements of an organized pantry. Labels provide clarity, eliminate guesswork, and are essential for maintaining the system over time, especially when multiple people utilize the pantry.
Labels should be applied to all containers, bins, baskets, and even directly on shelves or designated zones. This ensures that everyone in the household knows where items belong and what is contained within each vessel. For decanted dry goods, label the container with the name of the product (e.g., "All-Purpose Flour," "Brown Sugar," "Spaghetti Pasta"). You can also add the expiration date if you wish, though regularly checking expiration dates as part of your upkeep routine is also advisable.
For canned goods, if you’re not using a tiered organizer where labels are visible, consider labeling the bins or shelves where they are stored. For example, a label on a bin might say "Canned Soups," or a shelf label could read "Canned Vegetables." This helps when putting groceries away and when searching for specific items.
When categorizing items like snacks, cereal, or baking supplies, use labels to clearly delineate these zones. For example, a label on a shelf could say "Breakfast Cereals" or "Snack Station." This visual cue guides placement and retrieval. Even for items that are not in containers, such as potatoes or onions, labeling their designated storage area (e.g., a basket on the floor) reinforces the organizational system.
Consider the type of labels you use. For dry goods in clear containers, simple printed labels that are easy to read are ideal. You can use label makers, printable label sheets, or even pre-made pantry labels. For a more rustic or decorative look, chalkboard labels or handwritten tags can be effective. The most important factor is legibility and durability. Labels should be resistant to moisture and wear and tear.
Beyond simply identifying contents, consider adding additional information to your labels. For baking supplies, you might include measurements (e.g., "1 cup = 120g flour") to further streamline cooking. For bulk items, you could note the purchase date to help with inventory management. Labels also serve as a visual reminder of what you have, helping to prevent duplicate purchases. When items are consistently and clearly labeled, the entire pantry system becomes more intuitive and easier to manage, significantly reducing the likelihood of the pantry reverting to its former state of disarray.
Tip 5: Establish a Maintenance Routine – Sustaining the Organization
The most well-organized pantry will inevitably fall into disarray without a consistent maintenance routine. Organization is not a one-time event; it’s an ongoing process. Establishing simple habits and regular check-ins will ensure that your efforts are sustained and your pantry remains an efficient space.
First and foremost, make it a habit to put items away in their designated spots immediately after use or after grocery shopping. This is the most critical habit for preventing clutter. When you put things back where they belong, you prevent them from accumulating on counters or being shoved into random spaces. Encourage all household members to adhere to this rule by making the system as intuitive and accessible as possible.
Schedule regular, brief pantry check-ins. A quick five-minute scan once a week can make a significant difference. During these checks, look for any items that are out of place, note any low supplies, and identify any items that are nearing their expiration date. This proactive approach prevents small issues from escalating into major organizational challenges.
Incorporate a monthly or bi-monthly deeper clean and inventory. This doesn’t have to be as extensive as the initial declutter, but it involves a more thorough review. Take out items, wipe down shelves, and check expiration dates again. This is also the ideal time to restock and reorganize any items that have shifted. If you notice a particular item is consistently being forgotten or expiring before use, re-evaluate its placement or consider if you need to adjust your purchasing habits.
When grocery shopping, always refer to your pantry inventory before heading to the store. This prevents overbuying and ensures you’re only purchasing what you truly need. If you have a system of labeling with purchase dates or expiration dates, this will be invaluable. Make it a practice to rotate older stock to the front when unpacking new groceries. This "first-in, first-out" (FIFO) method is crucial for minimizing food waste.
Finally, be prepared to adapt your system as your needs change. As your household grows, your eating habits evolve, or your pantry contents shift, your organizational system may need to be adjusted. Don’t be afraid to tweak categories, swap container types, or relocate items if a particular arrangement isn’t working. The goal is a pantry that serves you, not the other way around. By implementing these consistent maintenance practices, you will not only enjoy a perpetually organized pantry but also experience the long-term benefits of reduced food waste, saved money, and a more enjoyable cooking experience.
